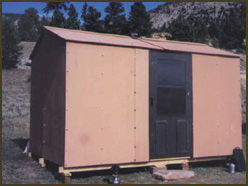
You’ve gotten the okay from the spouse and the extra-long weekend of hunting is on! Trouble is, there might be some weather coming in. You’re used to roughing it in a tent, but stronger shelter would leave you in better shape. These plans enable you to construct a portable, take-apart hunting cabin for less than $1,000 that lets you set up a warm, wind-protecting shelter anywhere.
Step 1: Making the Trusses
The skeleton of the cabin is made up of trusses. The trusses are all hinged to allow folding for transport.
For the six full trusses (each comprised of two rafters, two wall studs and two joists; TK letter in diagram), cut 2-by-4 pieces to 51 5/8 inches for the rafters; 73 1/4 inches for the studs; and 47 1/2 inches for the floor joists. Cut the rafter and stud ends to fit flush at angles (see diagram) and make the halves of each truss by joining the rafters to the studs and the studs to the joists by centering mending plates over each joint on both sides. Use the mallet to pound the plates in place.
Install five 2 1/2-inch hanger bolts on the outside of each stud; the first goes 5 1/2 inches from the bottom edge, each one 17 inches apart thereafter. Don’t install hanger bolts on the truss stud to the right of the door opening. On the outside rafter edge, install three 3-inch hanger bolts, one dead center, the bottom bolt 6 inches from the corner point and the top bolt 10 inches down from the peak point (the hanger bolts are later used to secure paneling).
Join the truss halves at the rafter and joint ends with the three-inch hinges using flathead sheet-metal screws; the whole assembly is 95 inches corner to corner across the joists and 96 inches high from the bottom joist edge to the rafter peak. To make the one partial truss that mounts against the door frame, build one side to the normal dimensions and then attach a 48-inch rafter and 45-inch joist with hinges to this assembled half, leaving the other stud off.
Four leveling supports go on the ground underneath the truss assemblies to space them evenly. Overlap two 96-inch 2-by-6s to make each 150-inch-long support. Drill insert holes and affix the lapped pieces with 2 1/2-inch panhead Phillips screws. Fasten 2-by-2s every six inches across the tops of the supports (starting 5 1/4 inches from one end), attaching them with 2 1/2-inch deck screws (omit 2-by-2s on the front support where it goes under the lower door header; see diagram TK). The gaps between the 2-by-2s act as squaring guides for the truss joists during setup.
Step 2: Wall Supports
Make the upper and lower back wall supports by cutting 2-by-4 pieces so you have two 83-inch pieces and two 59 1/4-inch pieces. Join a long and short piece with a hinge and then drill insert holes (for later) 5/8ths of an inch inside either end, two more 22 1/8 inches from either end and three more 24 inches apart across the remaining length (see diagram TK).
For the two left and two right front wall supports, cut 2-by-4s to make two 47 1/2-inch right-end supports and two 58 5/8 left-end supports. Drill insert holes 5/8ths of an inch inside either end. On the short support, drill an insert hole 24 inches from the hole on the right end. For the longer support, drill a hole 10 1/2 inches from the left-end hole, and another 24 inches from this second hole (see diagram TK).
Cut two (vertical) end-wall center supports 88 13/16 inches long at peak (angle the top to be flush with the rafter joints), installing seven hanger bolts on the outer surface, the first 8 1/2 inches from the bottom edges and the rest at 12-inch intervals thereafter (the bolts will poke through the wall panels). Drill insert holes at 15 and 51 inches from the bottom on the inside surface of each support.
Cut two left and two right (vertical) end-wall mid supports 81 1/4 inches long (angle-cut the tops to be flush with angled bottom edges of rafters, left and right) andrill insert holes at 15 and 51 inches from the bottom edges.
Fasten the mid supports with mending plates on the insides of two truss assemblies (hinges and insert holes on the inside) to make two end-wall assemblies. Then cut and fit the two wall panels for each end assembly, using 1 1/4-inch wood screws every six to eight inches to attach them to the studs, supports and rafters. Cut the top of each panel to match the rafter slope, and so they are roughly 1/8-inch shorter than each stud at the bottom. Trim the outer edge of each panel to fit over half the stud’s width while keeping tight the seam where the panels meet in the middle (each end-wall assembly can fold closed with the panels permanently attached).
Step 3: The Main Structure
Along the center seam of the end-wall panels, make a row of notches that align with each hanger bolt on the center support. Align the center support with the notches and push the hanger bolts through the notches, putting the support in place. Secure the bolts with flat and bushing washers and wing nuts. You now have a rigid end wall.
Lay the leveling supports on level ground (shim if necessary). Set an end-wall assembly, panels outward, in a support slot; set the next truss assembly and secure it and the end wall with both back and both front wall supports (use 2 1/2-inch panhead Phillips screws) at the 15- and 51-inch insert holes on the studs (the support’s hinges face outward). Add the third truss and attach it to the supports (flip-flop trusses to alternate the way the hinges face). Repeat this with the other paneled end and remaining two truss assemblies. Set the partial truss assembly in a support slot, securing it to the back wall support.
Cut 2-by-4s to make the upper door header (46 3/8 inches), the lower door header (35 15/16 inches) and the striker jam (75 1/2 inches). Locate the upper header between the two trusses on either side of the door opening and butt its side to the partial truss rafter (see diagram TK). Drill 1/8-inch pilot holes about 1/16-inch deep in the header where inserts should go into the trusses and rafter; drill and screw in inserts. Install header. Install the lower header and striker in the same manner. Fasten the striker to the upper head with a mending plate; bend the mending plate so it’s flush with the inside edge of the header. Drill inserts at 15 and 51 inches on the inside of the striker to align with front wall supports.
Step 4. Floors, Bunks and Walls
Cut four floor panels: A (94 7/8 by 47 1/2 inches; door area panel); B (47 5/8 x 47 1/2); C (95 5/8 x 47 1/2); and D (46 7/8 x 47 1/2). Notch all panels to fit closely around studs and supports; cut notches around end supports a little larger to allow for lifting and sliding.
Mark and drill 1/8-inch pilot holes through floor panels into joists. Space the holes to match the joists-two at the panel corners, then one in the middle of the panel, and then two more at the edges and then one in the middle, etc. Where panels meet, stagger the holes.
Remove the floor panels one by one and install inserts in the joists and drill clearance holes in the panels. Countersink clearance holes. Screw in panels with 1 1/4-inch flathead Phillips screws. Level and square as you go.
Cut the four end-wall bunk supports to 60 inches. Drill through-holes to align with the inserts in the end-wall center and mid supports. Attach bunk supports with 2 1/2-inch panhead Phillips screws (after flooring is set). End-wall bunk supports should be level with front and back wall supports.
Cut the four bunk platforms-two uppers at 87 7/8 x 32 inches, and two lowers at 87 7/8 x 40 inches; the width difference is to create a sitting ledge on the lower bunk. Position bunks in place and mark contact points on the back and front wall supports and end-wall bunk supports. Fasten joist hangers to the front and back wall supports with long sheet-metal screws. Set the front bunk supports (2-by-4s, 84 7/8 inches long) into the joist hangers. Fasten the bunks to all the supports with long screws and inserts (two on the end-wall edge, one on each bunk end and one at the center of the front support). Countersink the screw holes.
Cut the three back-wall panels: A (79 x 47 1/4 inches); B (79 x 48 inches); and C (79 x 48 inches). Mark and drill holes in the panels to correspond to hanger bolts on the truss studs. Notch holes in the edges on A and B, and B and C, where they meet in a seam to fit around the bolts. Secure the panels to the bolts with large washers, bushing washers and wing nuts along the seams, and bushing washers and wing nuts at the ends. Cut a 17 5/8 x 15-inch window space in B before installing. The outer edges of A and C should be flush with the end-wall panels. Install the storm window.
Fit the front-wall panels in the same manner. Cut D and F at 79 x 48 inches. Cut E at 79 x 11 1/4 and fit in the space created by the striker jam. Both E and F will need clearance holes for inserts that will hold the door frame.
Fit the door; cut it to length, about 36 x 75 inches. Drill 1/8-inch pilot holes through the door frame, five on each side. Remove panels E and F. Install inserts in the striker and truss stud. Drill clearance holes for door mounting screws. Reinstall the panels and fasten the door in place and a door latch or catcher on the striker jam.
Step. 5: Roofing and Final Touches
Cut the four roof panels (two panels per front and back, 74 x 48 and 73 1/4 x 48; you’ll have two inches of overhang on each end). Install the door-side panels first. Mark where the roof panels meet the rafter hanger bolts and drill holes (make sure the door swings clear of the bottom of the panel); there should be two inches of overhang along the bottom edge. The gap at the peak will be covered with boards. Fasten the roof panels with bushing washers and wing nuts except at the center seam where you also need flat washers. Attach the back roof panels in the same way.
Rip two peak assembly boards, 74 x 7 3/16 and 73 1/4 x 7 3/16, for either roof side, matching the rafter angles. Also cut four braces from 2-by-4s, 7 1/2 x 3 7/16, matching the angle of the rafter peaks. Set each brace evenly against the peaks of each of the four middle rafters (opposite the hinged side); drill a hole for a four-inch hex-head screw through both brace and rafter, and secure the screw with a flat washer and hex-wing nut. Caulk over the screws after tightening. Screw the peak boards to the braces using 2 1/2-inch deck screws; you’ll need to bevel the edges where the boards meet and then caulk the lengthwise seam.
Set two 2-by-4 slope boards (45 3/8 inches long) along the base of the peak boards below the seam where the peak boards meet, fitting them over the hanger bolts protruding through tscrews. Set the front bunk supports (2-by-4s, 84 7/8 inches long) into the joist hangers. Fasten the bunks to all the supports with long screws and inserts (two on the end-wall edge, one on each bunk end and one at the center of the front support). Countersink the screw holes.
Cut the three back-wall panels: A (79 x 47 1/4 inches); B (79 x 48 inches); and C (79 x 48 inches). Mark and drill holes in the panels to correspond to hanger bolts on the truss studs. Notch holes in the edges on A and B, and B and C, where they meet in a seam to fit around the bolts. Secure the panels to the bolts with large washers, bushing washers and wing nuts along the seams, and bushing washers and wing nuts at the ends. Cut a 17 5/8 x 15-inch window space in B before installing. The outer edges of A and C should be flush with the end-wall panels. Install the storm window.
Fit the front-wall panels in the same manner. Cut D and F at 79 x 48 inches. Cut E at 79 x 11 1/4 and fit in the space created by the striker jam. Both E and F will need clearance holes for inserts that will hold the door frame.
Fit the door; cut it to length, about 36 x 75 inches. Drill 1/8-inch pilot holes through the door frame, five on each side. Remove panels E and F. Install inserts in the striker and truss stud. Drill clearance holes for door mounting screws. Reinstall the panels and fasten the door in place and a door latch or catcher on the striker jam.
Step. 5: Roofing and Final Touches
Cut the four roof panels (two panels per front and back, 74 x 48 and 73 1/4 x 48; you’ll have two inches of overhang on each end). Install the door-side panels first. Mark where the roof panels meet the rafter hanger bolts and drill holes (make sure the door swings clear of the bottom of the panel); there should be two inches of overhang along the bottom edge. The gap at the peak will be covered with boards. Fasten the roof panels with bushing washers and wing nuts except at the center seam where you also need flat washers. Attach the back roof panels in the same way.
Rip two peak assembly boards, 74 x 7 3/16 and 73 1/4 x 7 3/16, for either roof side, matching the rafter angles. Also cut four braces from 2-by-4s, 7 1/2 x 3 7/16, matching the angle of the rafter peaks. Set each brace evenly against the peaks of each of the four middle rafters (opposite the hinged side); drill a hole for a four-inch hex-head screw through both brace and rafter, and secure the screw with a flat washer and hex-wing nut. Caulk over the screws after tightening. Screw the peak boards to the braces using 2 1/2-inch deck screws; you’ll need to bevel the edges where the boards meet and then caulk the lengthwise seam.
Set two 2-by-4 slope boards (45 3/8 inches long) along the base of the peak boards below the seam where the peak boards meet, fitting them over the hanger bolts protruding through t