We may earn revenue from the products available on this page and participate in affiliate programs. Learn More ›
The Adirondack chair is perfect for the porch of a hunting lodge or a deck overlooking a scenic vista. When you finish this summer project-with its curved backrest and wide armrests-sit down with a cold one in hand and dream of hunting seasons to come.
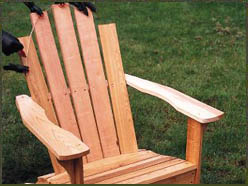
Adirondack chairs have a basic design that can easily be modified to a variety of sizes. Cedar is the preferred wood because it’s lightweight and resists rot. Wood that is ¾-inch thick is sufficient, although 1-inch stock makes a stronger chair. The chair in the photos is made of ¾-inch red cedar.
The chair is held together with No. 8 1½-inch wood or drywall screws. All screws are countersunk and sealed with cedar plugs. Glue is necessary to secure the plugs in place. I use three ¼-inch- diameter carriage bolts to affix the slanted legs to the vertical legs and to attach the armrests.
With most first-time projects I cut out patterns and assemble a prototype before finishing. Instead of working from a cutting list, it’s best to cut each piece as you assemble the chair. This lets you check fit and clearance as the construction proceeds.
_For more information on this project, visit www.butlerprojects.com. _
**1. **Start by cutting the four legs-two vertical and two slant legs. Use the first cut of each as a pattern for the second, so that each set of legs is identical. Screw the vertical legs to the front edge of the slant legs. Attach two small armrest support knees to the outside edges of the vertical legs with two screws each. Next, connect the assembled legs to the bottom backrest support piece by inserting two screws in each side.
2. Cut out the upper backrest support piece and screw it to the two armrests. Now, cut five back support pieces and six chair bottom pieces. Attach the center backrest piece to the bottom and top backrest supports. At this point the armrests can be connected to the vertical legs and armrest support knee. Make sure the armrests are horizontal.
3. With both armrests held in place, attach the remaining vertical backrest pieces to the top and bottom backrest supports. Spread the slats to leave equal distance between each. Attach the remaining chair bottom pieces, also spacing them equally. Next, connect the front trim panel against the front edge of the slant legs. The chair is now assembled.
4. Clamp a flexible batten across the top of the vertical backrest in an arch form. Mark the curve along the edge of the batten and cut. This will give the chair a rounded top.
5. Disassemble the chair to put on the finishing touches. The chair can be taken apart in about three minutes using a reversing drill.
Each component should be rounded with a router or with a block plane and rasp. Follow this by sanding (always with the grain) using medium and then fine-grit sandpaper. When reassembling the chair it may be necessary to do the final screw tightening by hand to prevent splitting the wood. After assembly, dip the wood plugs in glue and gently tap each one into the countersunk holes over the screws.