
We may earn revenue from the products available on this page and participate in affiliate programs. Learn More ›
This is the second post in a series on preparing for big game season. To see last week’s post on dry firing drills for trigger control and proper form, click here. Stay tuned for another installment next week.
What, exactly does it mean to zero a rifle? When most shooters zero their gun they put some shots downrange, getting a group, then adjust their scope and shoot again to confirm the point of impact. If the shot is one inch high at 100 yards (or whatever they’re trying for), they call it good. But this, however, does not mean the rifle is zeroed.
To properly zero the rifle you need to know where your bullets are going to impact, within the capabilities of the rifle you and ammo you’re using, every single time you pull the trigger. This, of course, assumes minimal error based on input from the shooter, which is why we try to zero from a bench and off sandbags and rests.
First, let’s back up. Say you’ve shot five-shot group that you’re happy with, meaning that you didn’t yank, flinch, or otherwise cause one of the shots to go astray. Figure out where the center of that cluster is and use it as your reference point. That point—whether a bullet hit there or not—represents your rifle’s zero.
Make the appropriate adjustments to get that virtual point of impact where you want it to be.
Now, whether you zero dead on at 100 yards or zero higher is up to you. Both have their merits. A dead-on zero at 100 allows for precise use with scopes with hold-over reticles—I’m talking mil/mil and moa/moa reticles, not the more generic type of ballistic holdover reticles that many companies make. Those reticles often have their own instructions for a given caliber and are an approximate representation of how the bullet will fly. Frankly, I’m not a huge fan of these types of reticles because for longer shots, which is what they’re purported designed for, because their reference points are an approximation of a ballistic curve and for long shots you want to know exactly where that bullet is going to hit.
Zeroing high at 100 yards—usually between one and three inches—can be very useful, as it gives you the ability to hold dead on an animal out to very respectable distances without worrying about holdover. Depending on the cartridge, this technique will give you a point-blank zero out as far as 200 to 300 yards. You’ll need to use a ballistic calculator to figure out the exact distance, but once your point blank zero is established it takes a lot of thinking out of the equation during your hunt.
In fact, I’m using this technique myself for a hunt I’m headed on next week. I’m going for a grizzly in Alaska and I’ve zeroed my .375 Ruger 2 inches high at 100. The 250-grain bullet exiting the muzzle at 2,900 fps will drop about 6 inches at 300 yards. So any bear out to 275 yards, I can just hold on the middle of the chest and know my zero is good—though to be honest I plan on getting a lot closer to the bear than that before pulling the trigger.
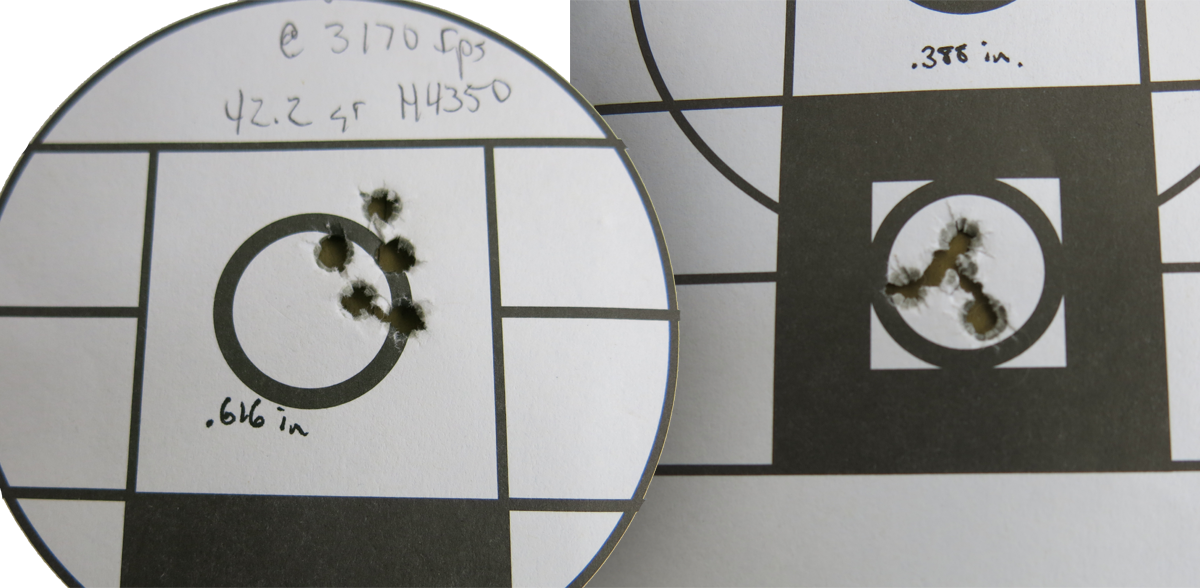
But all of this calculation is for naught if you don’t know where that bullet is going to hit when your rifle puts its first cold shot down range and if you don’t respect the size of its groups on paper.
Not every rifle is a 1-inch MOA rifle out there. Far from it. I test guns for a living and can tell you that a true MOA rifle—one that will print 5-shot groups every time with a given type of ammunition—is a rare beast. Most good rifles are 1.5 MOA rifles and plenty are 2 MOA or slightly worse. And this level of accuracy is just fine for most hunting. But you need to take into honest account the amount of dispersion your rifle exhibits at the range before taking it hunting. Just because a rifle might have once clustered three shots in a tidy 1-inch group doesn’t make it a 1-inch rifle.
Gather your data at the range and respect what it says.
If there’s a type of ammo you’re interested in hunting with, invest in two boxes of the stuff. With those 40 rounds you should be able to collect five good 5-shot groups and have some ammo to spare. This data will tell you what you need to know—where your bullets are hitting and what your rifle’s honest performance is. It will also give you a chance to dial in your rifle so that the center of your groups is exactly where you want.
Congratulations. Now, your rifle is zeroed. And from here on out, we’re going to move away from the bench and start drilling from the field positions you’re going to actually hunt with. See you next week.
Miss a week? We’ve got you covered:
Week 1: Dry Fire Drills
Week 2: How to Really Zero Your Rifle
Week 3: Rapid Fire Drills
****Week 4: One Dot Drill