
The figure-four deadfall is often the first trap illustrated in the trapping chapter of your handy pocket survival guide. As a result, it’s often the first trap people try to build when learning how to make traps. It might also be the last trap they ever try to build because of the trap’s frustrating design. If you carve just one part incorrectly, the whole thing will fall apart. If you have an eye for carpentry, whittling, geometry, or physics, you can usually produce a functional figure four on your first try. But if you have ever been stymied by this classic trap, let me help you out.
Like all other deadfalls, the figure four features some type of weight (often a rock) as the lethal component of the trap. This isn’t hard to find or set up, so long as the rock has a square edge or two points that can hinge against the ground to prevent it from twisting. It’s the act of carving and setting the three-stick trigger system that confounds most folks. This set of three sticks is carved and notched to lock into each other when a load is applied to the highest point of the trigger system. This set of sticks makes a shape that strongly resembles the number 4, hence the name. The number four-shaped assembly is what holds the edge of the rock up in the air until our future meal gets under it, and it releases that rock when the trigger is jostled. To make this trap, you only need three straight sticks, a knife, some bait, and the rock. But you do have to pay attention to the details.
Stick 1 – The Post
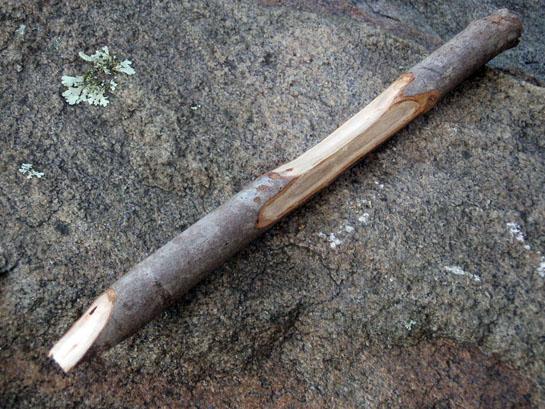
I usually carve the post first. This is the vertical part of the trap trigger. It must have a clean “chisel” point carved on one end resembling a flathead screwdriver. If it’s not square, the trap won’t be able to be set properly. The bottom of the stick should be flat so that it doesn’t get stuck in the ground. The trickiest part comes when you must carve two facets on the sides of the post. One should be carved in the center of the post to create a flat face on the same plane at the chisel top; the other is a flat face at a right angle to the chisel top. The net result of these carved faces is to make a square edge on the side of the post to catch a notch on the side of the horizontal stick, known as the lever.
Stick 2 – The Lever
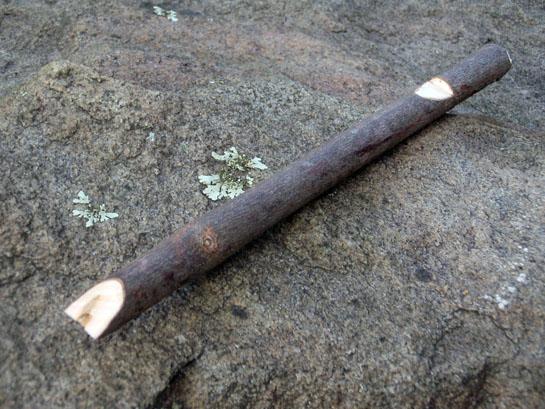
This stick is the diagonal part of the “four.” It requires a notch carved in the side near one end, and a chisel point carved at the other end. The notch sits on top of the chisel-topped post, while the chisel end of the lever locks into a notch at the end of the trigger stick. The lever stick should be the same length as the post stick.
**
Stick 3 – The Trigger**
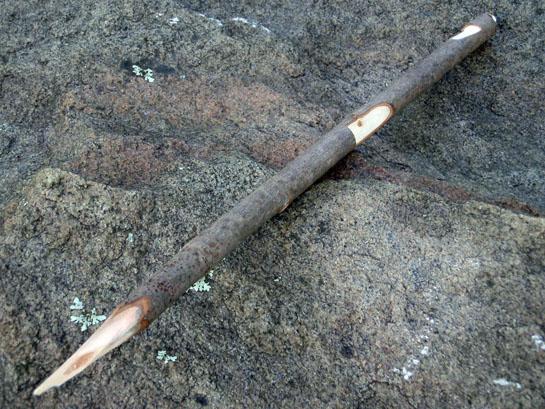
The third stick is the trigger, which should be a few inches longer than the other two sticks. This is the horizontal stick in the trap. It needs a notch carved in the side, and a notch carved near the stick’s thicker end. For the notches, cut straight down into the stick, then carve off a one-inch shaving from the center of the stick toward the end to meet your downward cut. The notch at the end will look upward in the finished trap, and the notch on the side of the trigger stick will face the post. This stick also needs a point carved at the free end to serve as a skewer for the bait.
If carved correctly, you should be able to set the lever on top of the post, set the edge of your rock on the tip of the lever, and then lock in your horizontal trigger stick (first against the end of the lever, then against the square edge on the post). If you have studied the mechanism well, and carved crisp edges at right angles, you shouldn’t have trouble with this trap again.
For most of us, this exact trap should be for survival purposes only, as deadfalls are not legal in most states. But if you are crafty, you can substitute a heavy box for the big rock and turn this into a live-catch box trap. A live-catch box is actually legal in many areas for catching specific game (often rabbits). Check your local trapping regulations before engaging in trapping, even for practice purposes with non-lethal components.
Have you tried the figure four deadfall? Tell us about your experiences with this trap in the comments.