We may earn revenue from the products available on this page and participate in affiliate programs. Learn More ›
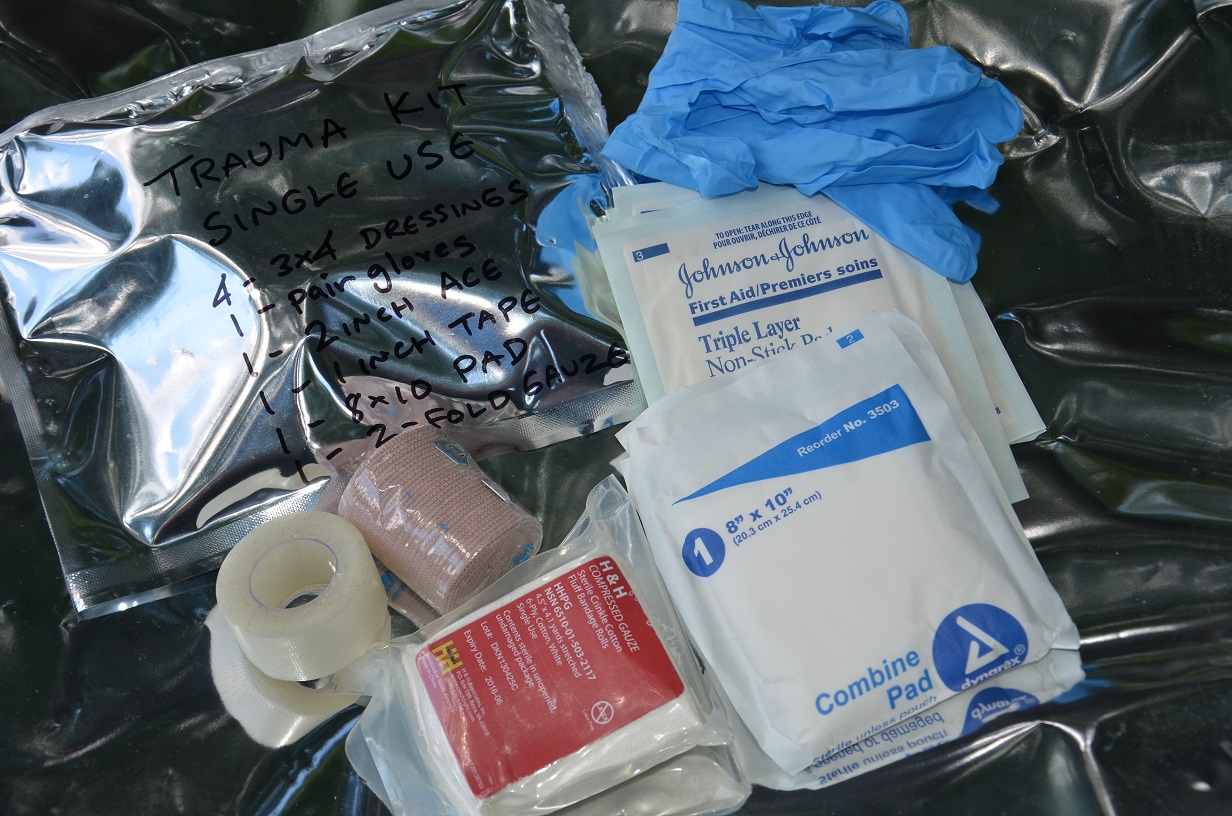
If you’ve ever heat-sealed your own Mylar bags at home, then you know what an amazing and versatile material Mylar can be. These silvery bags come in many sizes and can be heat-sealed with a Food Saver (or similar) unit, a clothes iron, or even a hair-straightening flat iron. Once sealed, the bags are waterproof and impermeable to air, and they’re even rumored to be EMP-proof. I’m currently taking a more modular approach to my gear, so I recently built a single-use trauma kit and sealed it up for safe keeping. Here’s how I did it.
First, I cut the corner off a large Mylar bag that had been damaged and was unsuitable to be used whole. Next, I grabbed my kid’s hair-straightening iron. Then, I readied my medical gear. Trauma kits are meant to deal with major injuries and keep a gravely injured person alive until medical care can be reached. Since this kit was going to be packed up for the long haul, I only wanted to use items that wouldn’t expire or leak, so the QuikClot, wipes, and ammonia inhalants would have to be left out. Here’s what should last until doomsday:
4 – 3×4-in. non-stick gauze pads, for wound coverage
1 – 8×10-in. trauma pad, for wound coverage
1 – Crinkle gauze, for wound packing and to secure dressings
1 – Pair of non latex gloves, for protecting the first responder
1 – Roll of 1-in. tape, to tape down dressings
1 – Ace bandage, 2 in. x 5 yd., non-self-adherent, to apply pressure and secure dressings (Note: if you use self-adhesive bandages, the sticky element will eventually glue the roll together and ruin it.)
Now it’s time to seal it up. If you’re using the corner of a large Mylar bag, you already have two factory-sealed edges. Use your heat sealer to seal another edge to create a pouch. Next, use a permanent marker to label the kit and list its contents.
Slide all of your gear into the pouch and organize it evenly. If you’d like to vacuum-seal your pouch, add a 100cc oxygen absorber to the pouch. This will draw roughly 20 percent of the atmosphere from inside the sealed package and pull a nice vacuum on it after a day or two.
Your sealed trauma pack can be added to any of your first aid or survival kits. It’s also a very smart addition to a range bag or vehicle emergency kit. Now you’re better prepared for a serious scenario where someone is significantly injured. Hopefully, you’ll never need it.
Do you carry an IFAK or trauma kit? Let us know what you’re packing in the comments.
To read more from Tim MacWelch, follow him on Twitter (@TimMacWelch) and purchase his survival manuals, including the latest: How to Survive Anything