There’s a saying among motivational speakers about the importance of having a goal: “If you don’t know where you’re going, it doesn’t matter which direction you take.” It’s a concept that fits map-and-compass work, too. But I would modify the saying to read, “If you don’t know where you are, nothing else matters.”
Some folks mistakenly think that if they have a map and compass, they won’t get lost. The problem is, even with that equipment, you might not have a clue about your actual location. In order to use a map and compass successfully, you must first determine where you are on the map. You need to establish a “fix” on your position.
MAP ORIENTATION
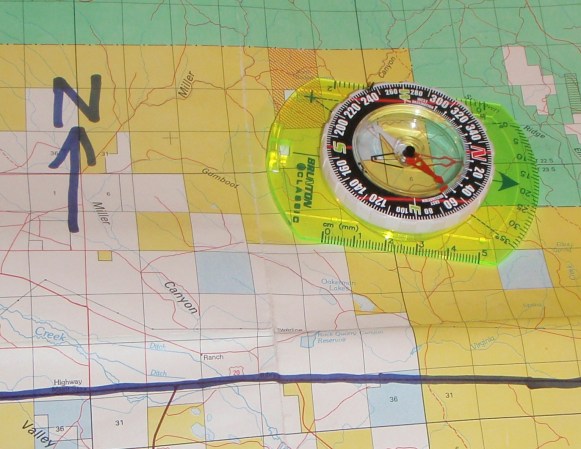
Maps are printed with north at the top. Your first step is to orient the map so it agrees with north on the ground. Lay the map flat and use the compass to align it so the map and compass are both pointing north. Of course, the grid lines are laid out toward true north, while the compass needle points toward magnetic north. Technically, you should adjust for the difference, which is called variation. Don’t worry about that now. We’re just trying to get you oriented to find out where you are.
Once you have the map oriented, look around and see if you can spot some terrain features like a lake, river or mountain range. Then study the map to see if you can identify those same features. If you have a topographic map, it will show contour lines that indicate the shape of the terrain. If you are in a location where prominent geographic features are visible, you’ll use those to develop a fix on your position. Besides mountain peaks, you can also use a bend in a river, a cove in a lake, a ridge or other identifiable landmarks.
GET YOUR BEARINGS
After you match features on the ground to those on the map, shoot a bearing to them with the compass. Here’s how.
If a certain feature–a mountain peak, for example–is at a compass bearing of, say, 232 degrees, you can draw a line from that feature on the north-oriented map at an angle of 232 degrees and know that you are somewhere on that line. In navigation, this is called a line of position, or LOP. But you don’t know where on that line you are until you shoot another bearing, preferably at a feature between 60 and 120 degrees from the first one. When you draw the second LOP, extend it far enough so it crosses the first one. Where the two LOPs intersect is your “fix.”
That’s where you are, within reason (due to the fact that we didn’t adjust for variation yet). The more landmarks you can identify and shoot bearings to, the higher the accuracy of your fix.
If you’re in the woods and can’t see geographic features, life is tougher. You might have to use less obvious landmarks. A topographic map will indicate elevation changes, so be alert to the direction of watersheds, ridges, etc. If you come across a swamp, river or shoreline, examine the map for those features. Then orient it and try to get a fix on your location.
Only after you know your location can you use the map and compass to plan where you want to go.
CONSIDER VARIATION
Your compass is going to point you close to the right direction, but to go exactly where you need to, you must compensate for the variation between magnetic north and true north. The compass responds only to magnetic north. The magnetic influence that attracts your compass needle is hundreds of miles away from the geographic north pole. Not only that, but the magnetic north pole is on the move.
On a topographic map an information block includes the number of degrees of variation needed for your calculations. Variation works in two ways–east or west. If you are west of the meridian that runs roughly north and south through Chicago (where true north and magnetic north line up with zero variation), the variation will be to the east, and vice versa.
After orienting your map so the longitude grid lines up with the needle on your compass, rotate the map either to the east or west to compensate for the variation. You want the compass needle to point the proper number of degrees in the direction of the stated variation when viewed in relation to the grid lines on the map. For example, if I’m hunting in western Washington, my map will say that the variation is approximately 20 degrees east. So I need to rotate the map counterclockwise so the compass needle is showing an angle 20 degrees to the east of the true north grid lines.
If you have a compass with a rotating bezel, just turn the bezel so it matches the variation. The needle will always point to magnetic north, so you can’t adjust the needle. With the bezel adjusted properly, the relationship between the map and compass will be correct.
If you were to follow your compass back to camp, using the map but without calculating variation, you could be heading 20 degrees in the wrong direction. An error of that magnitude continued for five miles would put you almost two miles off course. That evening you’d miss dinner around the campfire for sure.
What Would You Do?
The fishing report says they’re biting hard and fast in Lunker Bay. The only way to the bay is by boat across a mile of open water. You want to get an early start so you can ring the breakfast bell for those hungry fish, so you get underway before dawn. You’re all bundled up for the chilly trip and sitting on your personal flotation device (PFD, also known as a life vest) to keep your fanny warm and comfortable. Midway across, your skiff hits a floating log and capsizes. What should you do?
A. Strip off your clothes so their wet weight doesn’t pull you down.
B. Swim for shore as fast as you can.
C. Stay with the boat.
D. Kick off your boots and start treading water.
“What Would You Do?” The correct answer is C. Stay with the boat. Chances are the boat will float for a while, even if it is overturned, giving you something to hold on to while you get your wits together. It’s generally best to stay with the boat and try to attract attention to your predicament by using an audible or visible signal. Sound (a survival whistle) carries well across water, as does the flash of a waterproof LED beacon. By sticking with the boat, you also might be able to recover the PFD that you should have been wearing and put it on. Keep your clothes on, because they can trap air to help keep you afloat and will help keep you warm. Do not swim or tread water (unless absolutely necessary to stay afloat) because that will dissipate energy and body heat. Rather, draw up your knees to your chest and hug your arms around your knees to keep your body heat from drifting away.
Quick Tip CALL IT A NIGHT If you’re hiking and are overtaken by darkness or poor visibility due to fog, rain or snow, it’s time to make camp. Continuing on when you can no longer see is just asking for trouble. You could become seriously disoriented or stumble on some unseen obstacle and injure yourself, making the situation worse. Always be prepared to make an emergency overnight camp.

