We may earn revenue from the products available on this page and participate in affiliate programs. Learn More ›
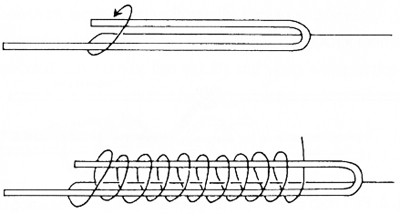
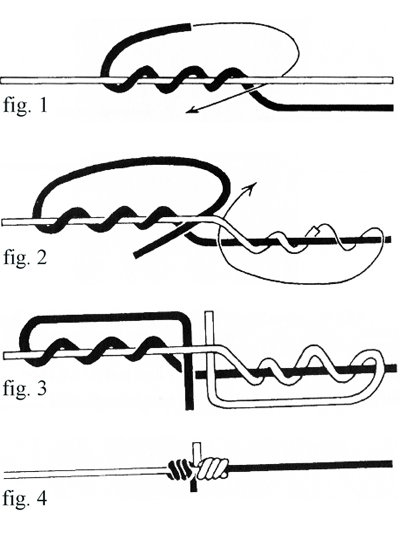
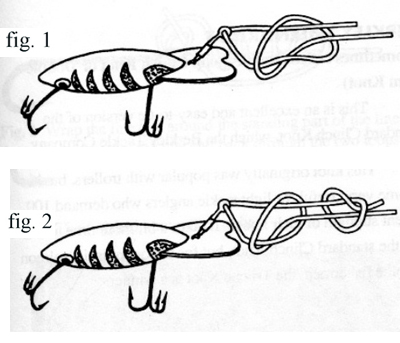
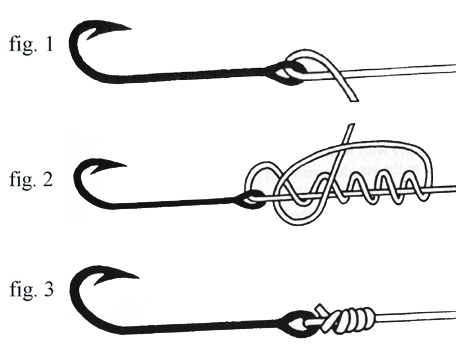
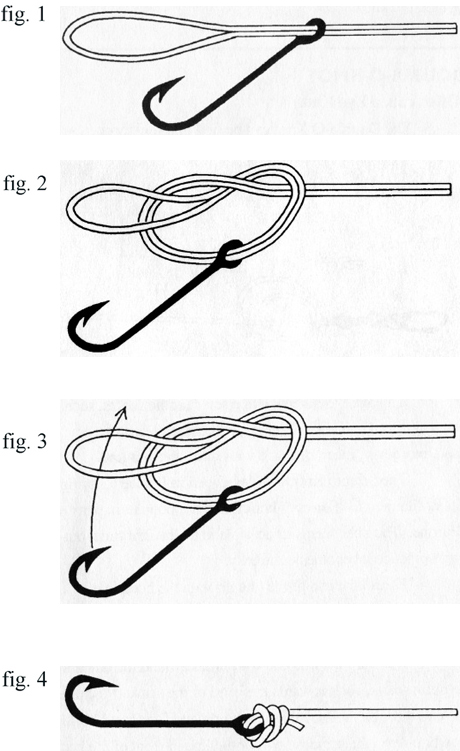
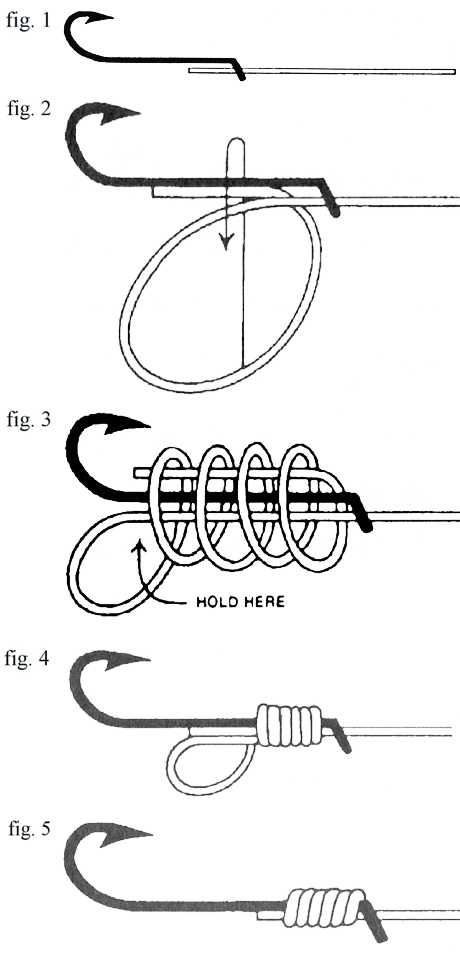
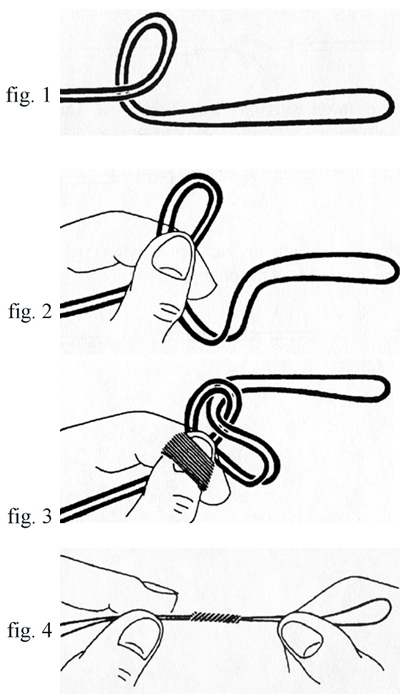
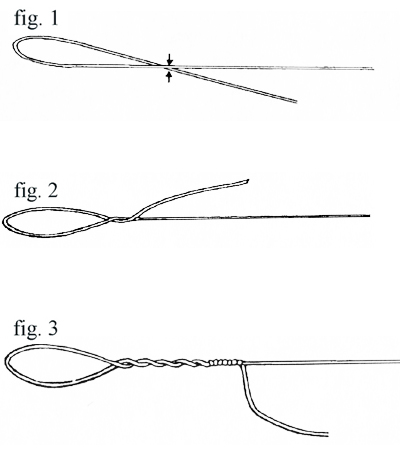
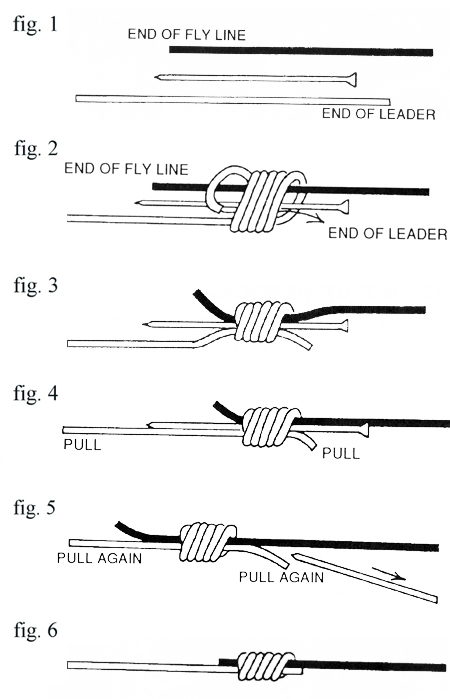
1. Albright Special Knot This knot was made famous by the well-known Florida guide Jimmy Albright, and is worthy enough to bear his name. It's an excellent knot for tying light test to heavy line. It also can be used to connect line to wire cable, nylon-coated wire, and even to small diameter single-strand wire leader. Outdoor Life Online Editor2. Blood Knot This knot is valuable to all fishermen for joining two monofilament lines, and is very popular for anglers using leaders, like fly fishermen. It's fast and easy to tie, its only drawback is that strands to be connected must be of equal, or nearly equal, diameters- though 10-pound test can be tied to 20-pound using the Blood Knot. The Blood Knot provides a small connection, and when properly tied it cannot pull loose no matter how close its tag ends are clipped. Fig. 1: Cross the two lines, and wrap one line three times around the other. Now place the line end through the loop formed by the two lines. Fig. 2: Turn the other line around the first line three times, put its end through the loop from the opposite side. Fig. 3: The turns should look like this. Now slowly pull on both long ends of the lines. Fig. 4: The tightened knot looks like this, loose ends trimmed. Outdoor Life Online Editor3. Homer Rhode Loop Knot This is an easy knot to tie, and very popular with anglers who use crankbaits. The Homer Rhode Loop allows plugs, spoons and other lures to have the best possible action. The knot forms a loop through the eye of a lure, so it swims more freely than if a knot were tied snugly to it. In fact, a loop formed by this knot often can make a diving plug run true that otherwise tracks irregularly. The Homer Rhode Loop can be made with very heavy or very light line. Forming this knot carefully is important. But when done properly, the knot is extremely strong. Although normally tied with monofilament it works well with heavy shock leaders up to 100-pound test. Fig. 1: Tie a simple overhand knot about four inches from the end of the line. Push the end of the line through the hook eye, then back through the center of the overhand knot. Fig. 2: Next, with the end of the line, make another overhand knot around the standing part of the line. When tightened, the two overhand knots slide and jam together, meeting at the middle of the two loose overhand knots and forming a loop. Where the second overhand knot is positioned around the standing line determines the size of the knot's loop. For a big loop knot, form the second overhand knot well up the standing part of the line. For a small loop knot, make the second overhand knot close to the first overhand knot. Outdoor Life Online Editor4. Improved Clinch Knot The Improved Clinch Knot is one of the most popular knots for tying a line or leader to either a hook or lure eye. It is one of the most dependable and secure of all knots, simple and fast to tie. Although many anglers still insist on using the ordinary Clinch Knot, the Improved Clinch Knot is just as easy to tie, and it is much stronger. The Improved Clinch knot can be difficult to tighten when using heavy-test monofilament of, say, over 40-pound. Heavy fluorocarbon also can be difficult to tighten with this knot because it is so stiff. But if the tie is moistened well, even heavy monofilament will tighten. Fig. 1: Pass the line end through the hook eye. Put about six inches of line through the eye so there will be ample line to tie the knot. Fig. 2: Hold the hook or lure securely in one hand and wrap the end of the line five times around the standing part of the line. Now pass the line end back through the small loop near the hook eye, and also through the large loop. Fig. 3: Tighten and trim the knot carefully. Outdoor Life Online Editor5. Palomar Knot Many anglers find the Palomar Knot the easiest of all knots to use for tying line to hooks, lures and swivels. This is a strong, simple knot that is the best overall tie for use with modern gel-spun poly braided line, which commonly slips when used with many conventional fishing knots. Fig. 1: Double the end of the line and pass the loop through the hook eye. Fig. 2: Double the loop back, then make an overhand knot around the standing line, leaving a loop large enough for the hook (or lure) to pass back through. Fig. 3: Put the entire hook (lure) through the loop. Fig. 4: Pulling on the standing line will draw the knot tight. Trim it, and the knot will be compact and effective. Outdoor Life Online Editor6. Snelling A Hook Snelling a hook once was necessary because many hooks did not have eyes. However, some expert anglers still insist on snelling their eyed hooks because they feel snelling makes a very strong connection. A very direct hook set in line with the plane of the hook is made when a fish is struck using this durable connection. Snelled hooks often are used in fishing natural baits, such as live shiners for outsize largemouth bass in heavy cover; and for large marine baits. Many bait fishermen prefer snelled hooks no knot is at the leader end in front of the hook eye, so weeds and other debris are less likely to foul ahead of a bait. This connection is easy, and is very similar to a whip finish fly tiers use to secure thread when they've completed dressing a fly. Fig. 1: Thread a leader through a hook eye and lay the leader along the hook shank. Fig. 2: Pull about six inches of leader through the hook eye and form a loop below the hook shank. Fig. 3: Hold the line near its end tight and parallel to the hook shank, while wrapping the line loops over the entire hook. Be sure the line of the loop closest to the hook eye forms the series of coils. Fig. 4: After six tight coils are formed on the hook shank, slowly pull on the standing part of the line. This brings the rear loop through the coils and tightens the knot. Fig. 5: The completed snell. Outdoor Life Online Editor7. Spider Hitch Knot Many anglers use a Spider Hitch instead of a Bimini Twist when they want a knot that doubles their line for increased strength. The Spider Hitch is popular in saltwater, but has many applications in freshwater, too. It can be quickly tied, and it has superb knot strength with monofilament, flourocarbon, and even modern braided lines. The Spider Hitch can be tied effortlessly to form a double line having twice the strength of a single strand. Additionally, it doubles the diameter of light line when connecting to heavy leaders, making for an easily tied connection. Another important plus is if one of the two lines formed by a Spider Hitch breaks during a fish fight, the second line will hold. Fig. 1: Double the line, then put a small reverse loop in it. Fig. 2: Hold the reverse loop with thumb and forefinger. Fig. 3: Wrap the doubled line five times around the thumb and the reverse loop. Fig. 4: Slowly pull the large loop so the line unwinds off the thumb. To make a small, properly-formed knot, it's important to pull all four lines of the connection firmly and evenly while tightening. Outdoor Life Online Editor8. Double Uni-Knot This outstanding, versatile and durable knot is an excellent one for connecting gel-spun polyethylene high-tech braided lines to monofilament, or braided line to braided line. Many anglers desire this because monofilament is nearly transparent, compared to braids, so they want monofilament leaders. The Uni-Knot is more than a simple fishing knot, it is an entire knot-tying system. Here it's shown used to connect two fishing lines. It can be used to secure lines of light or heavy test, as well as light lines to heavy ones, or even doubled lines to shock tippets. It's a bit more time consuming to tie than some other knots, but braid, it's the best. Fig. 1: Overlap the ends of two lines for about 6 inches. With one line end form a circle, crossing the two lines about midway of the overlapped distance. Fig. 2: Make four turns with the tag end through the loop. Fig. 3: Pull the tag line end tight to jam the wraps of the Uni-Knot around the standing line. Fig. 4: Follow steps two and three with the opposite line end, then pull the knots together as tightly as possible. Fig. 5: Pull the standing lines in opposite directions to slide knots together. Pull tight and trim tag ends. Outdoor Life Online Editor9. Haywire Twist This is one of the best and most commonly-used methods for linking single-strand wire to any type of connecting ring. The number of wraps and the two different kinds of wraps in the Haywire Twist may seem elaborate to some anglers. But for numerous varieties of strong, toothy fish, this tie is absolutely necessary to keep the wire from "pulling out." Many veteran anglers prefer single-strand wire to multi-strand cable, because it is finer diameter, less visible to fish, and easy to rig. The drawback to single-strand wire is that it can kink and break, unlike multi-stand wire or cable. Fig. 1: Thread the wire end through the hook eye, pulling about five inches of wire through it. Fig. 2: Pinch the two pieces of wire together, and begin twisting the wire strands simultaneously together, so they wrap around each other at about a 45-degree angle. Make four to six wraps. Fig. 3: Now bend the tag end of the wire at a 90-degree angle to the standing part of wire, and begin making barrel wraps tight to each other. Make four to six barrel wraps. Bend the tag end of the wire back and forth until it breaks, and the Haywire Twist is completed. Do not cut the wire, as that will leave a small tag end of wire that can cut hands when landing fish. Outdoor Life Online Editor10. Nail Knot This is a great knot for joining a large diamter line to a small diameter line, as when tying a shock tippet to a leader, or fly line to backing line (even braid). Tied correctly it will not pull out, and makes a very small connect that readily goes through rod guides. Although a nail was originally used in tying this famous knot, many anglers use a small plastic tube, ice pick, piece of coat hanger, soda straw, straightened paper clip, or even an air-pump needle. It doesn't matter what tool is used, so long as its surface is smooth and line coils slide off easily during tightening. Fig. 1: Position the nail or other tool between the two line ends. Fig. 2: Wrap the smaller diameter line (leader) around the larger diameter line (fly line), making five to seven turns. Pass the end carefully back through the center of the loops. Fig. 3: Slowly pull on the line ends to tighten around the nail, being certain to keep line coils side-by-side and taut. Fig. 4: Pull on both line ends and slowly withdraw the nail, making certain line coils remain snug. Fig. 5: Once the nail is removed, pull firmly on all four line strands protruding from the knot. Fig. 6: Here's the finished Nail Knot with tag ends trimmed close. These illustrations and knot tying instructions are from Bob McNally's best-selling book Fishermen's Knots, Fishing Rigs, and How To Use Them. It has 304-pages with nearly 700 illustrations, making it the most comprehensive reference on the subject. It covers nearly 200 fishing knots and rigs of value to all saltwater and freshwater anglers. Autographed copies are available for $19.95 from McNally Outdoor Productions, 1716 Bayside Blvd., Jacksonville, Fla. 32259. Outdoor Life Online Editor
You don’t have to be a knot-tying genius to catch fish. But it sure helps to know the basics of how to tie a fishing knot.