A crisis is no time to experiment with survival skills. It’s a time for action—a time to execute techniques you’ve already mastered. Do you feel prepared? Confident? Knowledgeable? If the prospect of staking lives on your current survival abilities makes you queasy, don’t worry. Hit the books instead.
OL has gathered 46 tips, skills, hacks, and projects from three of our savviest experts to help you begin, or to supplement, your training.
The backyard is an ideal place to experiment with these techniques, many of which would be useful around the house in the event of a natural disaster, or worse. And if ever you’re stranded in the backcountry with your wits and precious else, these skills should see you safely home. Just don’t wait until you’re dying of thirst in the desert or bleeding out on a mountain to try them.
Tip No. 1 I Project: Build a PVC Cache
You’ll need: PVC primer and cement, 4-inch-diameter PVC pipe, solid end cap, threaded end cap with plug, saw Apply primer around each pipe end, inside the cap, and inside the female fitting (but not on the threads). Let dry. Quickly wipe cement around one pipe end and inside the end cap, then slide the cap on and apply pressure for 10 to 15 seconds. Repeat this process with the female fitting. Push on it with the threaded section facing up to keep cement from running into the threads. Let dry for a few hours. Wait a day for fumes to clear before storing any food in it. Fill the cache and tightly screw the plug in place. Hide it in a secure and unexpected spot, like a fake pet grave. To store in:
Damp areas: Use Teflon tape around the threads.
Marshy areas: Put pipe dope on the threads.
Underwater: Glue on the cap and saw your cache open when needed.
—T.M.
Tip No. 2 I Skill: Keep From Freezing with Found Insulation
Bring extra layers and never wear cotton. But if you’re wearing a poor choice of clothing without enough layers for the conditions, add insulation. Use leaves, grass, or whatever you can find to stuff inside your shirt. Creating an air gap between the clothing and your skin will help trap warmth. Most important is to stay dry. Wind blowing on wet clothing will cool your body 25 times faster than normal. —C.A.
RELATED: Essential Knots: How to Tie the 20 Knots You Need to Know
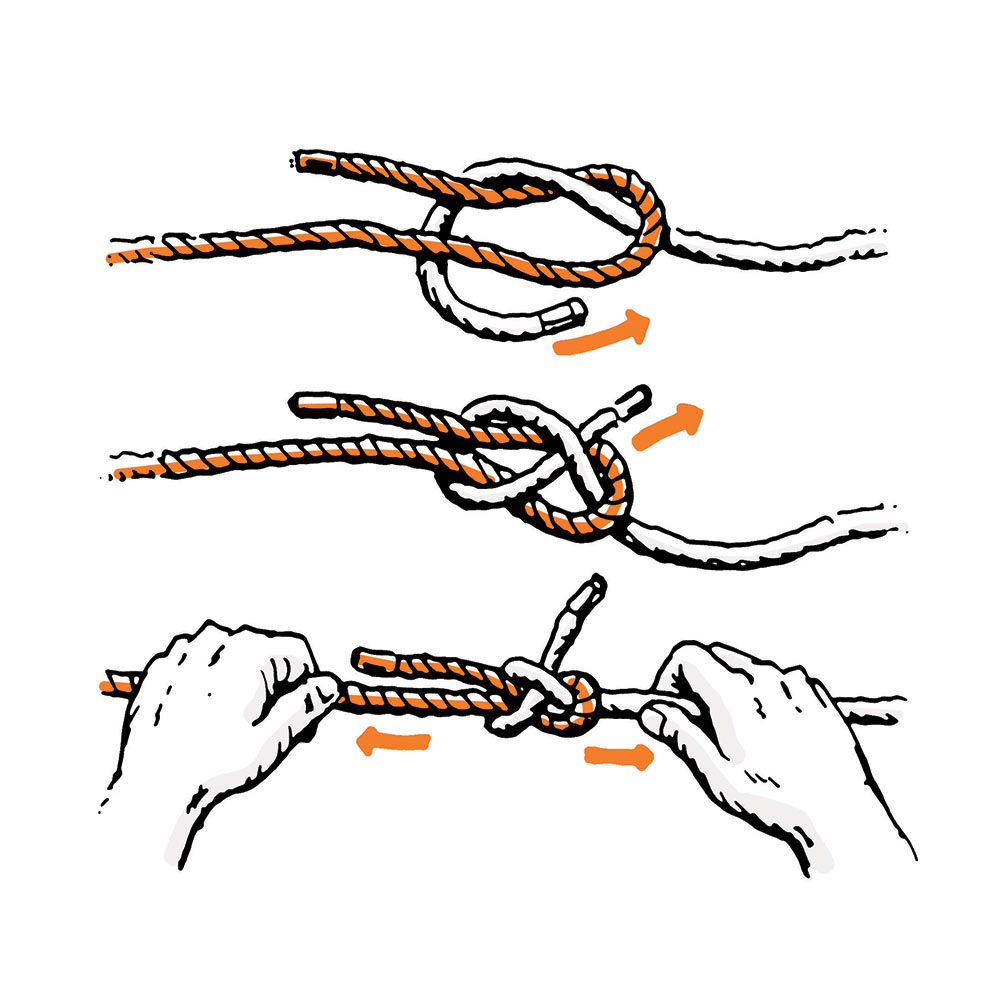
Tip No. 3 I Skill: Tie a Sheetbend Knot
This knot is great for tying two ropes end-to-end, especially if they are different sizes. It’s strong, reliable, and easy to untie.
- Double the thicker rope back on itself, forming a “bend.” Run the end of your second rope up through the bend.
- Run the second rope around both strands of the first rope, and tuck it under itself. Ends of both ropes should be on same side of the knot.
- Pull on both ropes and both ends to snug the knot until firm.
—A.V.B.
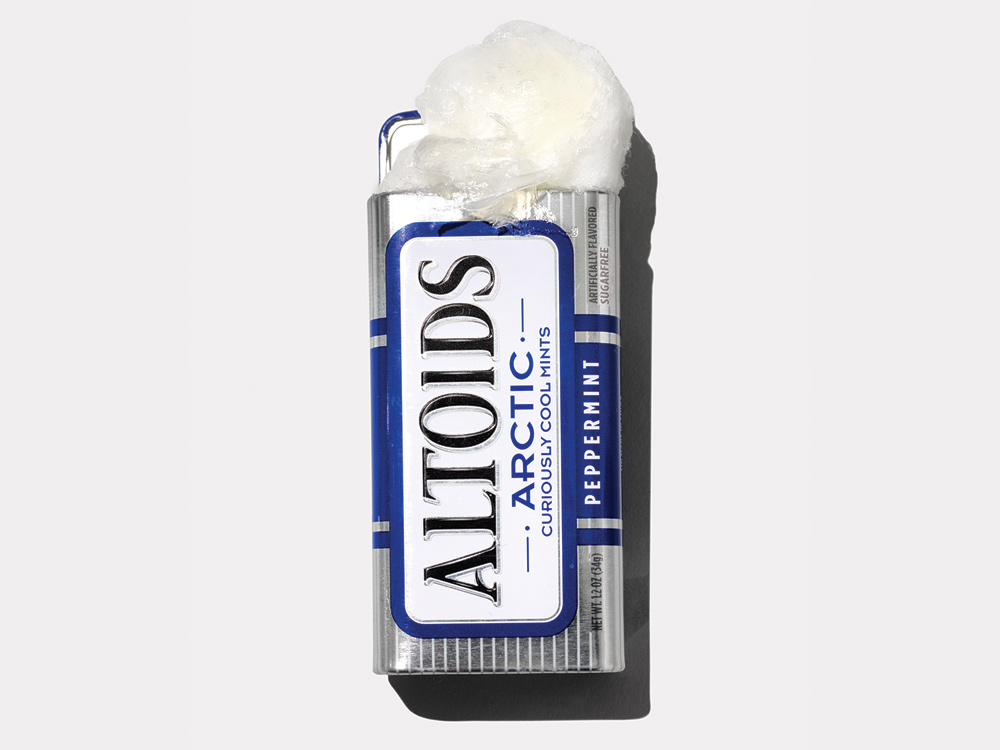
Tip No. 4 I Project: Make Fire Starters
You’ll need: Petroleum jelly, cotton balls, heat source, disposable tin, waterproof container
- Melt a few ounces of petroleum jelly in a tin can (or other disposable, fireproof container) over low heat.
- When the jelly liquefies, dip each cotton ball and set aside to harden.
- Once soaked with jelly, the balls aren’t harmed by water, but store them in a waterproof container in a cool place for the best shelf life.
To start a fire with matches or a lighter, apply the open flame to a ball. If you’re using a spark rod, tear open a ball to fluff cotton fibers before striking. Each ball can burn for up to five minutes. —T.M
Tip No. 5 I Hack: Top 4 Makeshift Tinder Items
- Shaved cotton lint, scraped from clothing with a knife blade.
- Birch bark, peeled from trees in thin strips.
- Pine pitch.
- Standing dead wood, carved into feather sticks.
You can combine these for the best effect. Add petroleum jelly to the lint if it’s available. —C.A.
Tip No. 6 I Skill: Heat Your Home
Turn stones into heaters during a cold-weather power outage. 1. Erect a heat-proof platform (e.g., a 2-foot square of bricks) inside. 2. Start the grill or build a fire outside. 3. Gather dry rocks or bricks—wet rocks, shale, and slate can explode when heated. 4. Heat them for 45 minutes. 5. Scoop out, ensure they’re spark-free, and deposit in a stainless-steel pot (galvanized buckets can release toxic vapors). 6. Bring inside, set on platform, and repeat every few hours.
—T.M.
Tip No. 7 I Project: Package Dry Goods to Last 30 Years
You’ll need: Dry-food staples (pasta, beans, rice), Mylar bags, oxygen absorber packets, clothes iron, permanent marker, food-grade bucket
One of the most dependable ways to ensure your family stays fed is to store food for an emergency. A cheap way to accomplish this is to package dry goods yourself.
- Fill each Mylar bag with dry goods and add oxygen absorber packs according to the volume. One-quart bags need a 100cc packet; gallon bags need 400cc.
- Close the bag’s mouth and run a hot iron across the opening to seal.
- Place sealed pouches (with date and contents marked) into the bucket.
If you sealed the pouches correctly, the oxygen packets will draw a partial vacuum on each pouch in a few days. Stash the bucket in a cool, dry place. Your cache should last for three or more decades. —T.M.
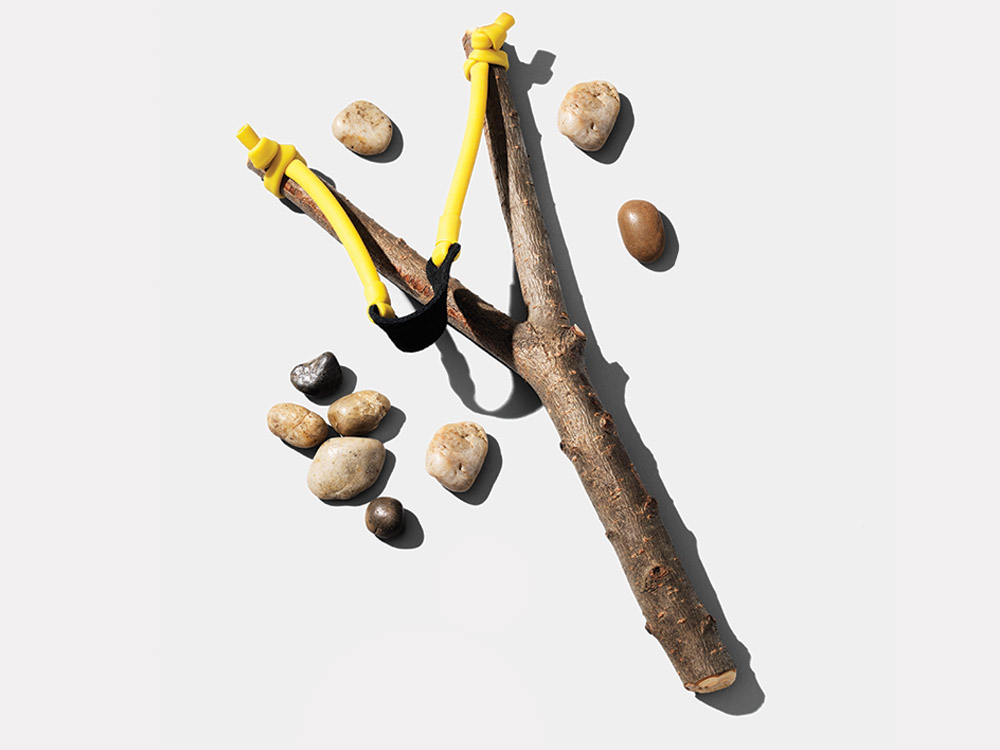
Tip No. 8 I Project: Make a Survival Slingshot
You’ll need: Forked stick, leather, elastic cord or tubing, knife, small stones
Run out of .22 rounds? A simple slingshot utilizes a nearly limitless supply of ammo— rocks.
- Pick a sturdy forked stick, ideally of hardwood.
- Cut a small patch of leather and pierce two holes in the corners.
- Cut two short sections of rubber surgical tubing and attach the leather to the fork.
- Place a stone in the pocket, pull, and aim.
With ample practice, you’ll hit your target. The ultimate goal: to knock down small game. —T.M.
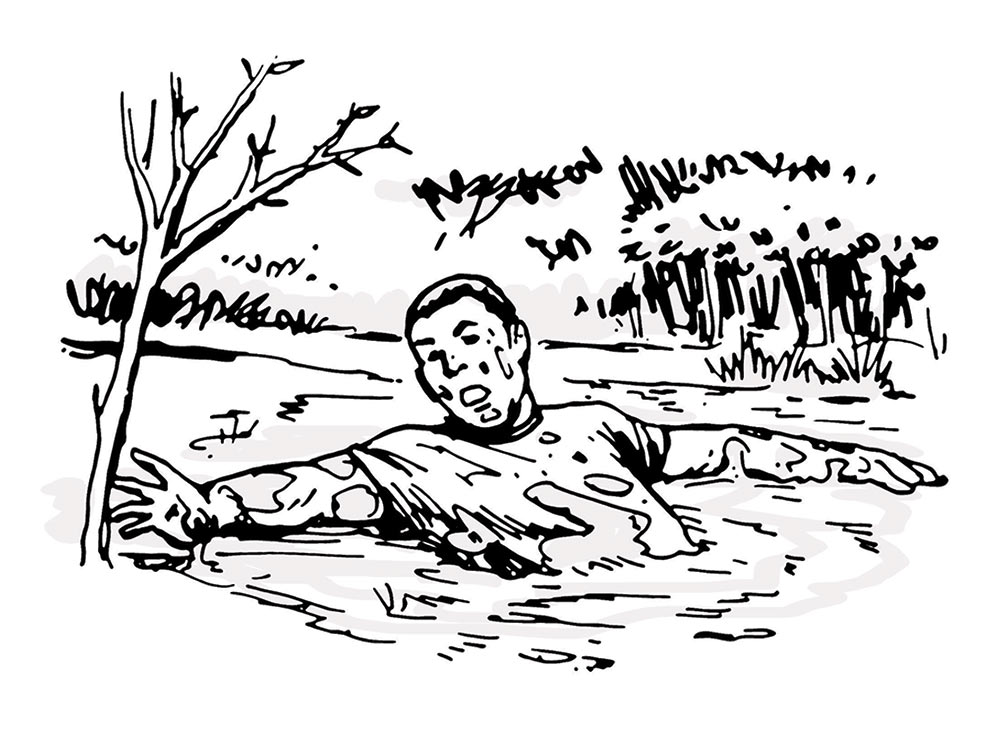
Tip No. 9 I Skill: Break Free From Quicksand
If you become mired, a rope or stick can drag you to safety. If you’re alone, try to distribute your weight broadly on the surface. Don’t struggle to pull your feet out—you’ll just work yourself in deeper. Instead, spread your pack, sleeping pad, and even your rifle across the surface. Use them for support and gently extricate your legs. Roll or work your way to safety, bringing your gear along. —A.V.B.
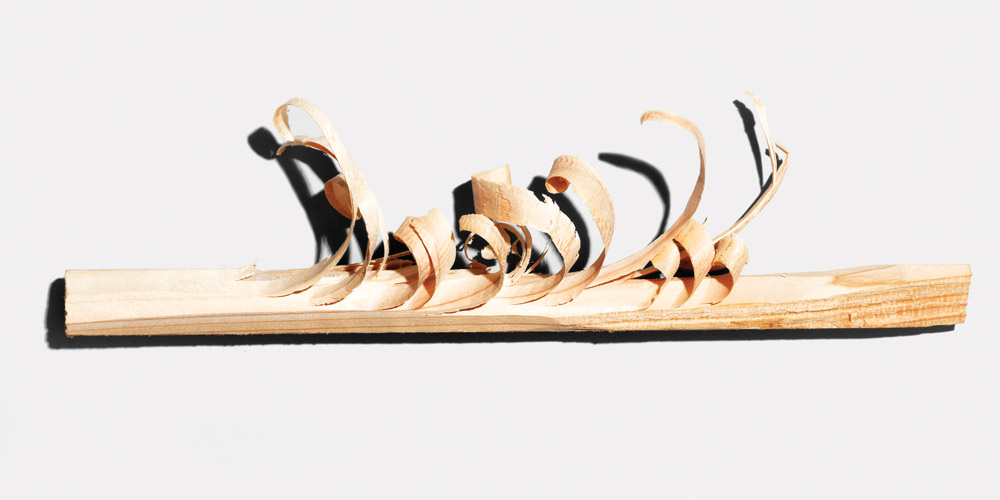
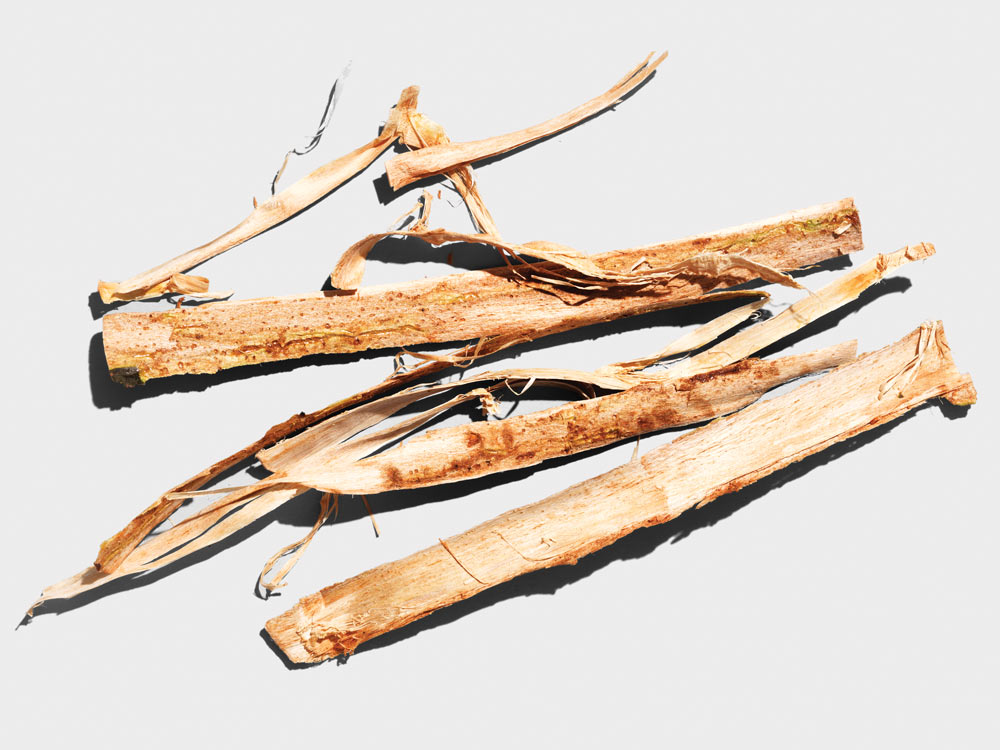
Tip No. 10 | Vocab Lesson: Feather Stick (n.)
A field-made fire starter that works wonders when all available wood is wet. Select the driest stick you can find (about as thick as your thumb) and strip away any wet bark with a blade. Carve the thinnest and longest curly shavings you can into the stick to expose the inner dry wood. —T.M.
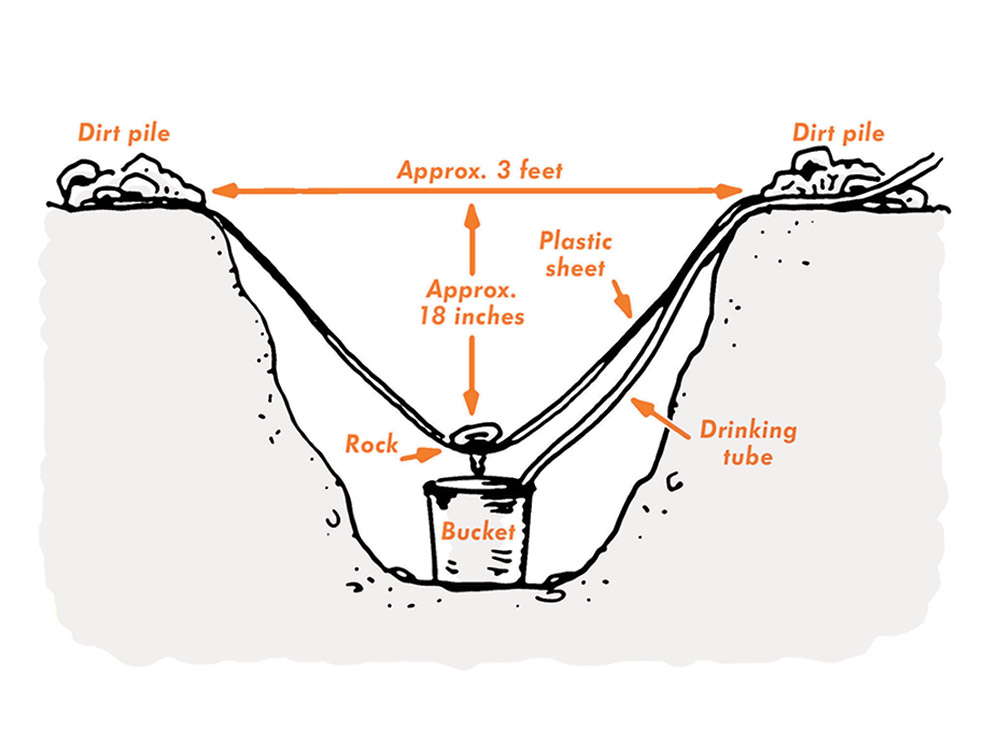
Tip No. 11 I Project: Build a Solar Still
The solar still is a simple invention that collects and distills water.
You’ll need: Square sheet clear or milky plastic (approx. 5×5 ft.), shovel, catch container, small rock, tubing or hose (optional)
- Search for a sunny location with the dampest dirt or sand available.
- Dig a 3×3 ft. hole.
- Place the container at the bottom.
- Drape the plastic over the hole.
- Spread a ring of dirt around the edges to seal off the still.
- Weight the plastic with the rock to create a 45-degree angle.
Condensation will collect on the underside of the sheet and drip into the receptacle. It’s most efficient to slip a drinking tube into the reservoir so you can drink without dismantling the still, but tubing may be hard to come by and isn’t critical. The distilled water is as clean as the surfaces it has touched, and may not need further purification. Add green vegetation and cacti around the container in the hole to increase production. Don’t expect gallons per day from a unit like this, but the ounces you do get can make all the difference. —T.M.
Tip no. 12 | Skill: Make Jerky
Preserve meat in a survival situation by drying it raw.
- Start with fresh meat, slicing pieces less than ¼-inch thick and cutting perpendicular to the grain.
- Trim all visible fat (it will go rancid if you don’t).
- Hang your jerky slices on an improvised rack or branches. Don’t leave unattended—birds and other critters will pilfer it.
Jerky can be dried near a smoky fire to add flavor and keep flies off. Just don’t dry it over a fire or it will cook and spoil within days. The jerky may dry in one day or several, depending on the humidity. Don’t leave it out overnight—place it somewhere safe and dry. Flip a few times while drying. It’s ready when the meat becomes slightly brittle and turns a purple-brown color (if it’s red meat). I toast jerky over the fire just before consuming to make it as safe as possible. —T.M.
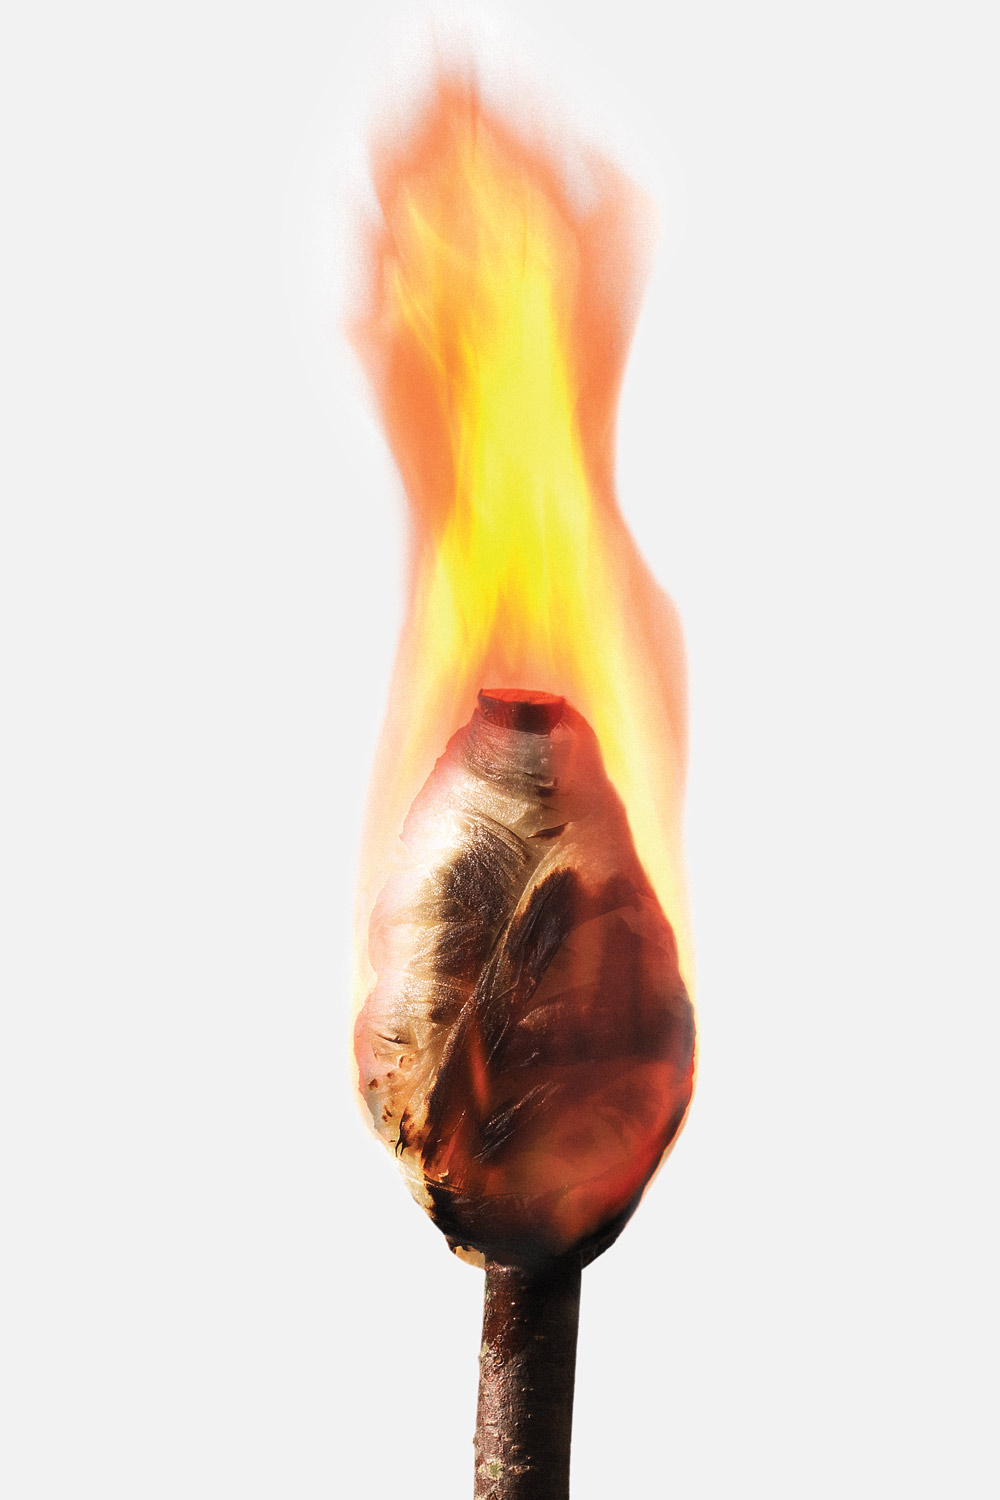
Tip No. 13 | Project: Make an Oil-Soaked Toilet Paper Torch
You’ll need: A freshly cut stick, forked at one end; toilet paper; cooking oil; lighter or matches
- Cut a fresh branch or sapling for the handle. Green wood is unlikely to catch fire.
- Choose a stick about 2 feet long and 1 to 2 inches thick, with a fork or side branch at the end to better secure the toilet paper.
- Wind TP around the forked end, twisting it into rope-like strands as you go.
- Once the bundle is fist-sized, tuck in the end of the paper.
- Soak your torch in cooking oil for one minute.
- Remove and pull out a thin strip of oily paper and light.
In a moment or two the torch will become engulfed in flames. It will burn for 15 to 20 minutes. —T.M.
Tip No. 14 | Hack: Get Caught Knapping
Should you find yourself in need of a cutting edge, pick a piece of flint, chert, obsidian, or similar rock. Select a chunk with an angled corner, and grab a sturdy, lemon-shaped stone to use as a hammer. Strike your flint at a low angle with the hammer stone, knocking away chips of rock to produce a thin, extremely sharp blade. Experiment with various stones for the best results. You can fashion arrowheads or a blade, and use pine pitch glue (see tip No. 39) to fasten it to a shaft or handle. —A.V.B.
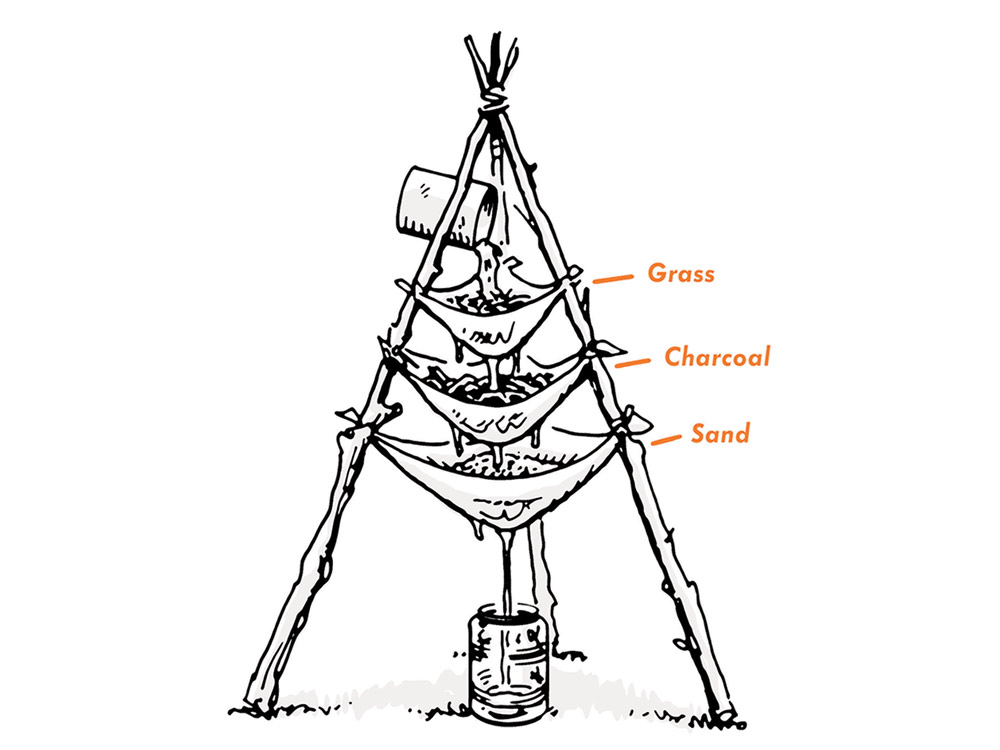
Tip No. 15 | Project: Build a Tripod Water Filter
You’ll need: Three small sticks, cord, clean sand, green grass, crushed charcoal from a fire, three pieces of cloth, catch container
This basic filtration system is easy to assemble in the field for treating foul water.
- Fasten poles together with cords to make a tripod.
- Attach the pieces of cloth, one above the other so they hang like hammocks, and put the container below the lowest one.
- Place grass in the upper cloth, charcoal powder in the middle, and sand in the bottom.
- Pour raw water in the top filter. It will trickle through the layers into the container below.
While this won’t remove pathogens, it will reduce mud and debris, which makes other disinfection methods more effective. Water can be poured through the filter multiple times. —T.M.
Tip No. 16 | Hack: Sharpen a Knife with a Rock
If you find yourself with a dull blade and no way to hone it, start hunting for a round, fine-grained stone from a local waterway. Select one with a smooth section that seems similar in texture to a commercial sharpening stone. Wet the stone and sharpen your knife with small, circular strokes. Apply equal strokes to each side of the blade to even out the grind. For a 4-inch blade, I usually execute 30 circles on each side. Try to match the edge angle of your knife as best as you can, and rinse your stone often to keep its surface porous. This helps hone the steel. Perform several rounds of sharpening. Once you feel you’ve sharpened enough, examine the blade, remove burrs, and polish the edge by stropping the blade against a leather belt or log (or even your pants, if you’re careful). Test the edge with a small carving or slicing task. Repeat the sharpening and stropping process until you’re satisfied. —T.M.
Tip No. 17 | Vocab Lesson: Char Cloth (n.)
Char cloth is a swatch of natural fabric (cotton or linen) that’s slowly burned for easy fire starting in the future. Bake cloth scraps in a metal box in the campfire for a few minutes, then let cool in the sealed box. Test it—it should ignite easily with a spark. Char cloth is great for flint and steel or for making fire with a magnifying lens. —T.M.
Tip No. 18 | Hack: Bite Some Bark
An old remedy, pine gum salve draws infection, splinters, and other nasties from your skin. Pure pine pitch right off the tree will have a similar effect, but it’s best mixed with beeswax, tallow (from sheep or bear), and a touch of goldenseal (Hydrastis canadensis) powder. These ingredients can be hard to come by in the backcountry, so make your salve beforehand and carry some with you. In desperate (and salve-less) circumstances, simply collect a finger-full of sticky pitch from the nearest pine tree and smear it thoroughly over the wound to protect it. —A.V.B.
Tip No. 19 | Hack: Jump Start a Fire
You’ll need: A paper-lined foil gum wrapper, one D battery, dry tinder
- Fold wrapper in half lengthwise.
- Tear a small triangle from the middle of the crease, leaving just ¹⁄16-inch of wrapper on either side. (If you accidentally tear the wrapper, you can still arrange the two sides so they touch.)
- Touch the positive and negative battery terminals with the wrapper, squeezing it for good contact. You should see an orange glow (a spark, or even a flame) at the thinnest part of the foil bridge.
- Hold the tinder near the bridge before making contact so you don’t miss the flame.
—T.M.
Tip no. 20 | Skill: Learn These Wet-Weather Fire Tricks
- Stick with the sticky stuff. Needle-bearing trees are my first stop in wet weather because they usually contain sticky sap (pitch) in their wood. Pitch is generally very flammable. Select dead twigs underneath the protective shelter of pines and firs.
- Strip it all off. Bark is a protective layer that helps shield trees from wildfire, so most bark isn’t especially flammable on its own. Tear, carve, or peel wet bark from sticks and kindling. There’s often dry wood just below the surface that will easily catch a spark.
- Split the wood. Hardwood kindling that’s cut in half lengthwise will expose the drier inner wood and burn better than wood that isn’t split. The lower mass of these “half” sticks will also speed ignition in tricky situations.
- Shape it up. A flat fire lay dooms many flame-coaxing attempts from the start. Build a 1-foot-tall cone of small twigs, and stay away from low-lying configurations. This tall tipi shape allows heat to rise more efficiently, drying out sticks and setting them aflame.
—T.M.
Tip No. 21 | Hack: Bite Some Bark
If you’re starving, look for a pine or birch tree. The innermost bark, or cambium, is a source of food for the super-hungry. It can be chewed right off the tree, toasted over a fire, fried and eaten like potato chips, dried and ground for baking and stews, or boiled for broth. Most tree species can supply edible inner bark to the painfully hungry, though some varieties are toxic (like yew). Know before you chow. —A.V.B.
Tip No. 22 | Hack: Extend Fuel Life
If you have liquid fuel but no regulator (or a broken one) to pressurize it, you’re not out of luck. Pour the fuel into an old drink or food can, then add dirt. It will absorb fuel, slow evaporation, and make the fuel burn up to 60 percent longer than the fuel alone. —C.A.
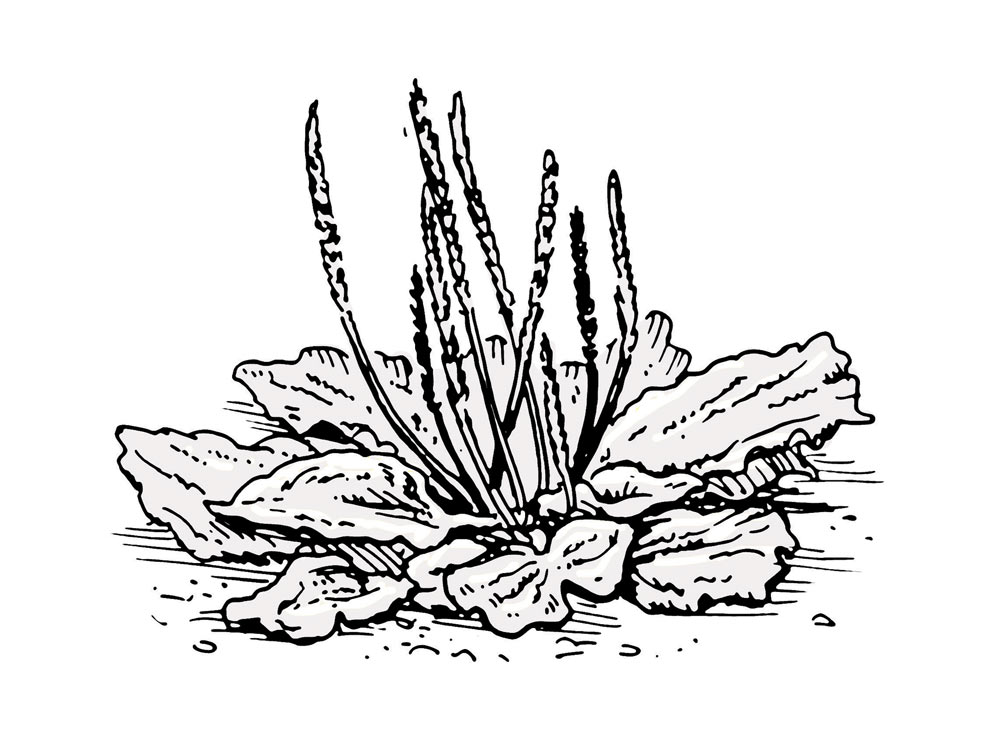
Tip No. 23 | Skill: Put Plantains to Work
The weed plantain (Plantago major) is a common low-growing plant found in lawns and fields worldwide. Identify it by its smooth-edged, simple leaves. Torn leaves often reveal stringy fibers inside the heavy parallel veins. Ripped leaves give off an astringent, cabbage-like odor. Use the young leaves in salads, or boil for 10 to 15 minutes. The white flowers grow greenish seeds that are edible raw or cooked. Crush leaves into a poultice to relieve pain from stings and venomous bites. —T.M.

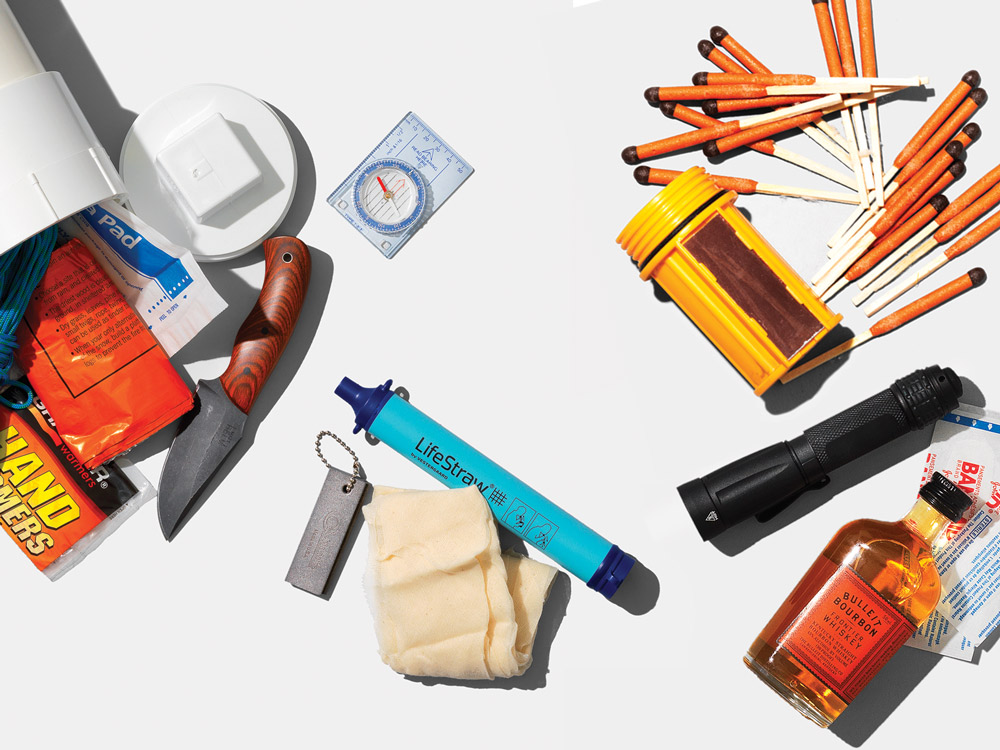
Tip No. 24 | Gear: Bare-Minimum Survival Pack
- Carry these items at all times:
- Large plastic survival bag for shelter and other hacks. Look for ones that fold to the size of a deck of cards to stash in a pocket.
- Tampons for tinder, still in plastic. Store them with matches.
- Survival knife with a carbon-steel blade at least 4 inches long and ¹⁄10-inch thick.
- Tub of stormproof matches, wrapped in bike-tire tube—it’s waterproof and burns well in any conditions.
- Whetstone for sharpening and blade repair.
- Waterproof notebook and writing tool to draw maps, leave messages, etc.
- Fire steel to strike a good spark.
- Compass, tied with paracord to a good
- signal whistle.
—C.A.
Tip No. 25 | Gear: Pack These Multi-Use Items
- 550 paracord: Carry a minimum of 20 feet with you in the backcountry, but the more you’ve got, the better. String a bow for friction fires, build snares, bind a splint, hang meat, and stretch a tarp or otherwise construct shelter. Separate the small inner strands and use them for building traps, sewing, or fishing. The possibilities are nearly endless.
- Contractor-grade trash bags: One of the cheapest, least sexy, and most useful survival items ever. Carry two or more. Use as an emergency poncho, to submerge meat on a hot day, or to keep gear dry. Fill with air and tie off for flotation, fill with duff for an emergency bivy sack, and use as a ground cloth under your sleeping pad.
- Steel canteen: This classic container can do all sorts of things a plastic water bottle can never hope to accomplish. Boil water, cook food, simmer tea—you get the picture.
—A.V.B.
Tip No. 26 | Vocab Lesson: Spile (n.)
A small wooden or metal spout for tapping the sap from a tree. Drill a hole in the trunk (sugar maples are best) and hammer in the spile. Carry a spile and a hand drill in late winter to draw up to one gallon of safe drinking water each day from one tap. —T.M.
First Aid Afield
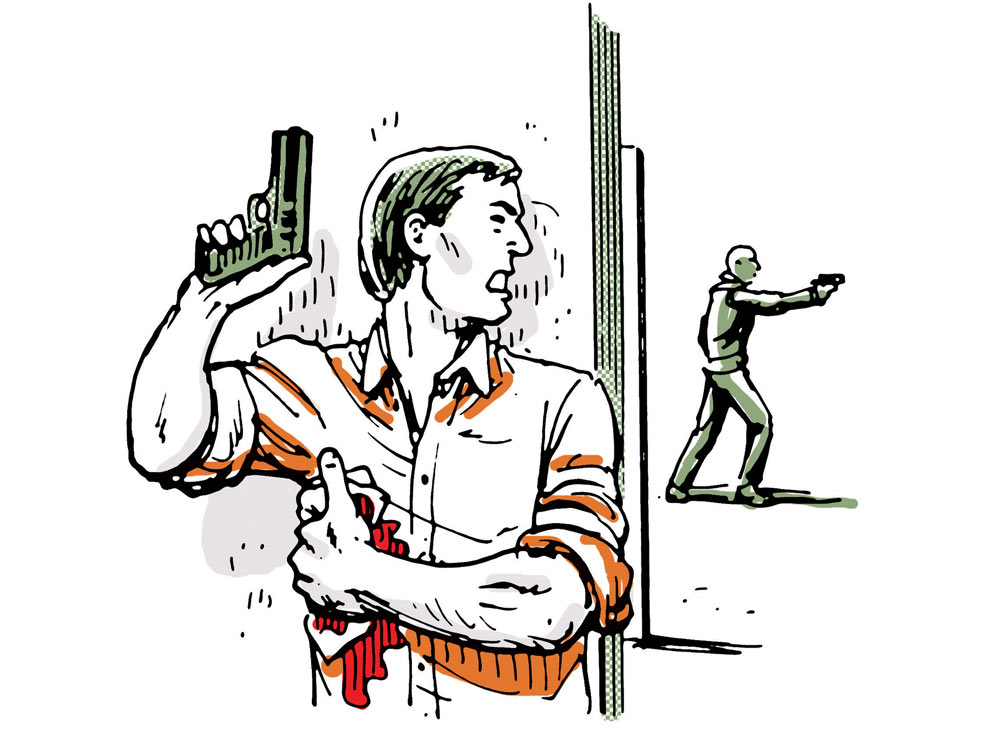
Tip No. 27: Treat a Gunshot Wound
Focus on controlling blood loss. If a limb is hit, apply direct pressure or a tourniquet between the wound and the heart. Use the tourniquet if you’re treating yourself. Apply direct pressure to a torso wound. Use homeostatic clotting dressings if available. —C.A.
Tip no. 28: Suture a Wound
Proper sutures are made from a non-absorbent material and can be bought for med kits. Don’t use a needle and cotton thread. This will only create an absorbent route for bacteria and dirt to track straight to the wound. If you don’t have sutures, use small safety pins or fishhooks. Sterilize them by boiling or with alcohol. Close wounds within 24 hours, or else the wound edges will begin to dry. Begin stitching at the wound’s center. Tie each stitch separately—do not use one continuous thread. Place the next stitches halfway between the remaining gaps on either side. Continue until all gaps are closed. —C.A.
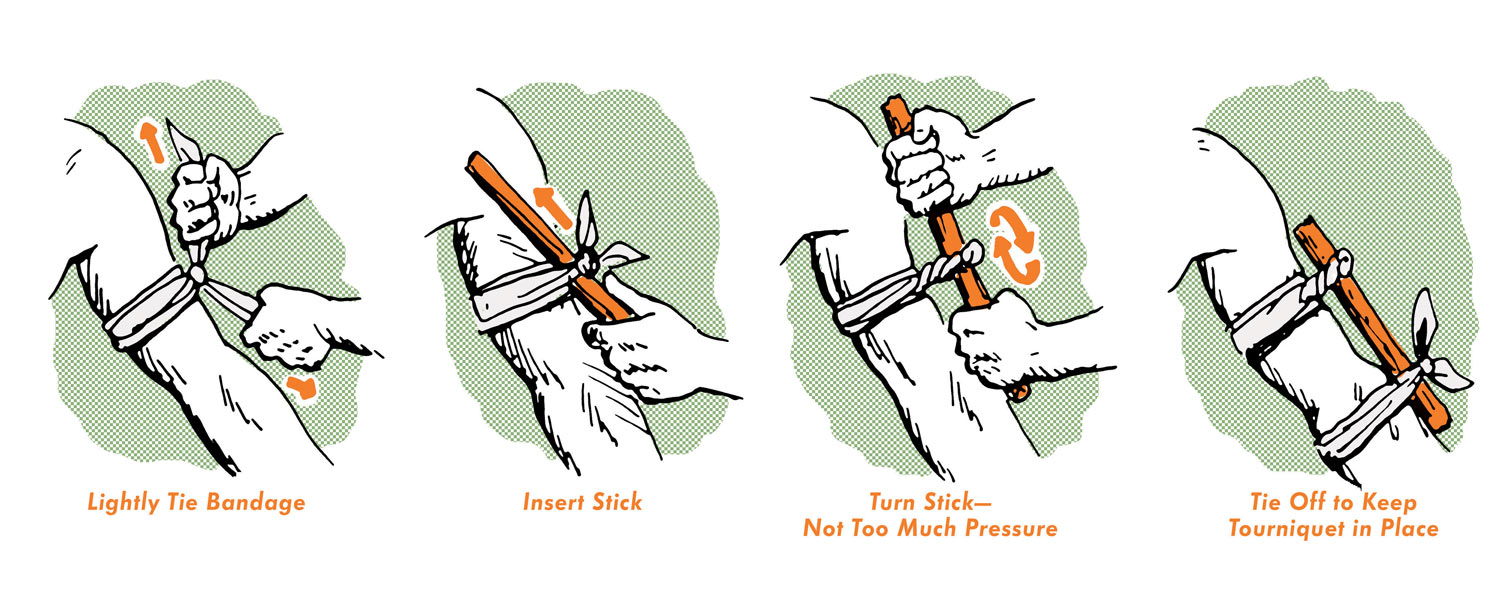
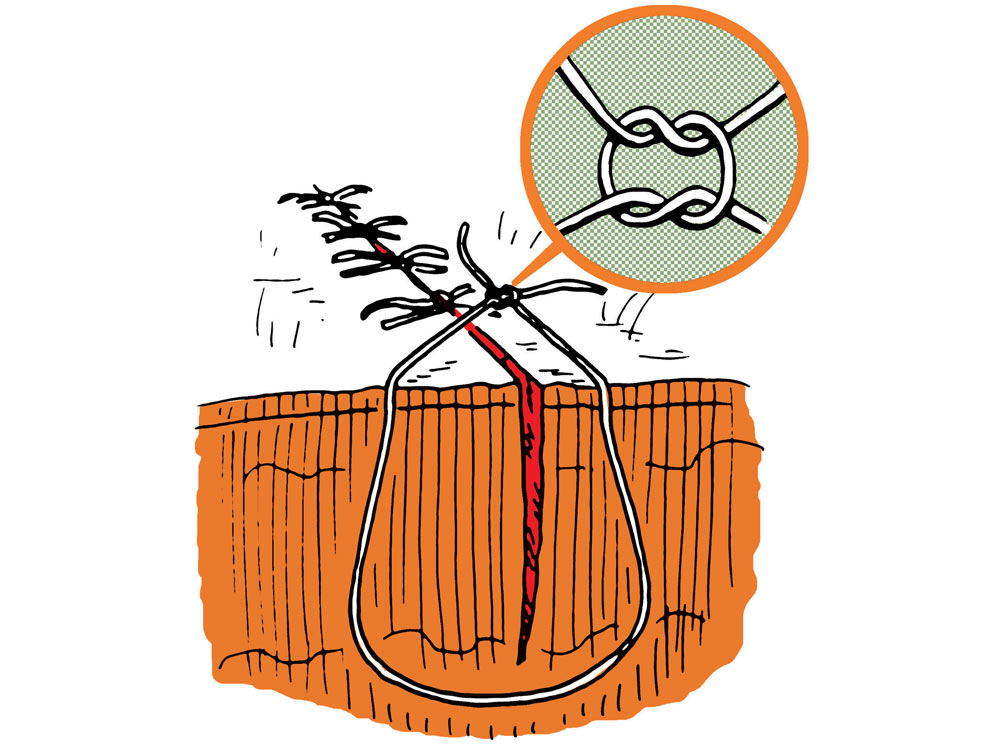
Tip No. 29: Improvise a Tourniquet
Use one when direct pressure isn’t working or a wound is squirting blood.
- Wrap a rope or belt as high up as possible on the limb.
- Insert a stick as a windlass.
- Twist hard enough to stop blood flow and eliminate the pulse on the limb—it will be painful.
- Secure the windlass, write down the time, and seek medical help.
Only remove a tourniquet if rescue is days away. If you have controlled the bleeding, release it after one hour at a rate of one turn every five minutes.—T.M.
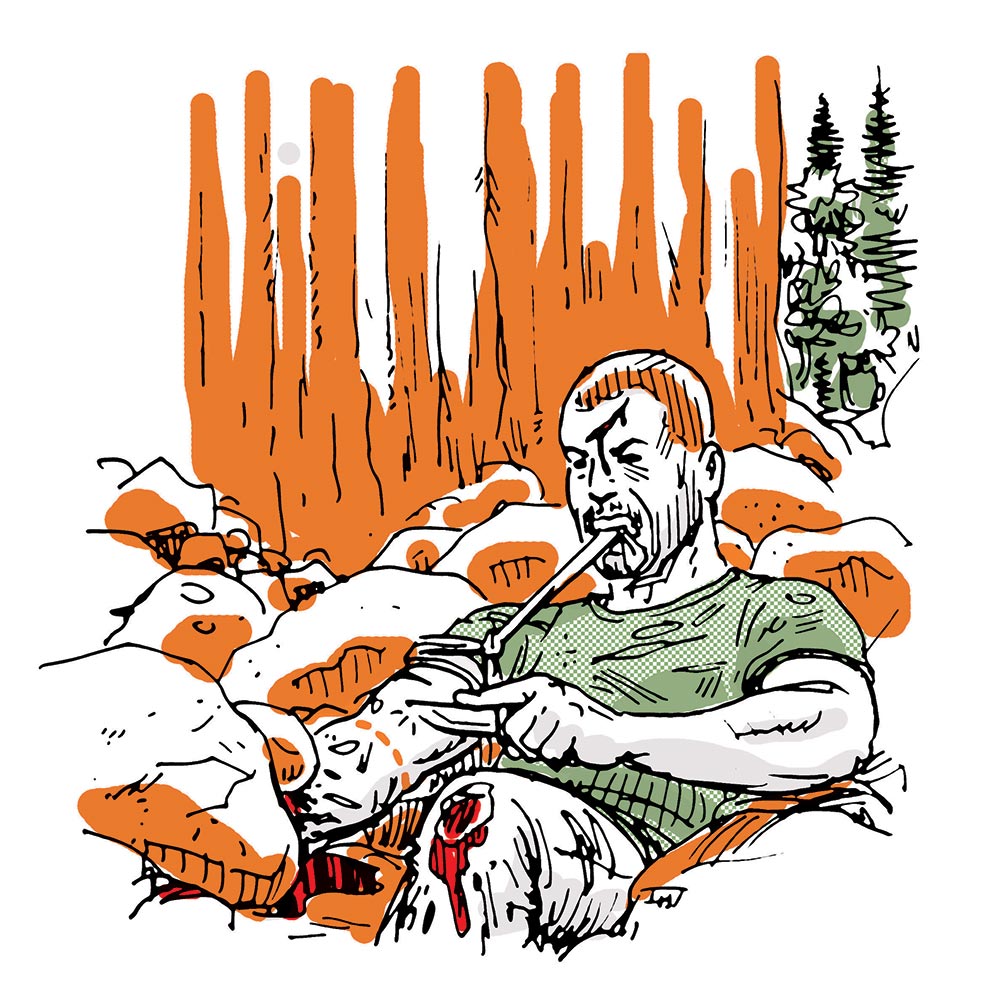
Tip No. 30: Amputate Your Own Limb
If there is a chance you could be found, hold off on this procedure. But if your arm is trapped and rising water will drown you, for example, then this might be your only option. Apply a tourniquet to cut blood flow between your heart and the cut you’ll make. Sterilize a knife blade as best as possible. Reduce the effects of shock by breathing deeply to oxygenate your body and work up some determination—and then tackle it. Ideally, sever your limb at the joint rather than midway along a bone. Cut around the joint as quickly as possible. This procedure includes major risks of hemorrhage and infection. —C.A.
Tip No. 31 | Skill: Escape a Horse Wreck
If your horse starts to tip, get off and away—fast. In the event the worst does occur—you’re trapped under him, and he’s hurt and can’t get up—holler for help. If none is available, you’ll have to shoot your horse. Then use your knife to begin breaking him down, working until you’re free. If you’re hurt badly, you’ll have to sleep in his hide and eat his meat until you can travel. Say goodbye to what’s left of your old pard’ and hobble to civilization. If this sounds far-fetched, I swear I know an old man who did just this. He survived with two broken legs. —A.V.B.
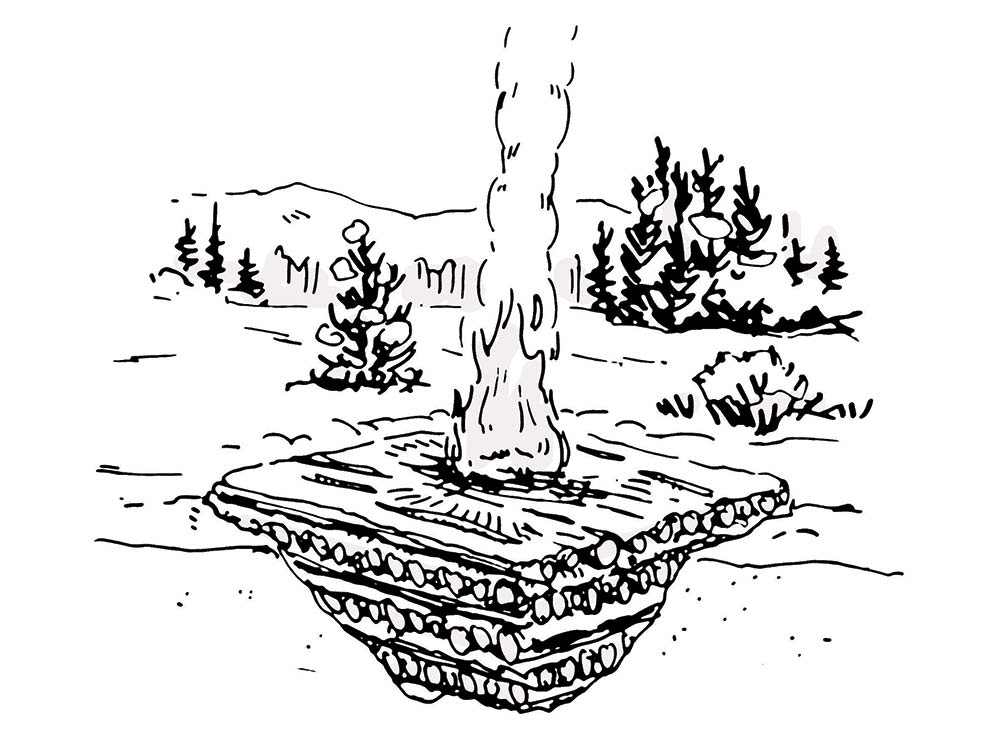
Tip No. 32 | Skill: Build a Fire in the Snow
Radiated heat from a fire will melt the snow it’s sitting on. Make a wooden raft to insulate the fire and keep it raised out of any melt water. This is sufficient for a one-off fire if you want to, say, boil water. If you need a long-term fire for a shelter site, more preparation is necessary. If you can, dig down to the ground. If the snow is so deep as to make this impractical, you’ll need to dig a pit at least 3 yards in diameter. Then dig the foundation 1 foot deep. Add a layer of sticks, followed by a compressed layer of snow 1 inch thick, a layer of sticks perpendicular to the first, a layer of snow, and so on. Stack this sandwich until you have at least six layers. Build your fire on that stack. Keep the fire small for better fuel efficiency. —C.A.
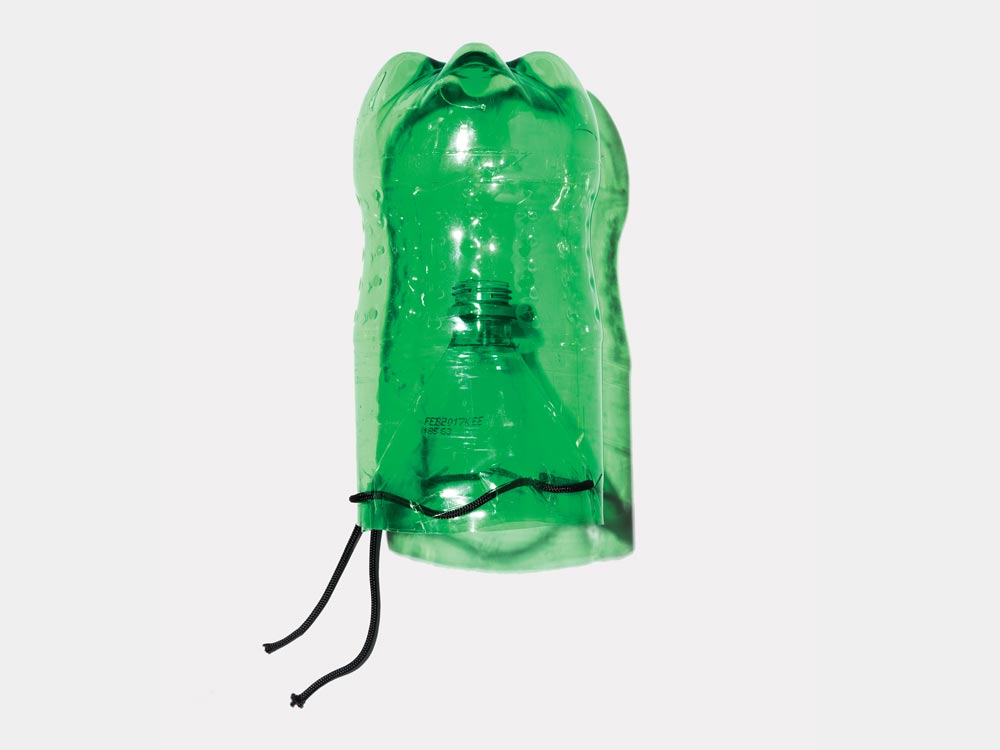
Tip No. 33 | Project: Put Together a Minnow Trap
You’ll need: 2-liter soda bottle, string or cord, cutting tool, meaty bait What it is: This is a handy trap for catching minnows, other small fish, and crayfish. You can use these bite-sized creatures as bait to catch larger fish and animals, or eat what you trap in the bottle as survival food.
- Remove any product labels and cut around the “shoulders” of the bottle.
- Unscrew the cap and insert the funnel-shaped piece inside the bottle.
- Poke a few holes along the seam and use paracord, string, or fishing line to stitch these separate plastic pieces together.
- Add a few small holes all over the bottle to allow water flow.
- Deposit some roadkill, fish guts, or crushed insects inside the trap.
- Submerge and tie off with a length of string.
- Wait for your trap to fill up, untie the funnel to collect your harvest, then reassemble and reuse
—T.M.
Tip No. 34 | Hack: Drink From a Barrel
A barrel cactus, that is. If you find yourself dehydrated in the desert and there’s a plump barrel cactus nearby, don’t despair—a drink is just one decapitated cactus away. Carefully cut the top off the cactus, carve or scoop some of the moist pulp from inside, and squeeze out the liquid. Use a clean rag or shirt to help strain the pulp. The result won’t taste good, but it’ll keep you alive. Too much can make you sick, though, so drink sparingly. —A.V.B.
Tip No. 35 | Hack: Spin Sinew into String
Remove silverskin from backstraps, or cut out the tendon that runs from above the hoof to the knee on ungulates. Scrape meat or fat, then dry. Next, peel strands (pound tendons with a rock first) and rehydrate (chewing works). Twist into cordage and let dry again. —A.V.B.
Tip No. 36 | Hack: Turn Trash to Treasure
Clean out a glass bottle or metal can to sterilize water. Place containers in the ashes beside a fire. Once the bubbles start to jump, let water boil for at least 5 minutes to disinfect it completely. Don’t suspend glass over the fire—intense heat can break it. —T.M.
Tip No. 37 | Vocab Lesson: Spark Rod (n.)
Also known as ferrocerium rods, spark rods are a man-made metallic material that produce hot sparks in excess of 3,000°F when scraped against a rough surface or sharp edge. They are made from cerium, lanthanum, and iron, with small amounts of praseodymium, neodymium, and magnesium. All chemistry aside: They make a great backup fire starter. —T.M.
Tip No. 38 | Skill: Make Saltwater Potable
The only way you can turn saltwater into drinking water is by distillation. This means using a solar still or boiling water and diverting steam to condense in a clean container. Distilling saltwater is tough in the field: The result will be brackish water, but it is drinkable and rehydrating. Boil saltwater in a soda can. The small opening will act like a kettle spout and concentrate steam. Rig a cold, smooth surface (like scrap metal) at an angle above the jet. Steam will condense as water droplets. Place a cup underneath to catch the drinkable drips. —C.A.
Tip No. 39 | Hack: Brew Glue
Handy for repair work in the backcountry, pine-pitch glue will fasten a point on an arrow, seal a punctured sleeping pad, or glue a handle on a stone knife. 1. Gather dried pitch from pine trees. Melt in a tin can over low heat. Do not let it boil—that will make it brittle. 2. Collect dried deer or elk scat and cold campfire charcoal. Crush and grind both to a fine powder. 3. Stir 2 parts pitch, 1 part powdered scat, and 1 part ground charcoal together, keeping the pitch hot until it’s thoroughly mixed. Remove from heat. To use, reheat and apply. —A.V.B.
Tip No. 40 | Project: Build a Quick Bow
If you’re in a desperate situation and need food, a stick bow will allow you to hunt small game and fish. Find a green stick about 6 feet long, and as big around as your thumb at the skinny end (about ¾ inch). Peel the stick and cut a notch an inch from each end. Find several straight sticks about 32 inches long and as big around as your little finger (about ½ inch) for arrows. Wild rose shoots, dogwood, and even poplar or willow branches work well. Peel these, cut a notch in the skinny end, and sharpen the thick end into a deadly point. Using sinew (see No. 35) or the inner strands of paracord, lash feathers or tough leaves just ahead of the nock for fletching. String the bow with paracord or sinew. Then unstring it and keep it that way. Only string it when a shot is imminent, or else your bow will lose its spring. Use your bow to hunt rabbits, squirrels, and fish, but don’t try to take down anything bigger.—A.V.B.
Tip No. 41 | Skill: Signal for Help Without Tech
- Signal fires: Daytime fires are effective for aerial searchers. A hot fire will create a visible heat wave. Burning green leaves and damp grass produces visible smoke. Night fires must burn brightly—gather enough fuel to maintain them.
- Whistle: Its shrill tones will carry well on the wind, and farther than voices. Three long blasts repeated every minute should attract attention.
- Ground-to-air signal: Create a large, high-contrast cross with sticks and logs. The bigger, the better. Each spar should ideally be 30 feet long and 6 feet wide. —C.A.
Tip No. 42 | Hack: Get Hooked
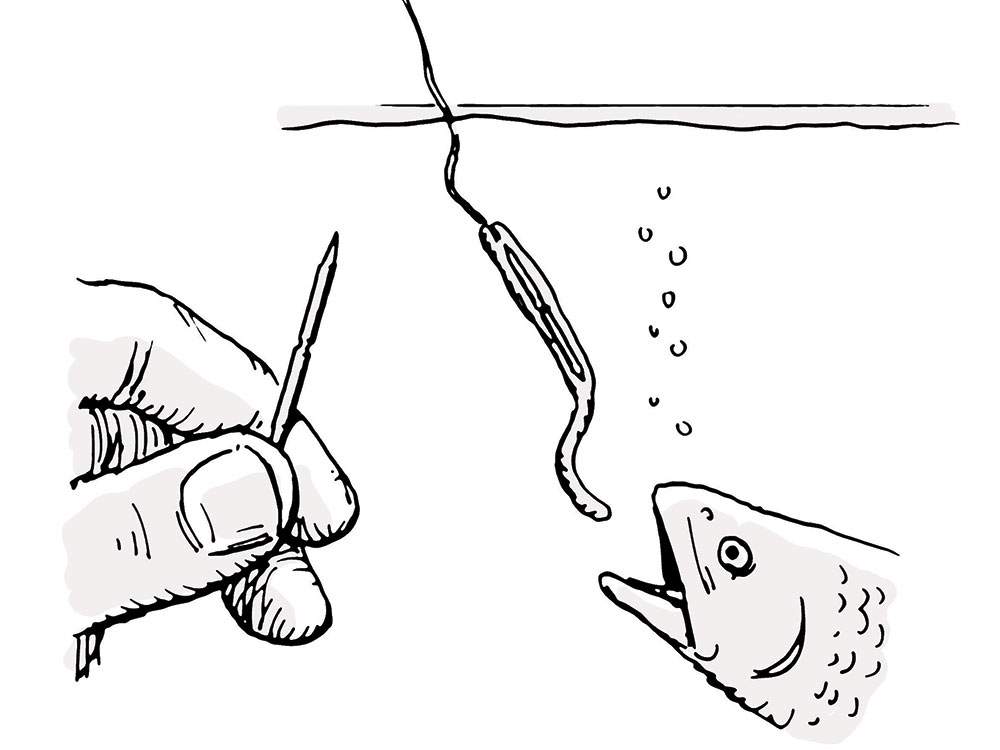
You’re hungry and there are fish in the creek. No hook? No problem. Whittle a strong piece of wood about 1 inch long and ¹⁄₈ inch thick, with sharp ends. (Bone and antler will work, but they’re harder to shape.) Carve a shallow groove around the middle and tie your line around this. If you don’t have fishing line, substitute dental floss, suture material from your med kit, or something similar. Thread on a worm and catch supper. —A.V.B.
Tip No. 43 | Skill: Build a Duff Bed
Find a dry, sheltered place to stay the night, ideally under an overhang or deadfall. Frame your bed with rocks or logs (about 18 inches taller and wider than you, and 18 inches deep). Plug cracks with moss, leaves, or bark. Gather dry leaves and other duff (oak leaves are ideal). Pile them into the bed until it bulges. Nestle into the leaves and keep a thick layer on the ground. Cover everything with a tarp or poncho. Your body heat will warm your cocoon.—A.V.B.
Tip No. 44 | Hack: Repurpose an Arrow
Fire can be hard to start, especially in a humid or high-altitude environment. Make a blow tube from a ruined aluminum arrow to aid your effort. Remove the fletching, break off each end, clean it up with your multi-tool, point, and blow. Carbon works, too, but you’ll need to heat the point and the insert before you can pull them out. Remove the nock and you’re in business. Just blow gently to coax a flame. —A.V.B.
Tip No. 45 | Hack: Avoid Piss-Poor Judgement
No matter what you hear on TV, don’t drink your own urine. It’s a waste product, and your body is trying to get rid of it. Let it. A properly hydrated human produces urine that’s 95 percent water. But as dehydration sets in, waste in urine becomes more concentrated. To salvage the water, urinate in a cat hole beside your solar still to add more moisture to the system. The liquid will soak into the ground and vaporize into the still hole. —C.A.
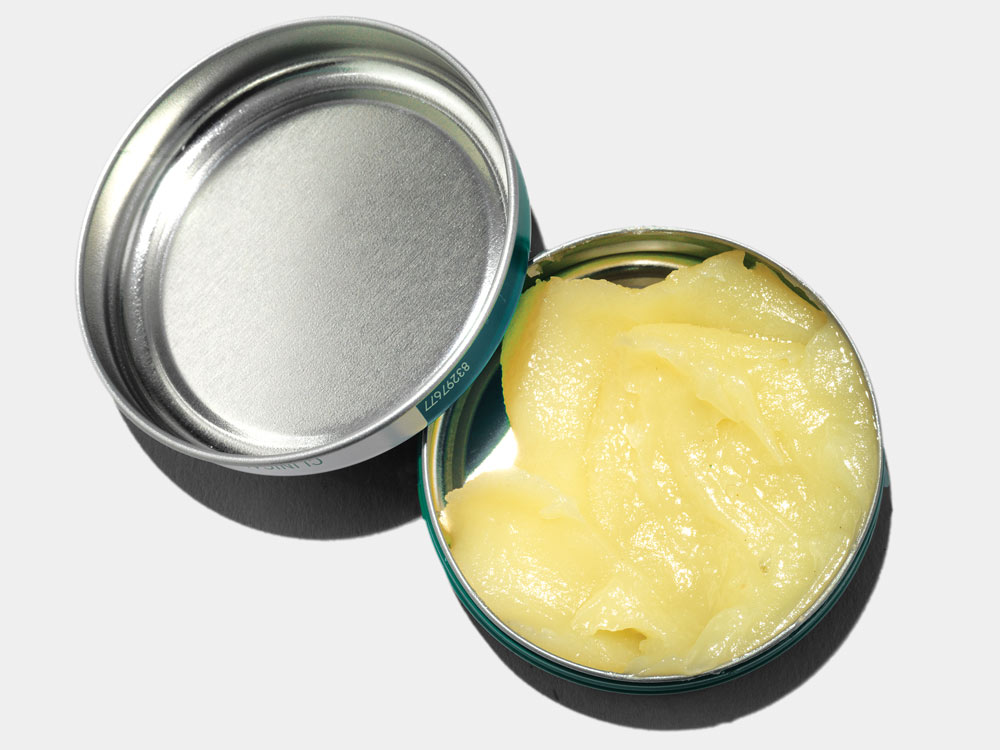
Tip No. 46 | Project: Make Use of Bear Fat
One of the most useful items for long-term survival is oil. The best natural source for that in most backcountry situations is bear tallow. Collect the fat from any bear you kill and render it to a clear liquid over low heat. Use it to oil your rifle, waterproof your boots, and fry your food, among other things. —A.V.B.