We may earn revenue from the products available on this page and participate in affiliate programs. Learn More ›
When Andy Pipkin decided to touch up the minor rust spots on his trusty deer rifle, he went all out with some spray paint and a few dollars’ worth of supplies, and created a camouflage pattern from the crown to the stock.
“I found a Web site that showed how one guy had done it to his gun, but it wasn’t as detailed as I wanted mine to be,” says Pipkin, who lives in Knoxville, Tenn. “So I improvised a little bit.”
Pipkin’s simple steps worked for me with a 20-gauge Stoeger Coach Gun. I’m using it for turkey hunting this season and plan to use it for squirrel hunting. My preferred gobbler shooting range is about 20 yards. That, combined with the reliable Hevi-Shot loads available, makes the Coach Gun a reliable turkey gun. Plus it’s lighter to carry than my 12-gauge, which still sees springtime action. The 20-gauge also will be used by my young son and daughter as they begin hunting and target shooting.
From start to finish, the project took about three hours. That includes preparation and drying time for the primer and coats of paint. The steps should apply to any shotgun, rifle or bow and the results will last for years, with minor touch-ups from time to time to take care of dings and scratches.
What You Need >>
- Acetone or rubbing alcohol
- Rags and cotton swabs
- Steel wool
- Masking tape
- Rubber gloves
- Gray primer
- Flat spray paint-khaki, olive drab, forest green and black
- Total cost approx. $30
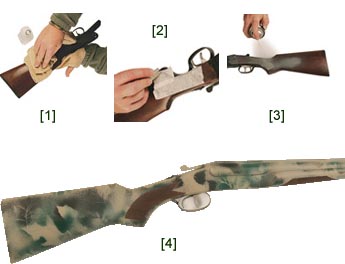
[pagebreak] **1. **Make sure the gun is unloaded; then clean the barrel, forearm and stock with acetone or rubbing alcohol and a clean cotton rag. Lightly rub the stock, forearm and metal parts with a steel wool pad. This will help the primer adhere better. The same can be done with a synthetic stock. It’s a good idea to wear rubber gloves to keep oils from your hands off the gun surfaces.
2. Reassemble the shotgun and again clean it thoroughly with alcohol or acetone. Use masking tape to cover any areas you don’t want to paint. I covered the triggers and checkering on the forearm and stock. If you have a scope on the gun, remove it or cover the lenses well with tape. Plug or cover the ends of the barrels.
3. If you can, tie a string to the trigger guard and hang the gun from a tree limb so you don’t have to handle the gun as you paint it. Thoroughly apply a coat of dark gray primer to serve as a good base. If the outer layers of paint get scratched, the dark primer will show through instead of wood or metal. Begin painting with flat spray paint, starting with a khaki layer over the primer. Use small limbs, leaves and cedar or pine boughs to build a pattern. Start in close with the spray can for sharp lines, working with the khaki and then adding black or forest green in layers of varying darkness.
4. Spraying from a distance creates shadowing and splatter effects. If you have an area that’s too dark or if one color prevails, hit it up close with a lighter shade over a leaf or twig to add detail. When you finish a layer of a specific color, allow 5 to 10 minutes for it to dry thoroughly before beginning the next layer.
After the paint has dried, remove the masking tape and use a cotton swab dipped in acetone or alcohol to remove any wayward paint. Don’t use the acetone to clean the gun again, however, because the pattern might smudge. Allow the gun to air-dry for a couple of days. To clean dirt or oils after the gun has been painted, use a soft cloth and a dab of dish-washing liquid with warm water.