We may earn revenue from the products available on this page and participate in affiliate programs. Learn More ›
Sooner or later, everyone who tinkers with guns is going to try his hand at refinishing a stock. “Hand” is the operative word here, because there’s nothing quite like a hand-rubbed oil finish to bring out the natural beauty of wood.
Before beginning any such work on a vintage gun, however, you should determine whether its collector’s value will be reduced if its “as-original” state is altered. Even with the best gun stock finish at your disposal, please keep in mind the first rule of refinishing: “If in doubt, don’t.”
On the other hand, there are those of us who want only to restore some of the look of newness to a favorite old hunting companion. The rifle shown at right-a Winchester Model 70 of pre-World War II vintage-falls into the collectible category, but to me it is a fine hunting rifle with more decades of service to offer. Moisture seeping under the buttplate had caused the original finish to peel. Also, oils from the action had seeped into the wood around the tang area, causing darkening and weakening of the wood. Here’s what I did to restore it.
1. Remove the Old Finish
Make sure the gun is unloaded and remove the barreled action from the stock. Spray the stock with finish remover to get rid of the old finish. Spray-ons are powerful stuff, however, so use rubber gloves and a face mask, and work in a well-ventilated area.
2. Scrub Away varnish
After the original finish is softened with finish remover, it’s easily scrubbed away with a varnish-removing scrub pad. The scrub pads work better than steel wool, which tends to snag and rip the grain and leave embedded particles that can cause problems later in the refinishing process.
3. Brush out Grease
The finish remover also tends to loosen some layers of grease, grime and old finish in the checkering. Scrub this away with a stiff brush-a toothbrush works well for this. Be sure to scrub in the direction of the checkering grooves.
4. Heat-Treat Stains
Gun-oil stains around the tang can be raised with a hair dryer. The heated oil comes to the surface and can be wiped away, resulting in considerable lightening and drying of the previously oil-darkened wood.
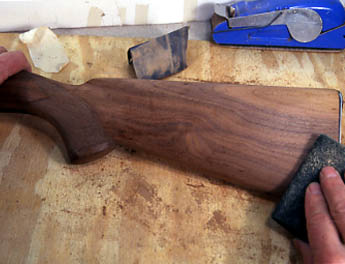
5. Sand the Raw Stock
With the old finish removed and the stock dry, start lightly sanding the stock and grip using a sanding block. Do not sand the checkering. Cover the checkering with tape to protect it from accidental overruns.
Use a large, lightly padded sanding block for smooth, full-length strokes, maintaining straight and flat surfaces. The buttplate must remain in place during the sanding operation or some rounding of the wood at the butt edges will occur-a sure sign of amateur refinishing.
You need not worry about sanding the bluing off of steel buttplates, as that can be repaired later with touch-up blue. Likewise, leave plastic buttplates in position while sanding.
6. Burnish and Dust
After sanding, swipe the stock with a fine-mesh scrubbing pad. This removes sanding dust from the grain and also has a burnishing effect on the wood, which will better prepare it for final finishing. It’s important to thoroughly wipe down the entire stock with a dry cloth to remove any remaining dust before beginning the next step.
7. Apply the Filler
Apply a thick layer of French Red to the stock. French Red is an old favorite with stock makers because it is a good grain filler that also duplicates the rich, walnut-hued stains typically used by gunmakers. I prefer rubbing it on by hand to force the filler deeper into the grain. Be sure to keep the filler out of the checkering pattern.
8. Rub off Excess filler
Wait for the French Red to dry before using a scrub pad to wipe away the excess. It is very important when using the scrub pad to work it across the grain rather than with the grain. Rubbing in the direction of the grain pulls the filler out of the pores in the wood, while scrubbing across the grain will insert the French Red more deeply into the pores. If necessary, continue to repeat the process until the grain is filled and the surface of the wood is completely smooth and even.
9. Add the New Finish
Spray on an even first coat of Tru-Oil and then rub it in with your fingers. By using Tru-Oil, a modern linseed-oil-type finish, I am bending one of the main rules of restoration, which would have me reapply a lacquer-like varnish similar to the one applied at the Winchester factory over a half century ago. With a modern stock finish such as Tru-Oil, however, you can create an appearance quite similar to the original finish. Plus, it’s much more durable and waterproof. When refinishing a stock, apply a total of three coats. Let each coat dry and then sand the stock very lightly with extra-fine sandpaper before applying the next layer.
10. Spare the Checkering
Apply Tru-Oil sparingly to the checkering. If the original checkering is in even moderately good condition it’s best left in its original state, so brush in only a light coating of protective finish. In my case, the original checkering was so badly worn that moderate restoration was needed. The trick to restoring original checkering is to follow the original lines with a checkering tool. Hand checkering, however, is an acquired skill. If you determine that the checkering is heavily worn, you might be wise to have this particular operation performed by an expert stock maker or gunsmith. Professionally restored checkering will help preserve the beauty of the stock.
11. Just Like new
Here is my M-70 stock in its restored glory, ready for another half century of service. The steel buttplate was restored with touch-up blue and the stock looks like new-even a little bit better, thanks to a stock finish such as Tru-Oil, which keeps the wood weather-resistant and looking good for another six decades.