We may earn revenue from the products available on this page and participate in affiliate programs. Learn More ›
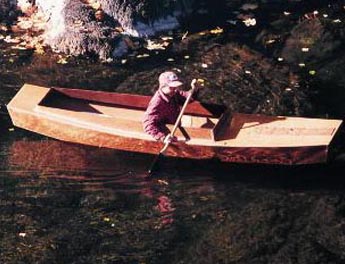
Older duck hunters might recognize this boat. The design is often called a scullboat or sneakboat, and the hull is very similar to the all-purpose bateau. This plywood version is just under 12 feet long and 3 feet wide, and weighs 50 pounds.
The hull can be built completely open or decked for extra weather protection (as shown). The boat can be rowed, sculled, poled or paddled and the smallest of electric or gas motors will easily push the lightweight hull. This boat is best used in backwaters and marshes. It’s not sizable enough to take out on big, open water.
You can adjust the boat’s dimensions to suit your tastes. The plywood panels are joined with simple butt joints reinforced with butt blocks. Epoxy is used to seal all surfaces of the plywood; seams of epoxy and fiberglass tape hold the hull together (just like in the Maxi-Mac, Do-It-Yourself, February/March 2002). Here’s how.
1. Prepping the Hull
Cut out the hull pieces-the two bottom sections and the four side sections (see diagram)-and seal them with two coats of epoxy, using a paintbrush. Smooth the first coating of epoxy with a scraper and then apply the second coat. Link the two hull bottom sections and the left and right hull-side sections by epoxying a butt block over the seam where the sections meet. Be sure to place the block on the inside surface. [pagebreak] 2. Hull Joining
Join the hull bottom, two sides, transom and bow panels together by drilling a series of matching 1/8-inch holes six inches apart along the panel edges; then stitch components together with wire or plastic ties (see inset). With the hull pieces stitched into place, forming the basic shape of the boat, place small dabs of thickened epoxy along all interior seams to “tack” the hull sections together.
When the epoxy dabs cure, remove the ties and apply a thick strip of epoxy along all the inside hull seams, creating a “fillet” that you then smooth into a concave layer with a round-tipped putty knife. When the fillets cure, flip the boat over and apply evenly strips of four-inch-wide fiberglass tape over all the exterior seams (one or two layers only).
[pagebreak] 3. Installing the Decks
Attach a 3/4- by 11/4-inch inwale strip from end to end along the top inside edges of the hull sides. Apply epoxy to both surfaces and clamp the parts until the epoxy sets. You may prefer to leave the hull open, without decking, and thus a matching outwale strip epoxied on the outside top edge of the hull sides is necessary. If the hull is to be decked, then no outwale is required.
To install deck panels atop the hull use a block plane to cut a flat gluing surface atop the inwale. Cut the fore, aft and side deck panels (see first diagram) and trim each panel to fit the outline of the hull. Install the fore decking first and then the side-decking strips; trim the aft deck panel to fit. Apply epoxy to both the inwale and the undersurface of the deck panel and secure the panel in place with screws or weights until the epoxy cures.
A cockpit opening in the deck may be large, as shown, for two occupants, or small, for one person. Adjust the boat’s dimensions as you see fit.
Optional plywood coamings may also be installed around the cockpit opening (see photo, previous page) to provide more weather protection. To install a coaming, glue a 3/4- by 3/4-inch timber cleat under the deck and around the cockpit cutout (see diagram above), then fit and epoxy a 78- by 5-inch plywood coaming against the cleat lengthwise, and a 241/2- by 5-inch coaming crossways. Apply fiberglass tape to the top-side corners.
[pagebreak] 4. Setting the Keel
Cut out and seal a plywood keel with two coats of epoxy; drill a hole two inches in diameter in the aft end of the keel for a tie-down when cartopping the boat and also for a tether loop when dragging the hull (see first diagraam). Install the keel to the centerline of the hull bottom by applying beads of thickened epoxy to both sides of the keel and smoothing them into fillets.
[pagebreak] 5. Final Touches
The epoxy-sealed surface makes an ideal undercoat for paint or varnish. Abrade the epoxy surface with a dish scrubber and wash with soap and water, dry and apply a varnish or paint to suit. To protect the bottom of the boat, apply an epoxy/graphite mix, which provides a hard but slick, low-maintenance surface that will withstand dragging over rocks and parking lots. You can also build and add a simple seat in the cockpit.
**Contact: Detailed building plans, including a 40-page shop manual with a variety of boat options, are available for $26 from Paul Butler (Box 1917, Port Angeles, WA 98362; paul@ butlerprojects.com). **