Bowhunting for whitetail deer is the most accessible and thrilling big-game hunt in all of North America. A mature, rut-crazed whitetail buck that stomps and grunts his way into bow range on a crisp November morning is a true spectacle to behold. Executing a perfect archery shot on that old buck—drawing your bow undetected, holding for the ideal window, squeezing the release, seeing the arrow in flight, and hearing it hit home—is perhaps the purest moment in all of modern hunting.
If you want to get in on the action, you’ve got a lot to learn. Bowhunting for deer requires general woodsmanship and hunting knowledge, plus some specific skills and gear. In this guide, we cover everything you need to know about how to bow hunt deer, including:
- How to find places to bow hunt
- Understanding deer behavior and deer sign
- Basic bowhunting gear
- How to practice shooting a compound bow
- Bowhunting tips and tactics
- Shot placement and shot selection
- Blood trailing and recovering your deer
The good news is that there are a lot of deer out there (more than 30 million), and every state east of the Mississippi has a robust whitetail population. Many western states also have excellent bowhunting opportunities as well. Find our full forecast on the 2022 deer hunting season here. With the right knowledge and gear, you can embark on a lifetime of bowhunting adventures. If you’re already a deer hunter and interested in adding an archery season to your fall, just skip down to the section on basic bowhunting gear. Otherwise, here’s how to get started.
How to Find Places to Bow Hunt
A bowhunter’s job is to ambush a deer at close range and then make a clean, killing shot. That can seem intimidating when you consider the fact that whitetails frequent large forests, small woodlots, rolling farm fields, expansive marshes, and almost every other wild land in between. So where do you start?
Begin your search relatively close to home. As a new bowhunter you’re going to need to spend time in the woods to learn. So, you want your main bowhunting area to be a place you can visit often with an easy drive. From there, consider the following types of land.
Private Land
Scoring a small piece of private land is a dream scenario for a new bowhunter. Maybe you have a family member or close friend with some farm ground you could hunt. Or maybe a neighbor might let you hunt on the back 40 acres. Or maybe you know some veteran hunters who might give you access to their private ground for part of the season. You could even try your hand at landing a small, affordable hunting lease. In any case, private land is ideal for a new bowhunter because it helps you avoid the biggest challenge in public-land hunting: competing with other hunters.
Public Land
If you don’t have access to private land, use a mapping app like OnX or Huntstand to identify public hunting lands in your area. Common public lands that usually allow bowhunting for deer included:
- State forests
- State wildlife management areas
- State natural areas
- National forests
- National wildlife refuges
- Waterfowl production areas
- Scenic wild river areas
- Bureau of Land Management lands
There are also a variety of private land programs that provide public access for hunting. Those programs include:
- Walk-in areas
- Voluntary public access areas
- Logging company owned lands
- Conservation easements
- Managed forest lands
Always check your local regulations before making plans to hunt a piece of publicly accessibly land. Even within states, similar types of public hunting land can have different regulations.
Once you’ve identified the piece of land you like (either public or private), then it’s time to look closer using your mapping application. Take note of access points, farm fields, bodies of water, and general topography (hills, ridges, lowlands, etc.). Once you have a lay of the land, it’s time to put boots on the ground and do some scouting.
Understanding Deer Behavior and Sign
There are an infinite number of articles written about whitetail behavior, deer sign, and the rut. But at the most basic level, deer need to eat, drink, and find a safe place to bed every day. During the rut, they need to breed. Deer leave sign behind as they move through the woods and progress through the breeding season. Understanding deer behavior, deer sign, the rut and how hunting pressure impacts it all, will help you pinpoint the best places to hunt at any point throughout the season. The following basics will get you started.
Basic Deer Behavior
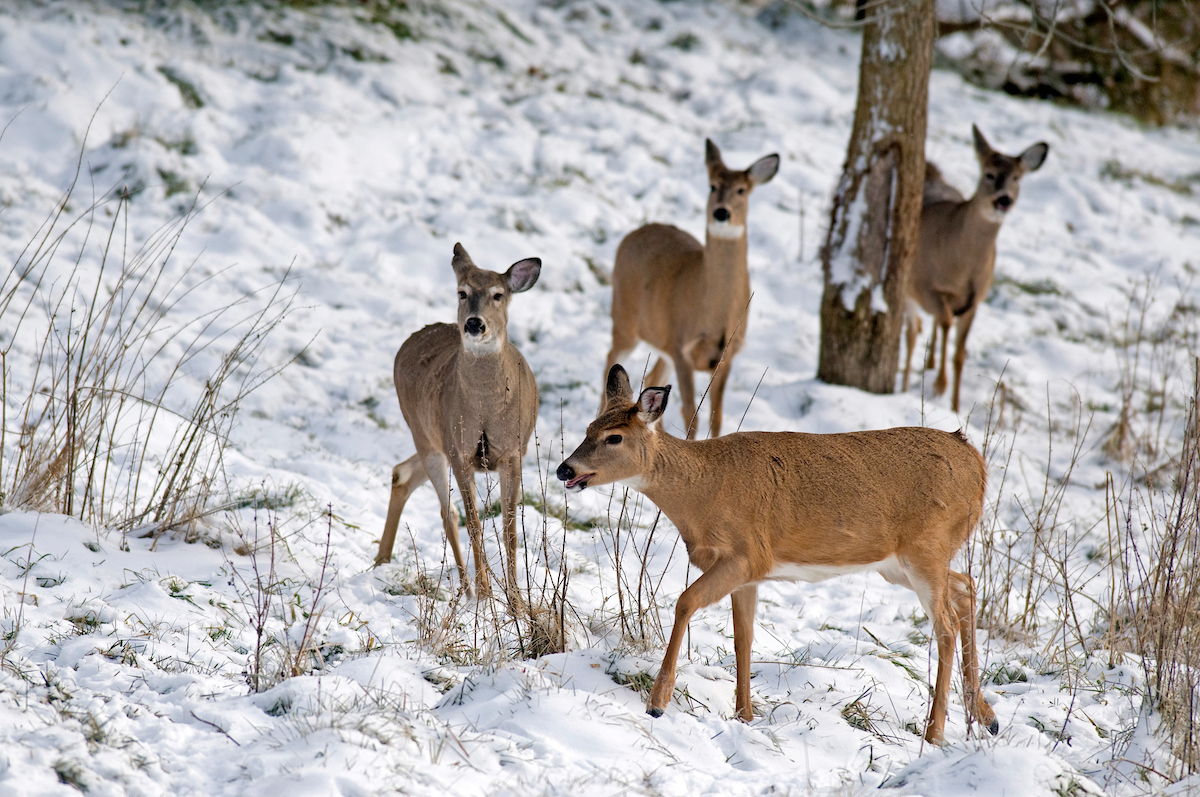
In general, deer are most active in the early morning, the late evening, and at night. During the middle of the day, deer bed down in areas where they won’t be bothered by predators. This could mean thickets, grassy patches of marsh, or remote wooded ridges. However, deer do feed throughout the day, usually just closer to cover.
By late afternoon, deer will typically stir from their bedding areas, and start to mill around looking for food and water. By evening or nighttime, they’ll head for major feeding areas like agricultural fields or oak flats where there are lots of acorns on the ground. By morning, deer will start to head back to the security of their bedding areas. This means that ideal places to ambush whitetails is on trails between feeding areas and bedding areas or on core feeding areas themselves. But remember, there are no hard-and-fast rules on deer behavior. Whitetails will do whatever they like, whenever they like.
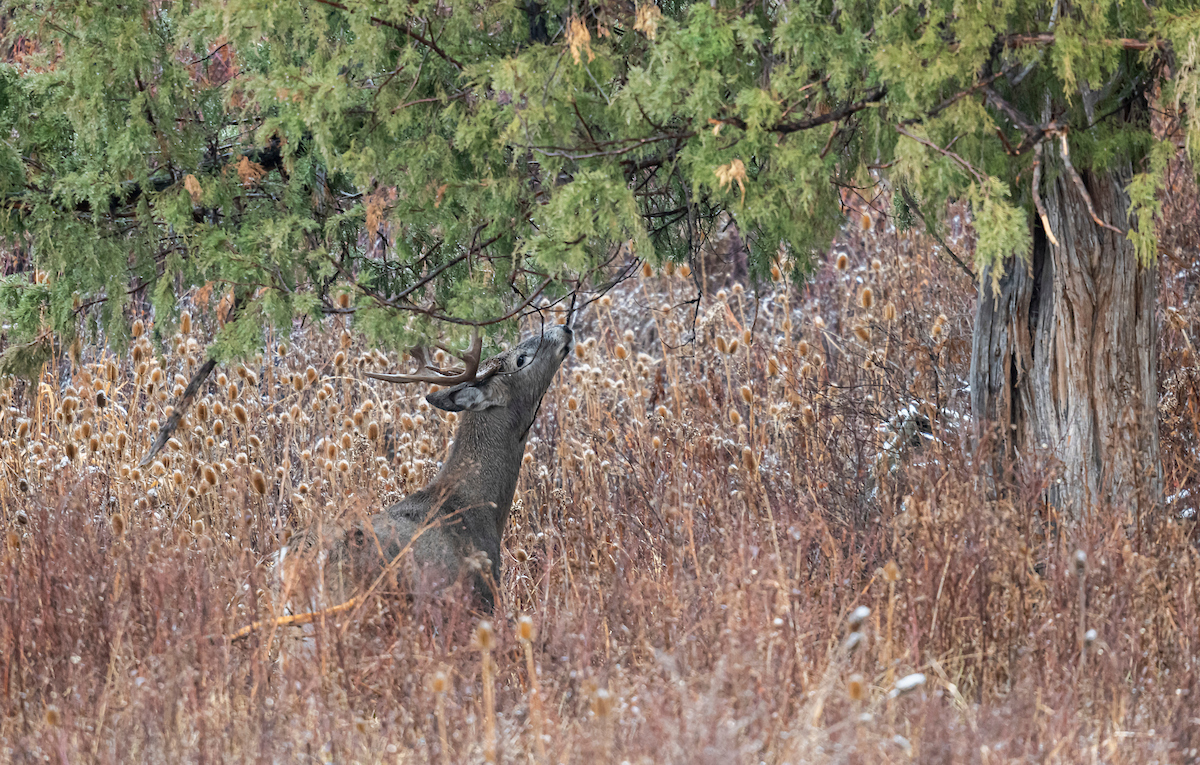
The Whitetail Rut
The rut (or the fall breeding season, which is spurred on by decreasing daylight) greatly impacts deer behavior and patterns—typically in a good way for hunters. As the photo period shortens testosterone in whitetail bucks increases, which drives them to breed. This means that rutting bucks will spend more time on their feet, searching for does when the rut begins. There are several phases to the rut, but in most parts of the country heavy rutting activity begins in late October and continues through mid-November. During the rut, bowhunters should target major deer trails or naturally occurring funnels (like a strip of woods between two ponds) to intercept cruising bucks.
It makes sense to hunt all day during the rut, since bucks could stomp by at any time. Many mature bucks are killed each year between 10 a.m. and 2 p.m.
Bucks also fight for dominance during the rut, however it’s important to note that whitetails are not territorial. Bucks are fighting over breeding opportunities, not the ground itself. So, when all else fails, hunt where the does are, and soon enough a buck might come charging by.
Reading Deer Sign
The best bowhunters are knowledgeable woodsmen. They know how to read tracks, scat, sign, and interpret how deer use the landscape. This takes a lifetime of practice to master, and the only way to get good at it is to spend time in the field. However, these basics will get you started.
Tracks
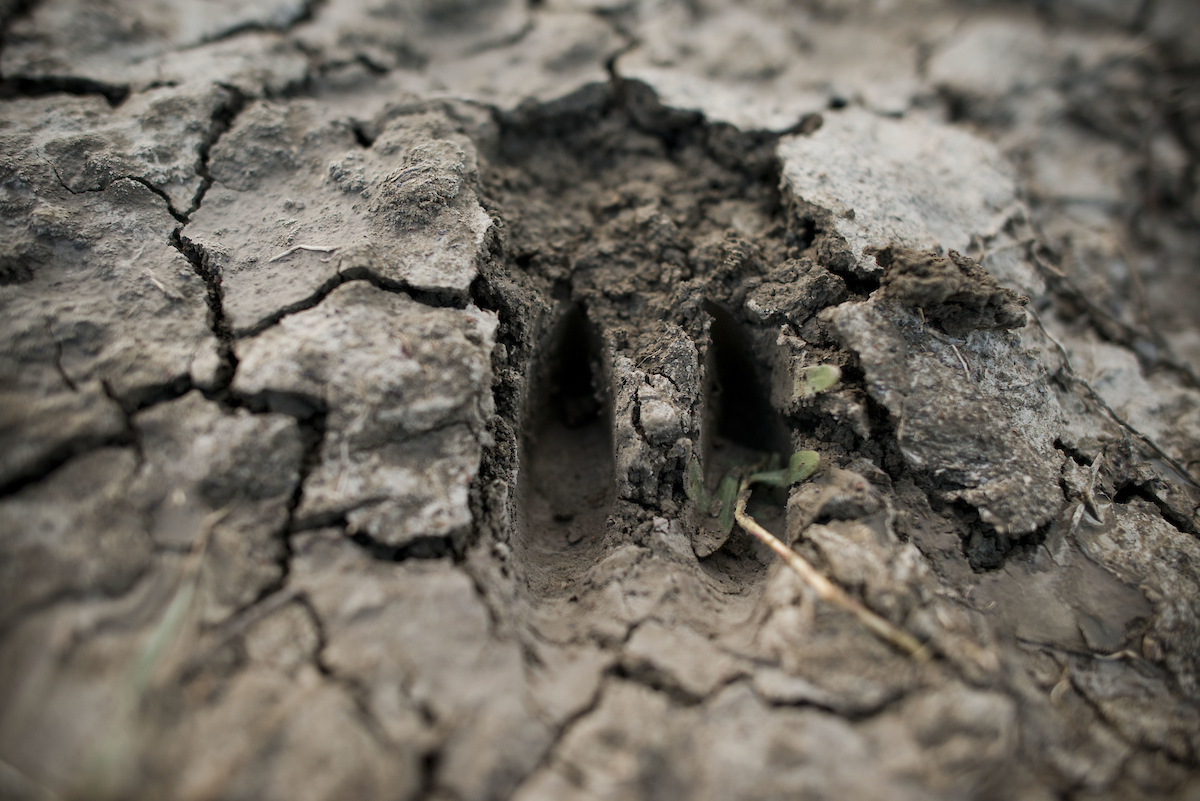
You’ll find deer tracks in mud, sand, and snow. The points of the hooves tell you which way the deer was heading. Buck tracks are typically longer and wider (they appear blockier) and doe tracks are typically more slender. If you consistently see fresh tracks in the same area over and over, you know that’s a good area to hang a trail camera or a stand.
Scat
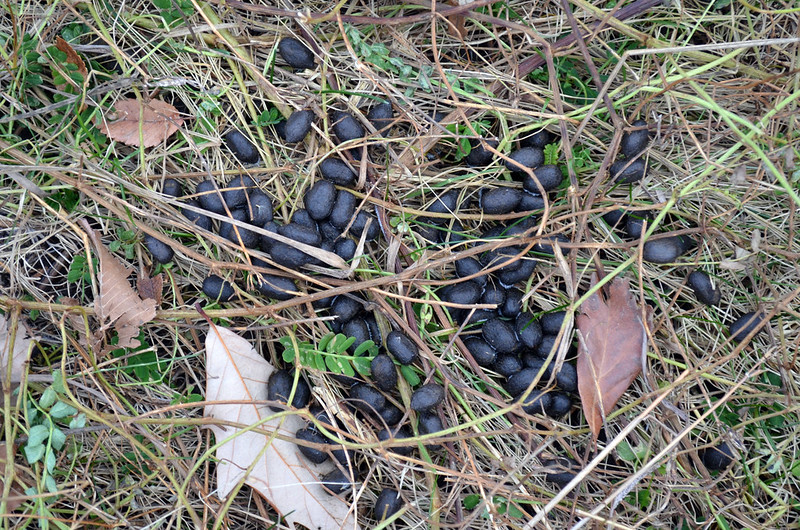
Deer poop is another easy way to identify that whitetails have been in the area. Look for an area that has a variety of scat freshness. In other words, there’s fresh poop, old poop, and very old poop laying around in piles. You’ll find this in main feeding areas or bedding areas.
Buck Rubs
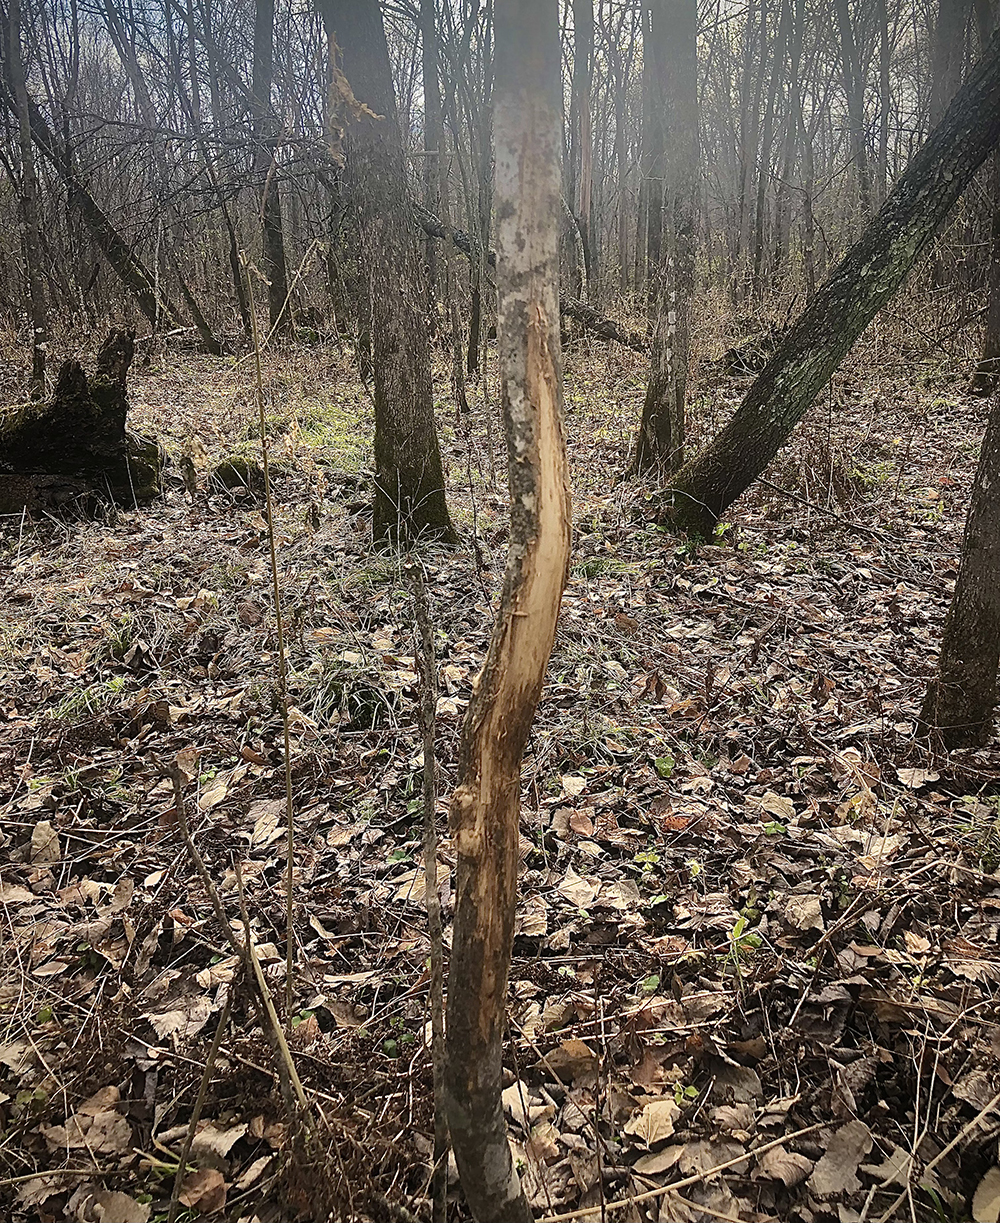
As soon as bucks shed their velvet, they begin rubbing their antlers on trees. These rubs are sometimes made one after another along a trail—this is called a rub line. Rubs are good for showing that a buck was in an area, but they are not necessarily a dead giveaway for a hunting spot. However, spots that receive rubs every year, or large “sign post rubs” are worth targeting, at least with trail cameras.
Scrapes
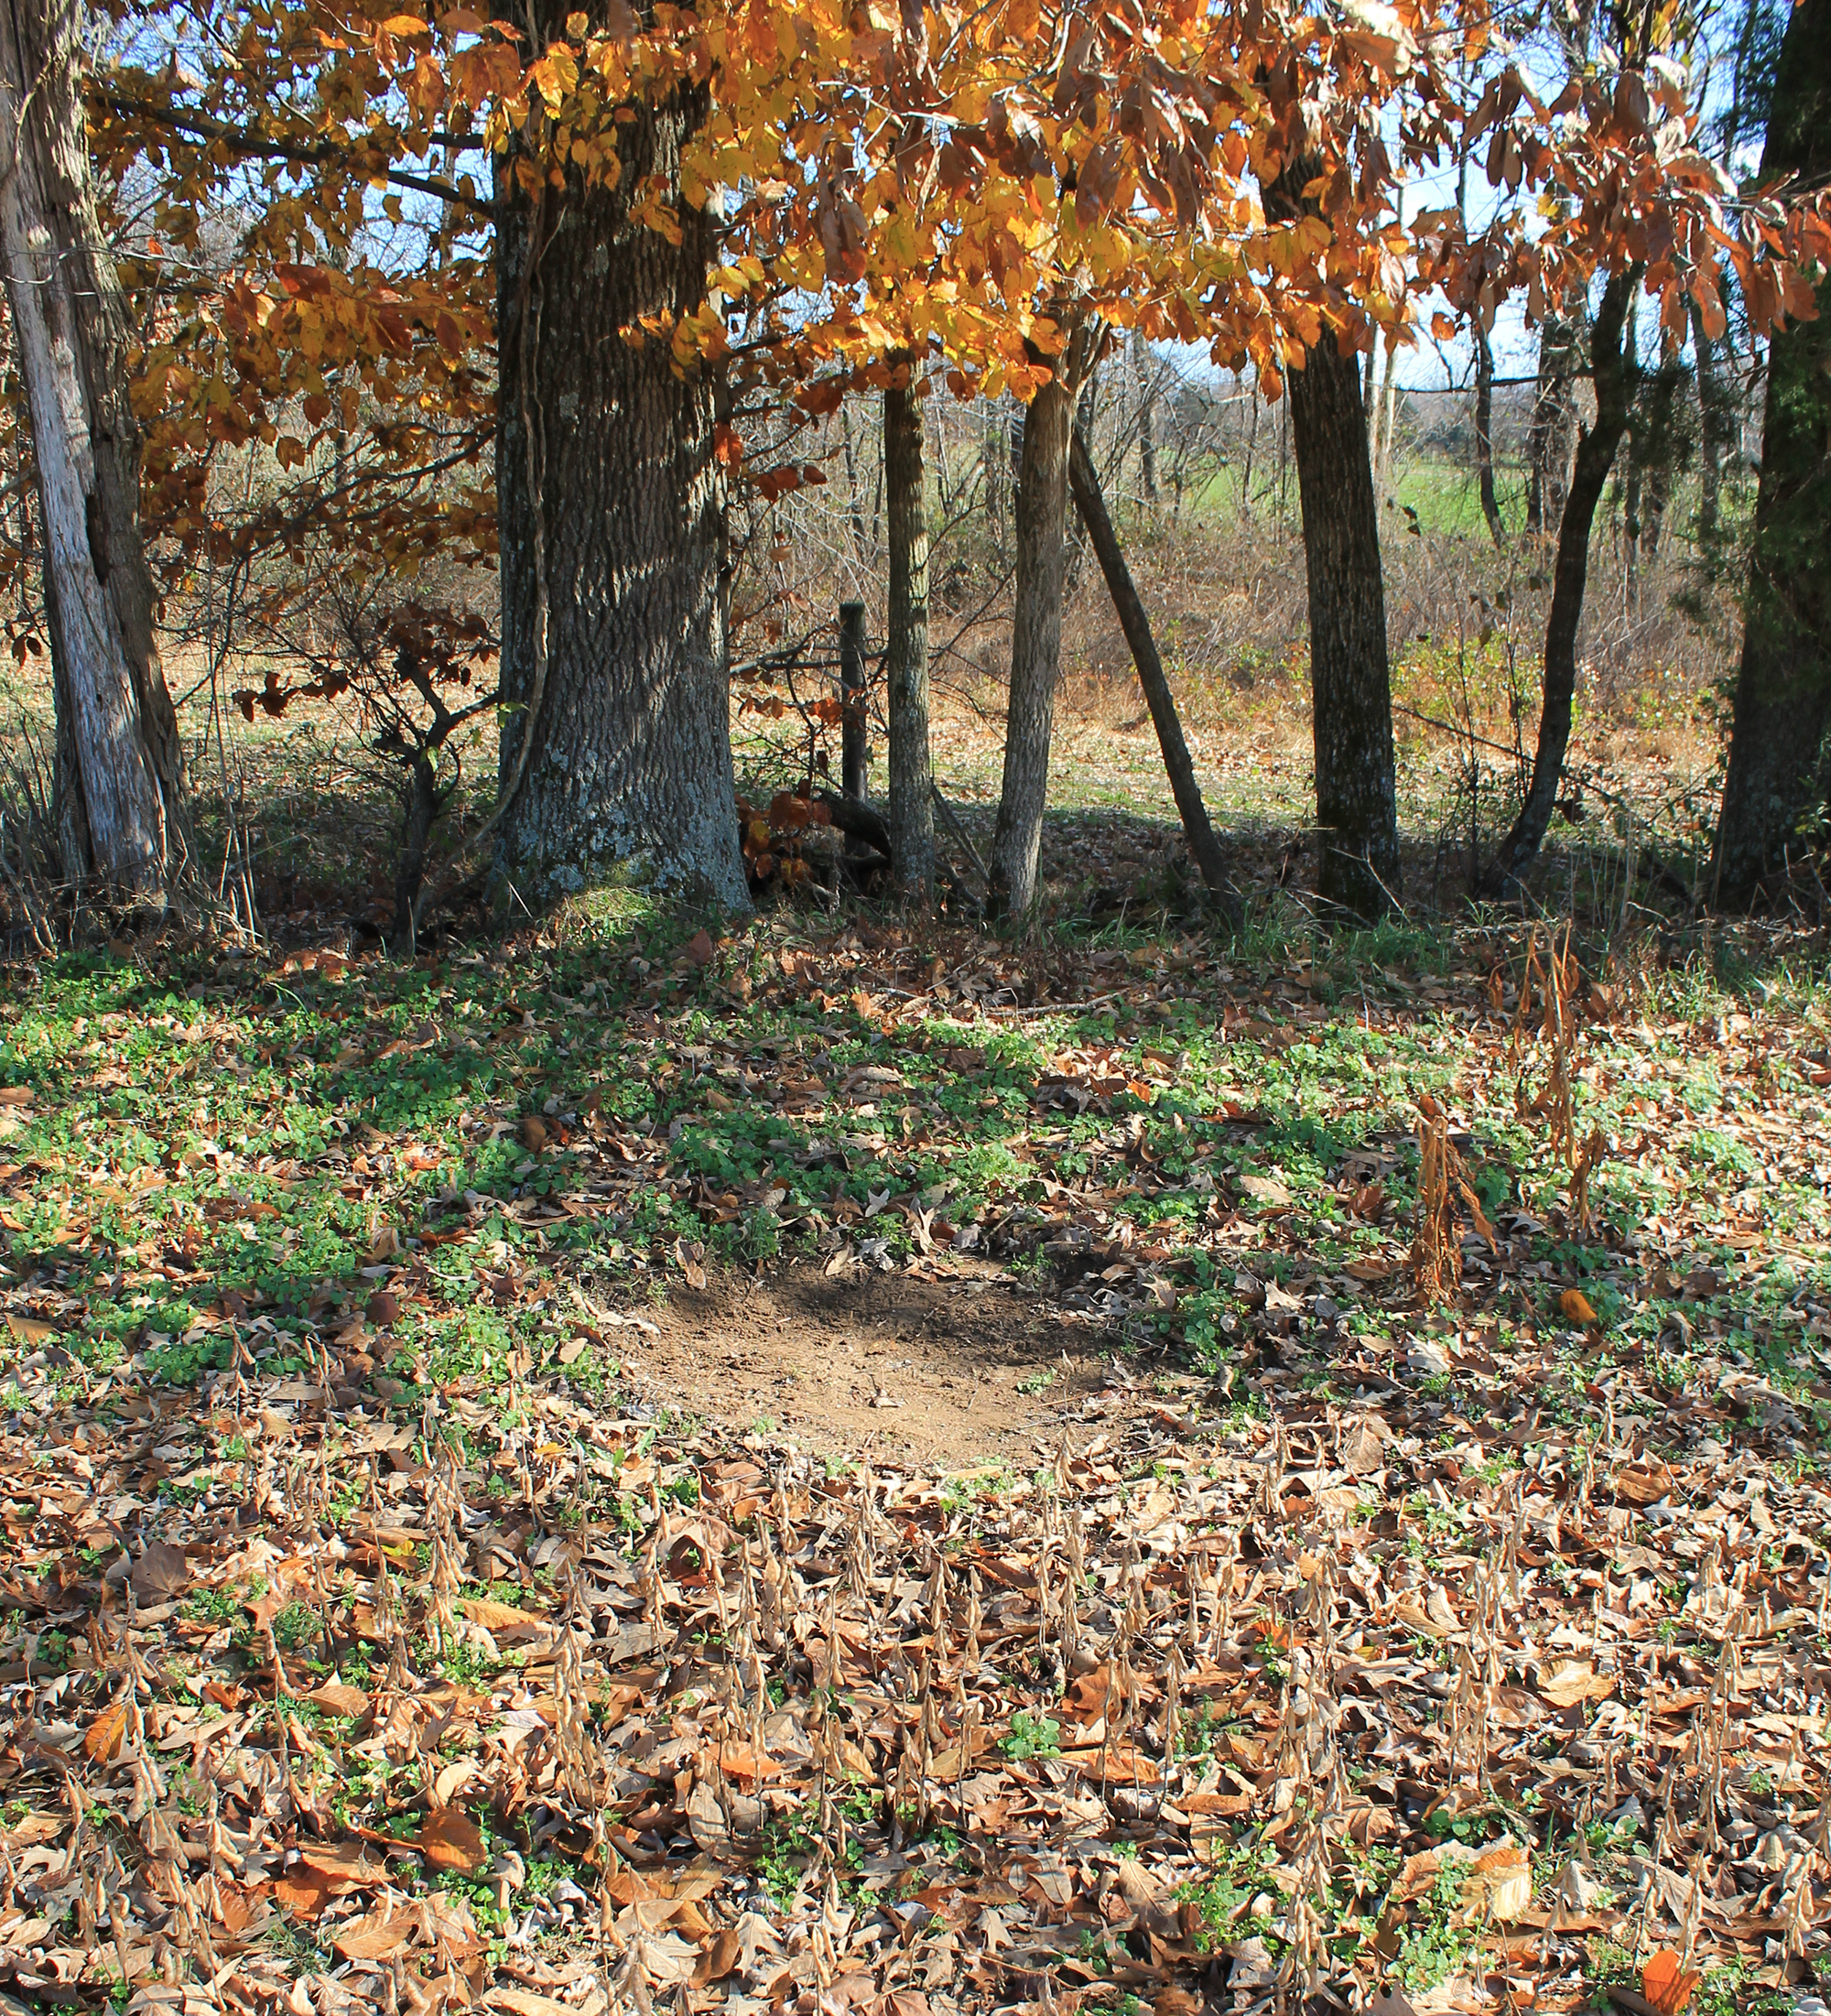
A whitetail scrape is a circular dirt spot where deer have scraped away leaves and debris with their hooves. They can vary in size from about two feet in diameter, up to the area of a small dining room table. Above the scrape there will be a branch that hangs to about chest height, this is called a licking branch. Both bucks and does will urinate in scrapes and rub the glands on their face against the licking branch. Doing so leaves behind their scent and lets other deer know who’s around. You can dig into the details around hunting scrapes and making mock scrapes here, but for a simple explanation, think of them as that fire hydrant in the neighborhood that every dog likes to sniff and urinate on. Scrapes are most often used at night, so hunting over a single scrape is a bit of a gamble. However, active scrapes (which are often made along field edges) are good places to hang trail cameras. If you find a buck hitting a scrape in the daytime, it often pays to hunt it right away.
Basic Bowhunting Gear
Getting started bowhunting is an investment in time and money. Buying the wrong gear can cost you more of both, so here’s a guide to make sure you’re headed in the right direction. You’ll need:
- Bow or crossbow
- Arrows
- Broadheads
- Release aid
- Rangefinder
- Quiver
- Treestand or blind
- Knife
- Pack
Choosing a Bow
The brand or model of bow you choose is not important. What’s important is that the bow fits you. There are two key things for bow fit: draw length and draw weight. Modern compound bows are so efficient that you can effectively hunt with low draw weight, so leave your ego out of that equation. You want to be able to draw the bow straight back easily. No wrestling the bow back through a series of awkward and dangerous movements. Just a nice easy pull, straight back.
Equally important is draw length, which requires a studied eye to set properly. Also, your draw length might change a little as your form improves. That’s why you really need the help of a great archery shop to buy, set up, and tune your first bow. For many people, a good archery shop (not a big box store) requires a drive, but trust me, it’s worth it to get started properly.
The Complete Bow Setup
There are many shiny and seductive accessories at archery shops, but for a new archer, keep it simple. A three- or five-pin sight, a Whisker Biscuit, and a bow quiver are all you need. A lot of the best bows for the money come as ready-to-hunt packages, which make things easier and save you money, which you can use for archery lessons.
Arrows and Broadheads
You can’t shoot just any arrow from your bow. Arrows come in sizes, called spines, that correspond to your draw weight, arrow length, and point weight. When you’re buying a bow, the shop staff will help you figure out that equation, and every arrow manufacturer has a spine chart or calculator to help you find the right size arrow.
Broadheads, like bows, are a matter of personal preference. Many will work great, and you don’t have to spend a lot of money on them to kill deer. But you do need to make sure that the broadhead you choose is sharp and shoots where you aim it. I recently tested more than 20 of the best broadheads, and you can use that review to help guide your choice. But you still need to shoot the head you choose and get it sharp again before you go hunting.
Hunting Gear
You can kill a deer in jeans and flannel sitting in a natural blind. But a treestand makes the already difficult task of shooting a deer, a little easier. You’ll of course need all the treestand-related gear like a safety harness, lifeline, bow hanger, and bow pull-up rope. A small bowhunting backpack is helpful for carrying essentials like a knife, license, food, and layers. Trail cameras aren’t necessary, but they’re a helpful tool for new hunters because they can give you the confidence that there are deer in the area.
READ NEXT: What Colors Can Deer See?
Avoid Gear Rabbit Holes
Bowhunting gear is fun. There are a lot of interesting products on the market as well as communities of people who are zealots for their preferred gear style. From heavy arrows to tree saddles, bowhunters can get downright tribal with gear choices and they can be pretty convincing that their way is the best way. But, becoming a successful bowhunter is not about the gear you choose. It’s about spending time shooting at the range and learning in the woods. Stick to the basics and let your taste in gear evolve through experience.
How to Practice Shooting Your Compound Bow
Basic Archery Form
You’ll hear the term “archery form” thrown around a lot in archery discussions, and form just means the set of steps you follow each time you shoot. Here are the important steps:
Grip
A good grip uses your body’s natural bone structure to help you support the bow and imparts no torque. Start with a relaxed hand and slide it up the bow’s grip until it can go no farther. The web of your hand should now be in the throat, which is the deepest part of the bow’s grip.

Next, rotate your hand until only the area between your thumb and the palm’s lifeline contacts the grip. As you look at your hand, your knuckles should be set back and at a 45-degree angle to the riser. Point your thumb toward the target, and lightly rest your other fingers on the front of the bow. If you find yourself squeezing the bow’s grip, tuck in your fingers, so they don’t touch the bow. If you use the tucked technique, you’ll need a finger or wrist sling to prevent the bow from dropping. Apply slight pressure to the bowstring to set your grip into place, and keep your hand relaxed throughout the shot.
Draw
Straighten your arm that holds the bow and pull with your arm attached to the string via the release aid. Keep your finger away from the trigger during this process—the one time I failed to mention that to a student, it resulted in a dentist visit. You should not need to make a violent motion to bring the string back, if you do, your draw weight is too high. Imagine the arm doing the pulling as a train, where your elbow is the locomotive leading the way.
Anchor
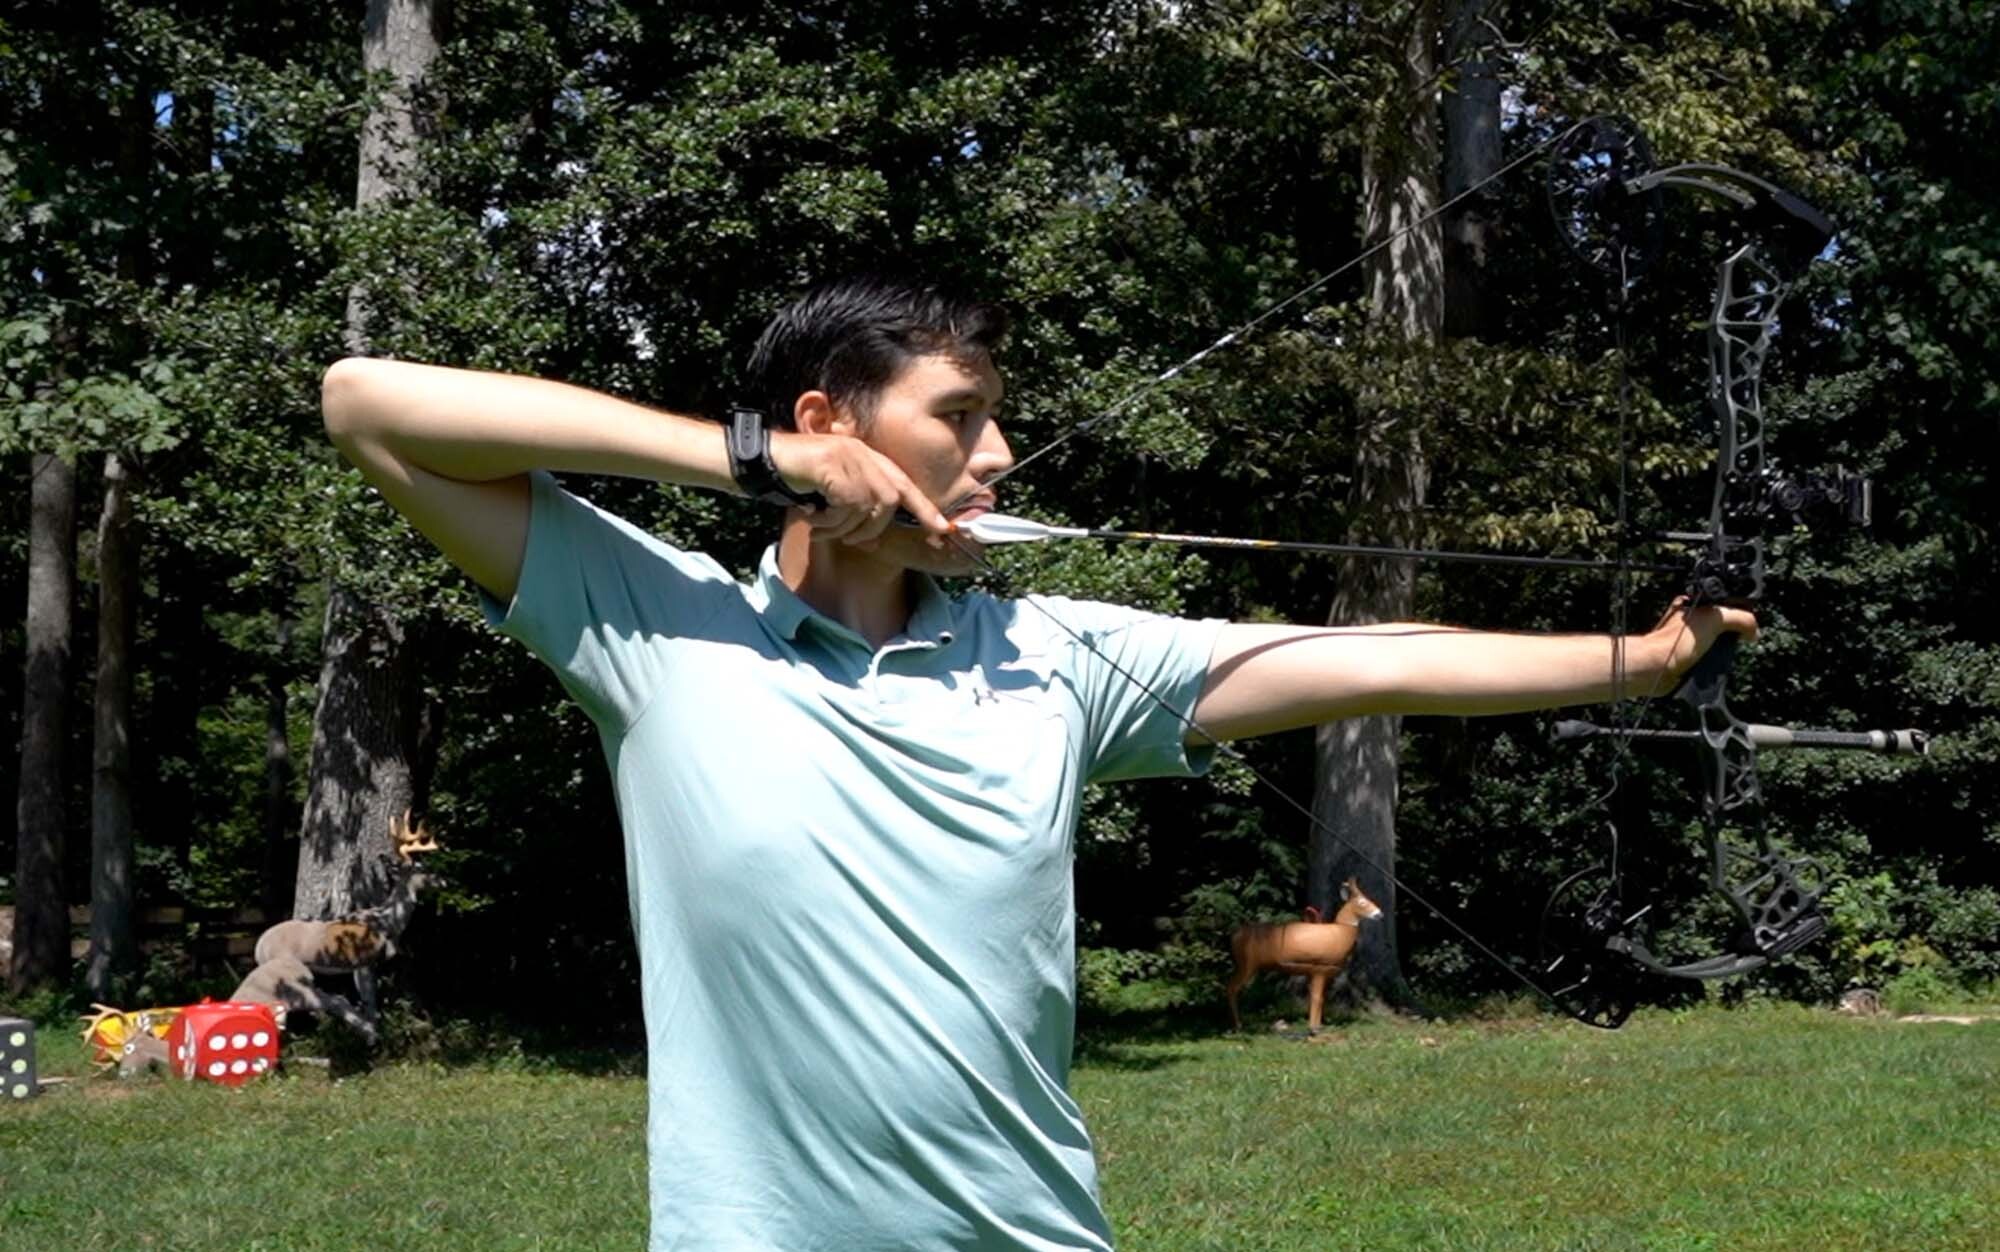
Your anchor is simply the point at which your bow is at full draw and you settle in to aim. An often-missed portion of anchor is something called alignment. As your cams rollover and you feel the draw stops hit, it’s time to move your elbow and shoulders into position. Moving them into alignment means you’ll be supporting the weight of the bow with bone structure, rather than muscle. Bring your elbow back and around your head so that it’s in line with the arrow. Your shoulders should be aligned with each other and pointed toward the target. Once in this position, you’ll feel that keeping the bow back is very easy. Then look through your peep sight and center the circular sight housing within the circle of your peep. You can add more reference points to your anchor like a kisser button, which can make centering your sight an easier process.
Aim
Place the pin for the distance you’re shooting on the target and let it float around your aiming point. Don’t try to stop the movement. Just let the pin naturally float and move on to executing your release.
Release
There are a lot of ways to activate a release. But the easiest to start with is to set the release so that the trigger is fairly heavy. You should be able to rest your finger on the trigger without it going off. Step one is to touch the trigger and hook your index finger around the trigger. Then slowly increase the pressure until the shot breaks.
Follow Through
There’s enough time between the release and the arrow disengaging for you to change the arrow’s path. So, your job in this moment is to do nothing. Don’t move, and don’t add flair to the shot. Just keep your eyes on the spot you want to hit and maintain your position.
Learn to Shoot
You can learn archery form by reading articles, watching videos, or from old uncle Bobby, but you’ll be much better off by getting instruction from a qualified coach. A few lessons to learn the fundamentals followed by a lot of practice will set you up for success.
Making Shots Under Pressure
Shooting groups in the backyard is one thing. Making the same shot when your pin drops onto a live animal is the true test. Success here is not about making yourself less nervous. It’s about shooting the same shot despite the nerves. To do that, don’t focus on how much you want to shoot the deer. Instead, keep your focus on the steps you need to do to achieve that result. Focus on the key steps of your archery form—one by one. By executing each step and only focusing on those tasks, you reduce the chance of making a bad shot.
How to Bow Hunt Deer, Tips and Tactics
Hunt the Wind
Whitetails navigate the world by scent. They have incredibly powerful noses that lead them to food, other deer, and help them avoid predators. This means that bowhunters must always stay downwind from deer. Check prevailing wind data and hang key stands based on that info. Also make sure you have stand setups that are optimal for different wind directions. If the wind isn’t right for a given stand location, simply don’t hunt it on that day. If deer get downwind from you, they are almost guaranteed to smell you before they get into bow range. If you blow out deer from a stand location, you can burn that spot for several days.
It’s just as important to factor in wind when approaching your stand. Never let your scent blow into a bedding area. Likewise, don’t let your scent blow across the main trails that you are trying to hunt.
Kill Your Scent (as Much as Possible)
Many veteran bowhunters (myself included), believe that it’s worth trying to reduce your scent. To do this, you can shower with scent-free soap before you hunt. Wash your hunting clothes with scent-free detergent. There are a variety of scent-killing sprays that you can spray on your outer layers before you walk into your stand. Avoid getting strong scents (like gasoline while filling up your truck) on your clothes or boots before a hunt. Wear rubber boots and spray them down. Avoid touching vegetation with your bare hands on the way into your stand.
All these tactics will help prevent you from being busted by deer; however, you’ll never consistently beat a deer’s nose. So always hunt with the wind in your favor, no matter what scent mitigation tools you use.
Set Up for Close Encounters
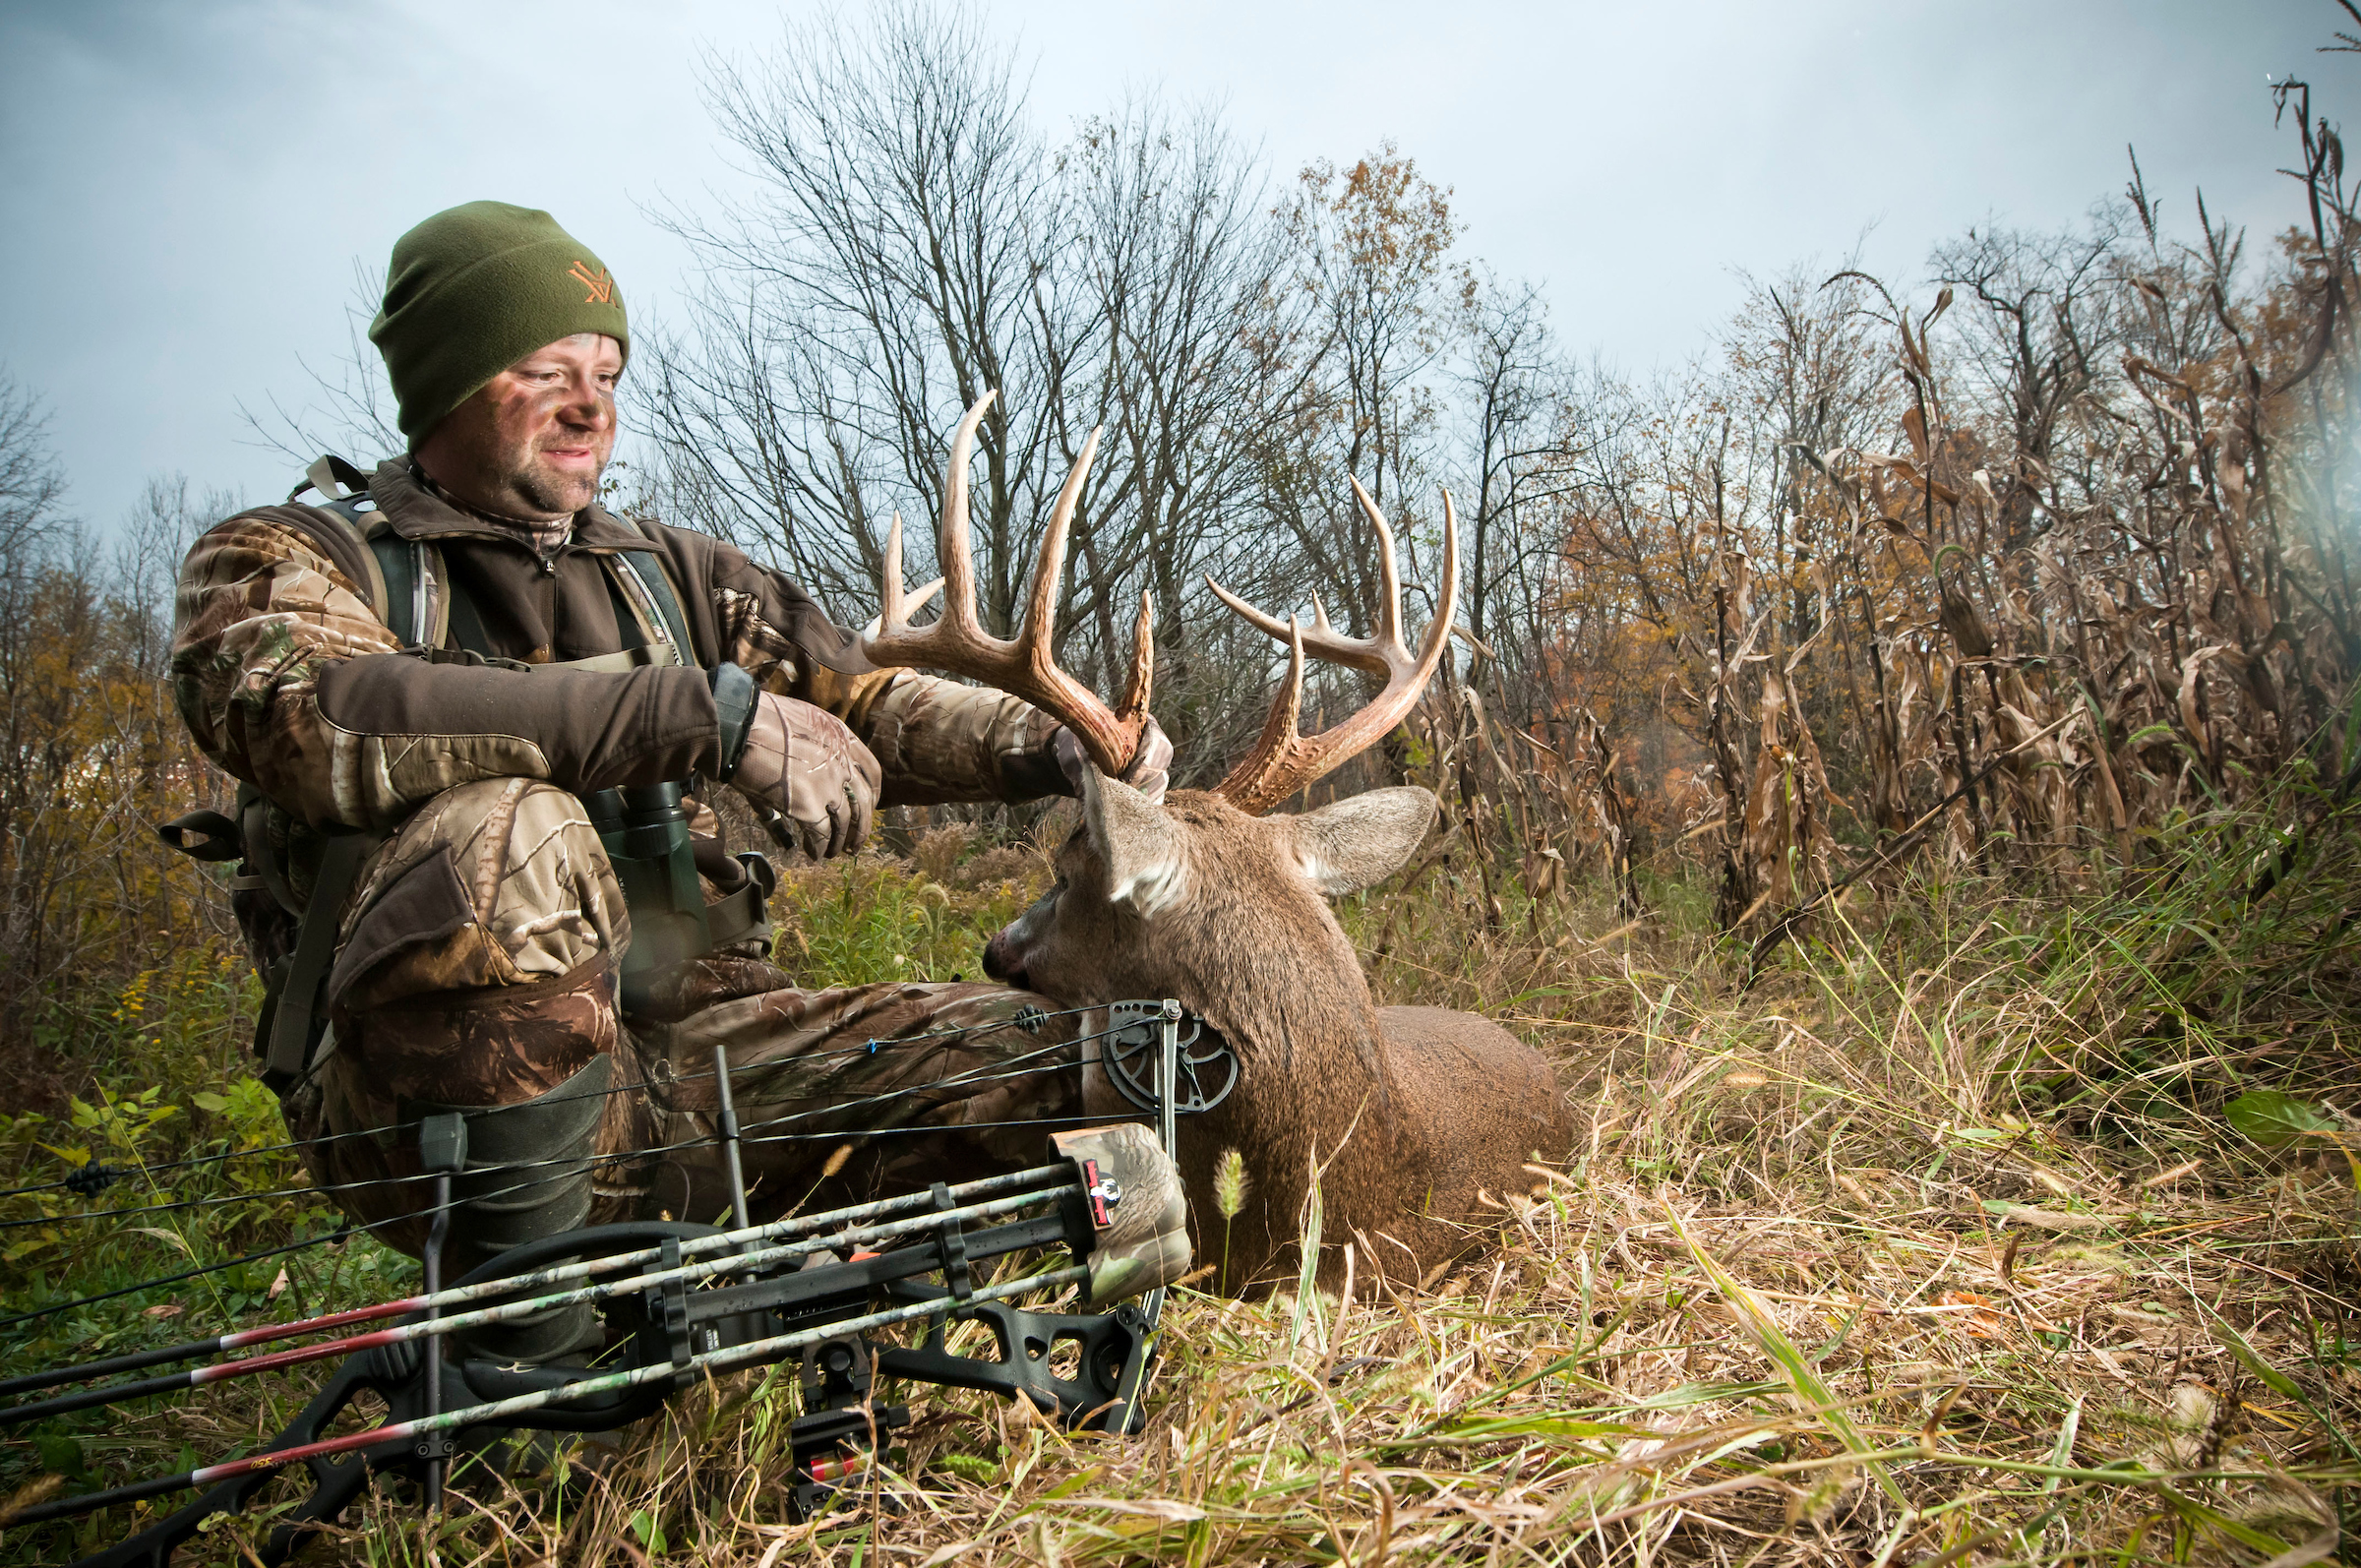
Bowhunting for whitetails is a close-range game. When you’re a new bowhunter, it needs to be an ultra-close-range game. No matter how accurate you are on targets, your first shot on a whitetail deer should be 20 yards or less (read my story about deer jumping the string). To make this happen, you need to set up your stand or blind close to where you expect deer to show. Treestands are the go-to option for most bowhunters. Pick a good-sized tree that’s about as wide as your shoulders. If you’re using a hang-on stand, mount the stand so branches or forks break up your outline. Make sure that you have cover behind you. If you’re using a blind, brush it in diligently and tuck it into existing cover so you’re not sticking out in the open. Confirm that you’re setting up close enough to main trails by using a rangefinder. And when you’re sitting in your stand waiting for deer, range trees, rocks, bushes, ect. Establish a 20-yard perimeter and don’t shoot beyond it.
Hunt Does
It’s important for anyone learning how to bow hunt deer to get useful field experience. The only way to do that is to start shooting deer. And the best way to do that is by targeting does in areas with high deer densities. Many states have areas where whitetail populations are too high, often where rural lands meet suburbia. Trophy potential usually isn’t very high in these areas, but for a new bowhunter, any cleanly killed deer should be considered a trophy.
Use Calls and Scent Attractants
There are dozens of different deer calls and attractant scents on the market, and many of them are useful. They key is to use them sparingly. You can’t simply hammer on a grunt tube and expect deer to come running from far and wide. When it comes to calls, a grunt tube and a doe bleat are a good place to start. Read about deer calling tips from the experts here.
When it comes to scents, I’ve found that a little Tink’s 69 Doe-in-Rut sprinkled on a scent wick will get bucks (at least younger bucks) to stop in shooting range during the rut. But you still need to be in the right place at the right time.
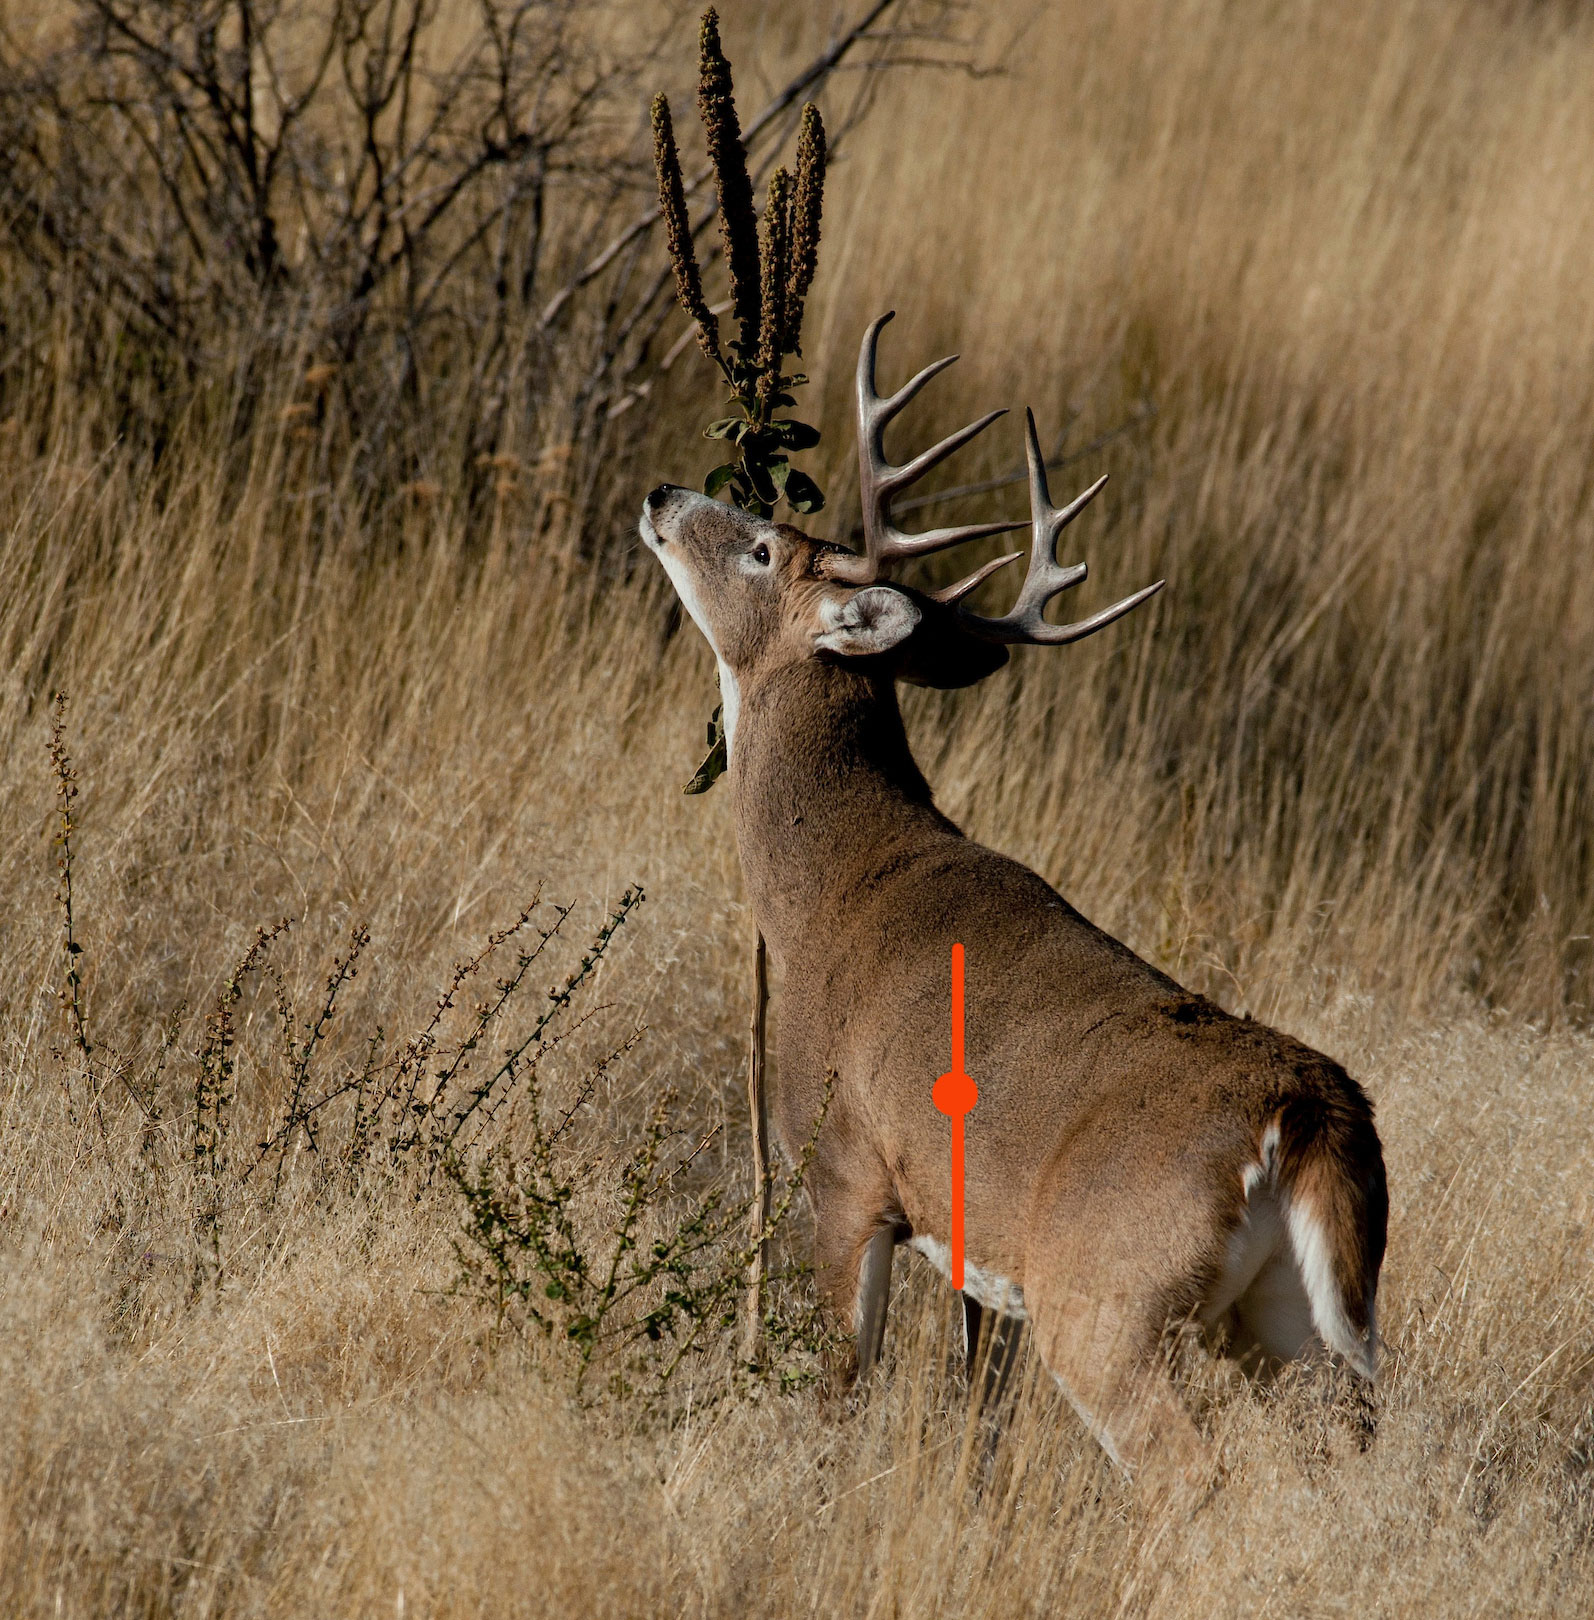
Shot Selection and Placement
We’ve already covered taking close shots only. Now you need to know where to place your arrow. In the simplest terms, you want your arrow to enter behind the deer’s shoulder, pass through the heart/lungs area, and exit the body cavity (here’s our ultimate guide on where to shoot a deer). In other stories and on social media you might read about shooting heavy arrows that will penetrate the bones in a whitetail’s shoulder. It’s true that certain setups will penetrate bone without issue.
But beginner bowhunters should first learn proper shot placement behind the shoulder, no matter what setup they’re shooting. That means broadside and quartering away shots only.
On broadside shots, aim just behind the deer’s front leg (when it’s in the forward position) and halfway up the body. There are a lot of charts and videos online covering archery shot placement on whitetail deer. But this simple video from the National Deer Association is the best.

On a quartering away shot, visualize a line coming up from the front of the deer’s offside front leg. You want your arrow to exit through that line. However, you should pass on extreme quartering away shots. Buy a 3D deer target and practice shooting quartering away angles, and the high angle from a tree stand, as much as you can. When shooting from high angles pay close attention to how the arrow enters the 3D deer’s “body cavity.” With the arrow’s downward angle, you still want it to penetrate the top of the heart.
Blood Trailing and Recovering Your Deer
You got to full draw, waited for the deer to get into the right position, and let it fly. Congratulations, but your hunt isn’t over. You haven’t fully learned how to bow hunt deer until you’ve developed blood trailing skills. There are two keys to recovering deer: patience and attention to detail.
Watch and Listen
At the shot watch and listen. Listen for how the arrow sounds when it hits the deer. A hollow sounding “thunk” often means a shot through the body cavity. A loud “crack” often means a direct hit to bone. Watch how the deer reacts. A mule kick often means a shot through the lungs. A hunched up, arched back often means a gut shot. Continue watching as the deer runs (or walks) away. Mark the last spot that you saw the deer, and take a photo of that spot with your phone. Continue listening even after you no longer see the deer. Oftentimes you can hear them crash down. Mark the direction it sounds like the deer was traveling. From your stand, take a photo of the spot the deer was standing when you shot (this is called the hit site).
Wait for 30 Minutes
If you didn’t see the deer fall or clearly hear it fall, you job now is to wait. Just hang out in your stand and relax for 30 minutes. Set a 30-minute timer if you must. Climbing down early and rushing the blood trailing job is a good way to bump (scare off) a mortally hit deer. Bumped deer can run a far way and are often impossible to recover. Do not make this mistake.
Call for Help
If you have hunting buddies or even a friend who likes the outdoors, now is a good time to call them. It’s much easier to blood trail a deer with a little help. Plus, when you find your deer, it’s nice to have a friend to help drag it out.
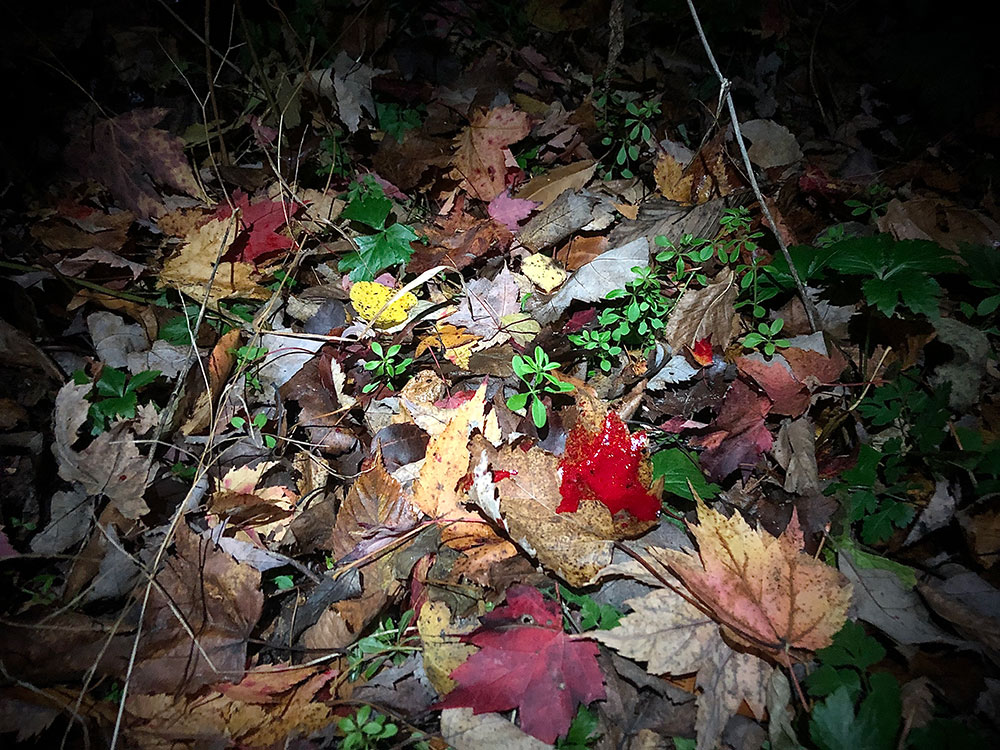
Analyze the Hit Site
After a full 30 minutes, climb down from your stand or leave your blind and go directly to the hit site (the spot the deer was standing when you shot). Look for blood and look for you arrow. Bright red blood with bubbles in it typically means a lung shot. If you find your arrow and it’s covered in bright red blood with some bubbles, this is a very good sign. Mark the spot of first blood.
Now, follow the blood trail slowly and carefully. A deer that was shot through both lungs (and the heart) will bleed profusely. The trail should be relatively easy to follow. Still, take your time and leave trail markers every 20 yards or so to mark the trail. Within about 100 to 150 yards, you should find your deer.
Marginal Hits
If you comb the hit site and don’t find an obvious splotch of blood, or if you find blood that smells, rank and gutty (or has green slicks in it) then you’ve likely made a marginal hit. Quietly, and I mean very quietly, work your way toward the spot you last saw the deer. If there’s still a poor blood trail, or signs of a gut shot, it’s best to pull out and leave the woods. You should wait several hours, and likely overnight, before continuing the search. A gut shot deer can take hours to expire, bumping it means you might never recover it. Many states have volunteer blood trailing dog programs. Calling in an experienced blood tracker with a dog can be incredibly helpful for a new bowhunter. Tracking a marginally hit deer is a real challenge that even experienced hunters struggle with. For more information, click on the links below.
- 6 Blood Trailing Lessons Learned from Tracking Dogs
- 10 Myths About Blood Trailing Deer
- How to Bloodtrail and Track Wounded Deer
What it Means to Be a Bowhunter
The best bowhunters are patient, thoughtful woodsmen. They’re excellent shots on the range and in the field. And more than anything, they enjoy being in the woods and trying to get close to the animals they pursue. Bowhunting takes more practice and attention to detail than other types of hunting. Becoming a bowhunter means committing to mastering a craft. If that sounds like fun to you, then welcome to the club. We’re glad to have you.