Since we did a post on the Quick Survival Bows the other week, it’s only natural to set you up with some field-made arrows that are fun to shoot, and effective on small game when properly built.
Remember that each finished arrow needs to be lightweight, yet strong. It also needs to be straight and well-fletched, have the right spine (rigidity) and be the right length for the bow you are shooting.
**
Getting Started**
Collect branches and straight saplings that are at least 30 inches long with diameters of between 3/8 and 1/2 inch. Viburnum and Arrowwood are great tree species to look for. Trim off any side branches or, better yet, select sections that have no side branches at all.
Preparation
If you need to start shooting arrows right away, you can work green sticks into serviceable arrow shafts, but remember that the extra water will make the shaft heavier and change the spine of the arrow.
While it’s better to dry the arrow wood for a few months, you can certainly choose to get right to work. Carefully peel off the bark and carve off any knots or branches. You can also sand them down if the shaft is dried. Straighten crooked spots by heating them for 30 seconds over an open flame. Then bend it a little bit beyond straight and hold the wood in the over-straightened position until it cools. It may take several tries at heating and cooling to get the arrow straight, but once it has been straightened, the arrow should hold the new shape for a while.
Notching and Nocking
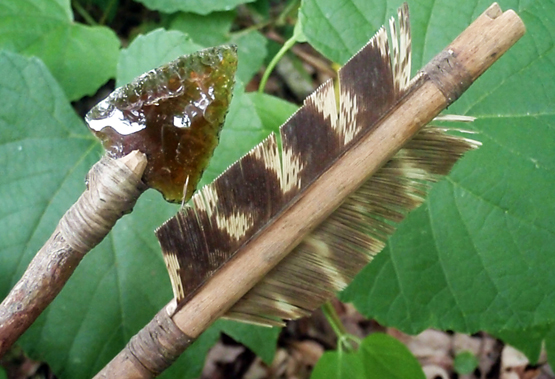
Cut a notch about a quarter-inch deep into the end of the shaft to create the nock that attaches to the bowstring when shooting. Make sure the nock is sawed out carefully so you don’t end up splitting the arrow.
Cut a similar notch in the head end of the arrow to receive a stone or metal point. Metal points can be made by grinding and filing thin, flat steel pieces. The stone or glass arrow head is chipped into its arrowhead shape. Add glue into the notch and then insert the arrowhead. Wrap twine, floss, dried sinew segments, or dogbane fiber around the shaft and arrowhead. Next, seal the wrapping with more glue to make sure the arrowhead stays in place. You can also just carve a point on the arrow shaft to simulate a field point.
Fletch The Arrow
Gather up some bird feathers and split them in half. My favorites are turkey wing feathers. They don’t have to be from the same bird, but they need to all be from either the wing or the tail. They also need to be from the same side of the bird (right or left). Shorten them to about 4 or 5 inches in length and about a half-inch wide. Space the split seam of the three feathers equally around the arrow and glue the feathers onto the arrow. Secure the feathers with the same cord you used for the arrowhead. Duct tape can make a quick fletching also, but feathers are far superior. Make sure you over-wrap the feather quill on the leading end of the fletch. If the tip of a quill is sticking out, shooting the arrow can damage the quill, or the quill can scratch your hand.
Now you are ready to shoot.
Just remember to treat homemade arrows with the respect and caution you would treat the store-bought variety, and never shoot wooden arrows from a compound bow. Be safe and enjoy our heritage of hunting and archery.