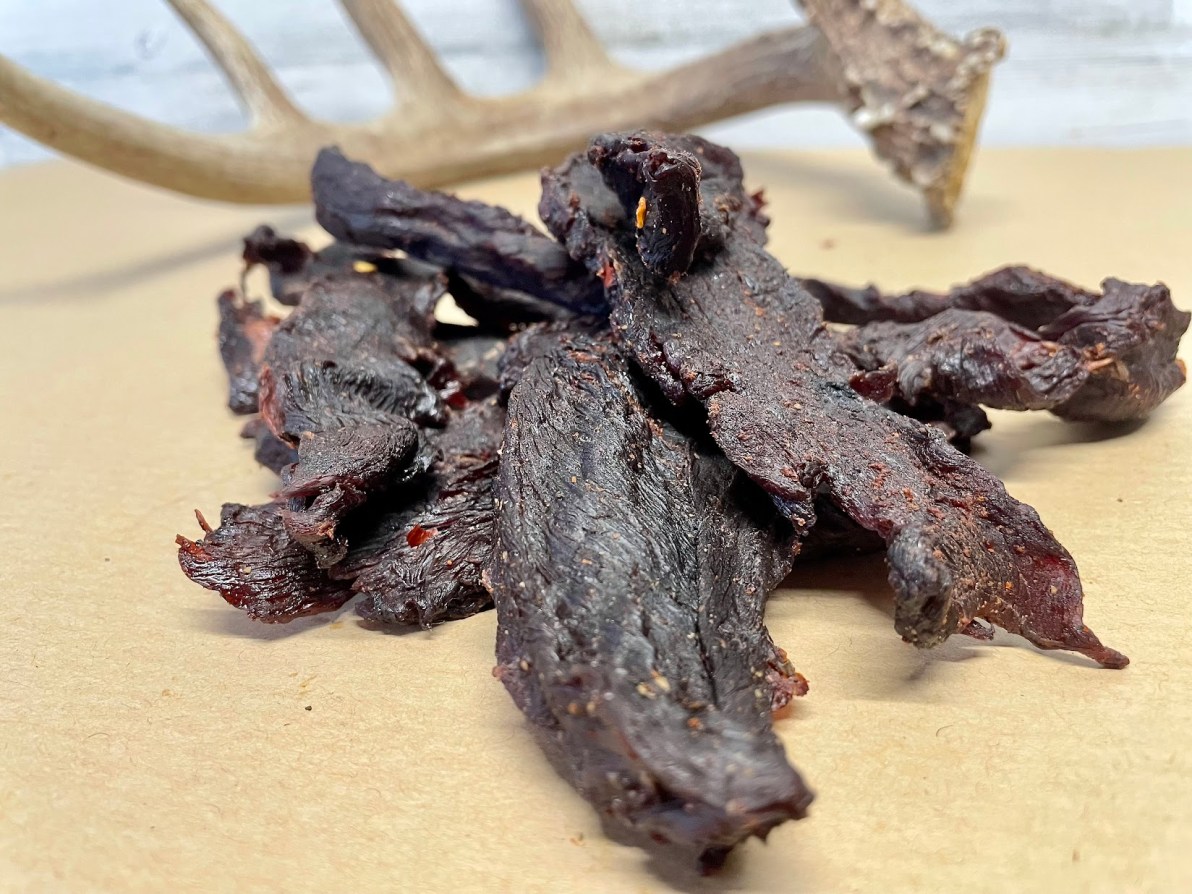
A pocketful of jerky is pure bliss for most hunters. It’s even better when you make it yourself. But, to attain that heightened state of meat happiness, you’ll need to know how to make deer jerky. It’s a simple process that has been used for centuries to preserve venison.
In its earliest forms, jerky meant thin strips of salted meat dried either in the sun or over a smoky fire. Those methods are time and labor intensive. But, with modern appliances, we can make enough jerky to last an entire hunting season in a day or two, all while going about our normal day-to-day schedule. Here’s how to make deer jerky at home.
Step 1: Preparing the Meat
You can make jerky out of just about any lean meat. Venison of all kinds is popular, as is beef, pronghorn, bison, African plains animals—you name it. For the purpose of this article, we will concentrate on venison, but the techniques transfer over to just about any kind of meat.
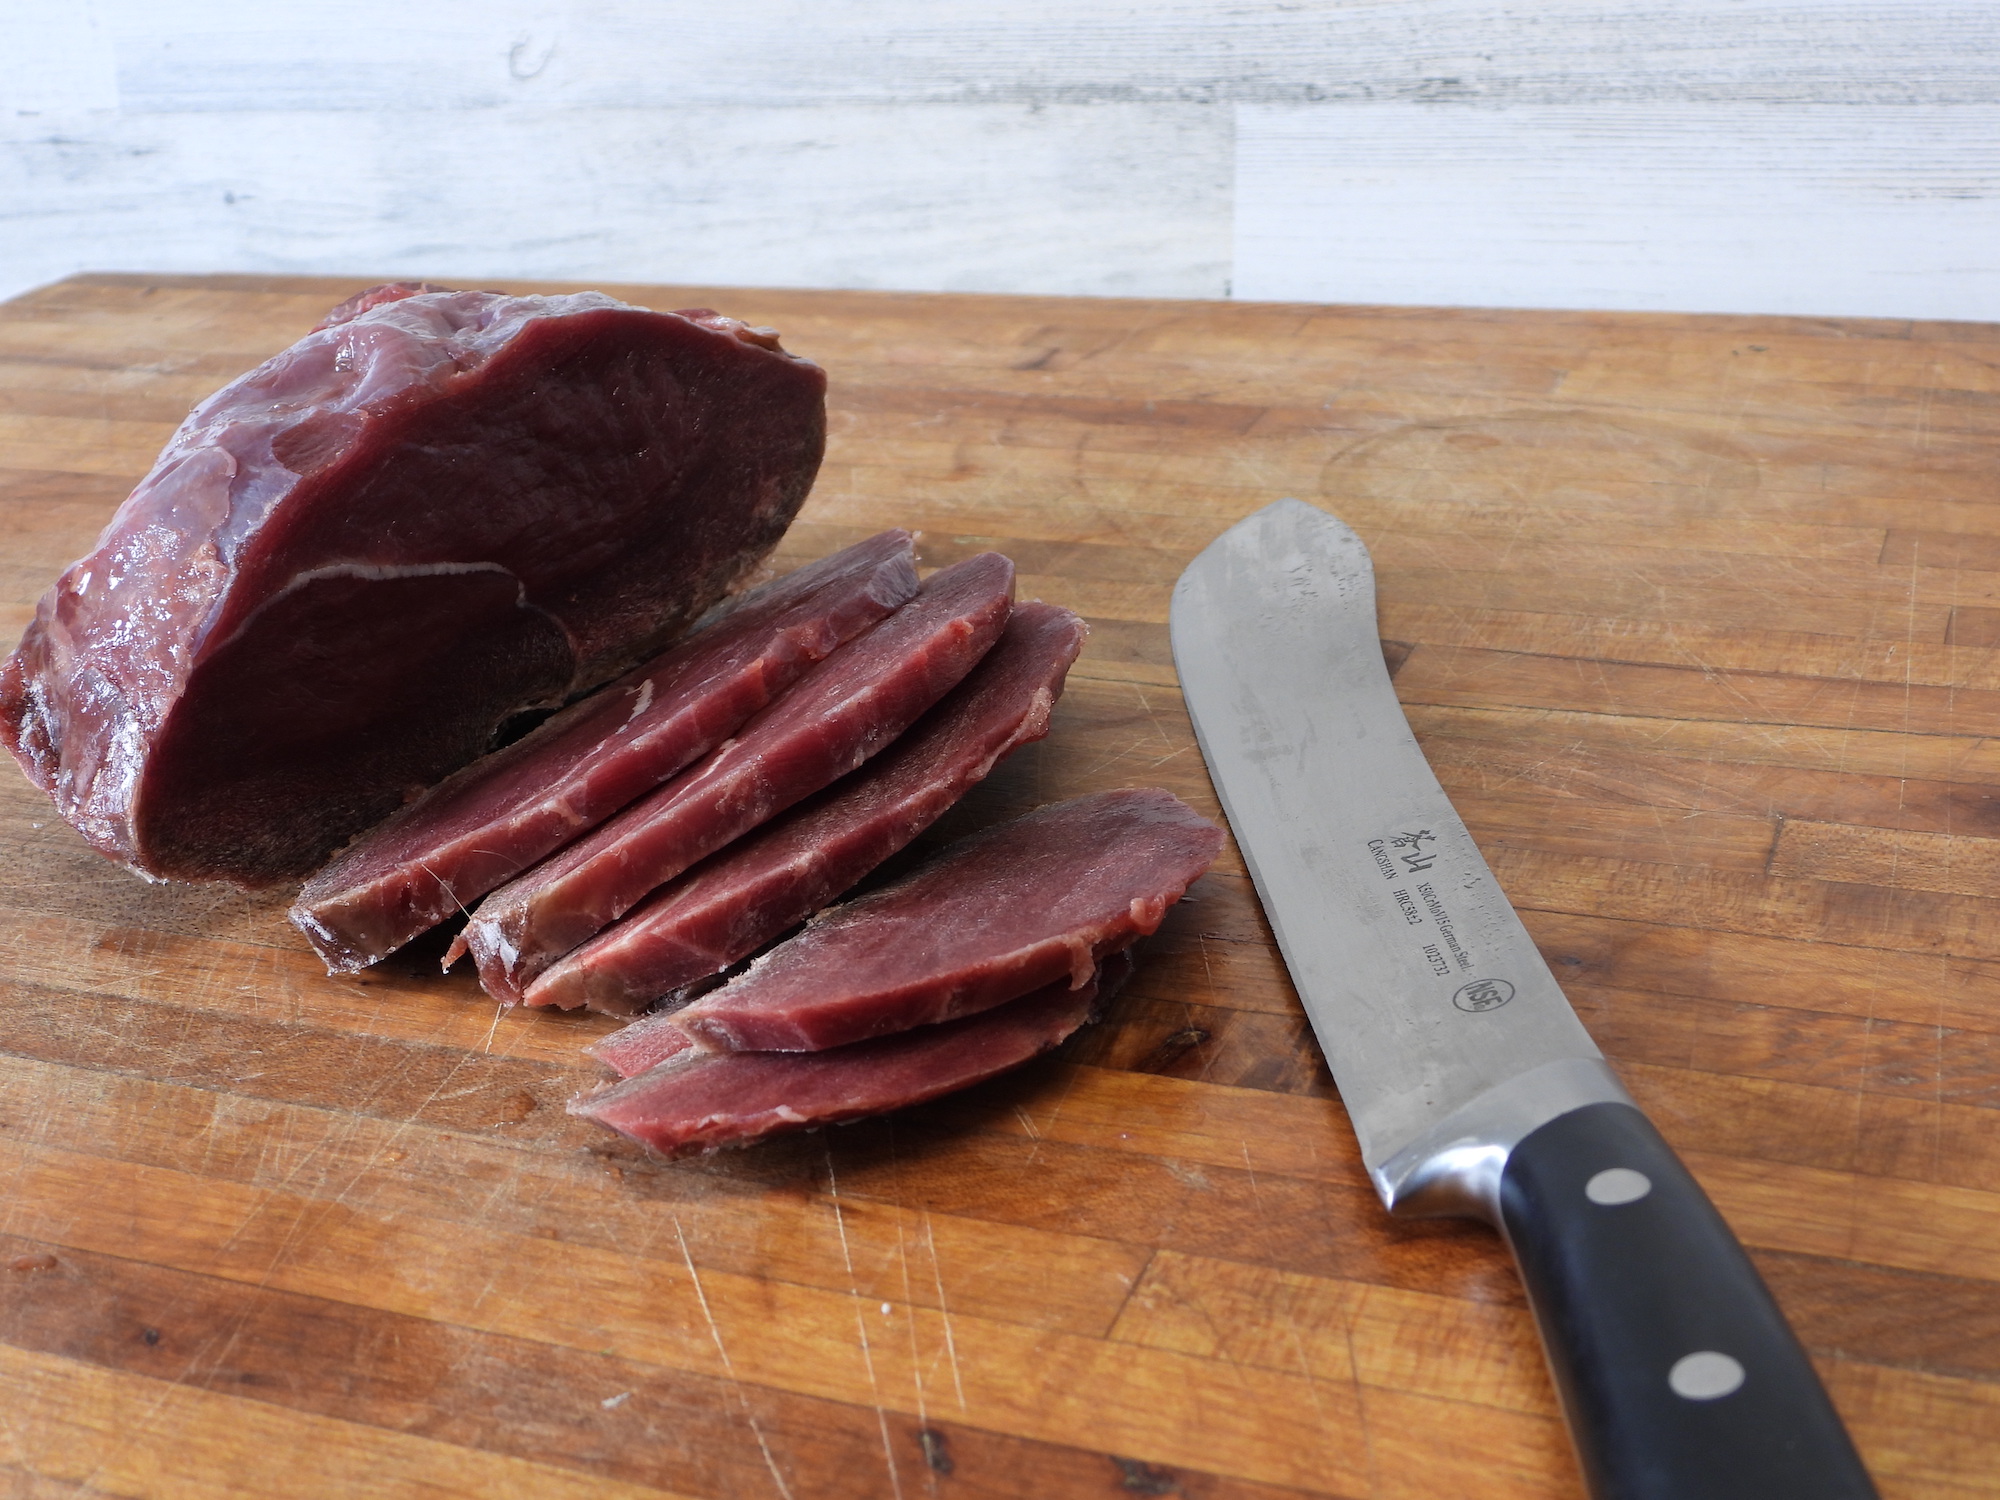
Just about any lean part of your deer can be made into jerky. The best cuts of meat for jerky are top eye, and bottom round roasts, sirloin tips (that football shaped roast on the back hams), rump roasts, and neck roasts.
Jerky Thickness and Grain Direction
When it comes to slicing jerky meat, you have some choices. Slicing with the grain gives the finished product more of a satisfying chew when you bite it. Going against makes the jerky more tender and easier to eat. Try them both and see which one you prefer.
The most important part of slicing jerky is to make it a consistent thickness. You want the jerky to dry at an even rate. Having a mix of thin and thick jerky drying means going through it constantly to pick out thinner pieces that may be finished, while a thicker piece next to it might still need hours before it’s safe to eat.
What thickness, you ask? It’s up to you, to a point. Thicker slices, while meaty and satisfying, don’t keep well without refrigeration. Thick jerky also takes a lot longer to dry. Thin strips of meat dry fast, but they can get overdone in a hurry, leaving you with a crispy piece of meat that crumbles more than chews. My preference is somewhere in the middle. I slice most of my jerky around ¼ inch in thickness.
How to Slice Deer Meat for Jerky
There are a number of ways to slice your venison. First, and by far the simplest, is a good sharp knife. Partially freezing the meat for an hour or two before slicing helps to firm it up and makes hand slicing at a consistent thickness easier to accomplish. Work in batches, taking only as much meat out of the freezer at a time as you can slice before it softens back up.
Next, on the list is a jerky slicing guide. These guides are made from metal or wood and feature a shallow tray to hold the meat and thickness guide. They are like manual deli slicers.
If you really enjoy jerky and want to make large batches, consider investing in an electric meat slicer. They have sliding guides that allow you to adjust the thickness of each piece, and make short work of several pounds of venison.
Another handy option to crank out several pounds of jerky strips in a hurry is a crank-style jerky slicer. Often sold as a combo unit that includes a cuber attachment, these slicers have a large open neck at the top that allows the user to drop in a large cut of meat and guides it through a set of blades that turn with the crank of an outside handle. While not adjustable for thickness, these units turn out a very uniform slice about ¼ inch thick and do it in a hurry.
How to Make Deer Jerky from Ground Meat
Have a few packs of last year’s ground meat in the freezer that you need to use up? Here’s how to make deer jerky from ground meat. The basic idea is to mix it with your favorite commercial or homemade jerky seasoning and form it into long, thin strips to dry.
You’ll use a jerky gun, which looks like a large caulk gun and comes with various tips for squeezing out flat strips of ground meat for drying. While ground meat jerky doesn’t have the rewarding chew of sliced, many jerky lovers say the flavor is better since the seasoning runs throughout the ground meat.
READ NEXT: How to Cook Venison: The Best Ways to Cook Every Cut
Step 2: Marinade and Cure
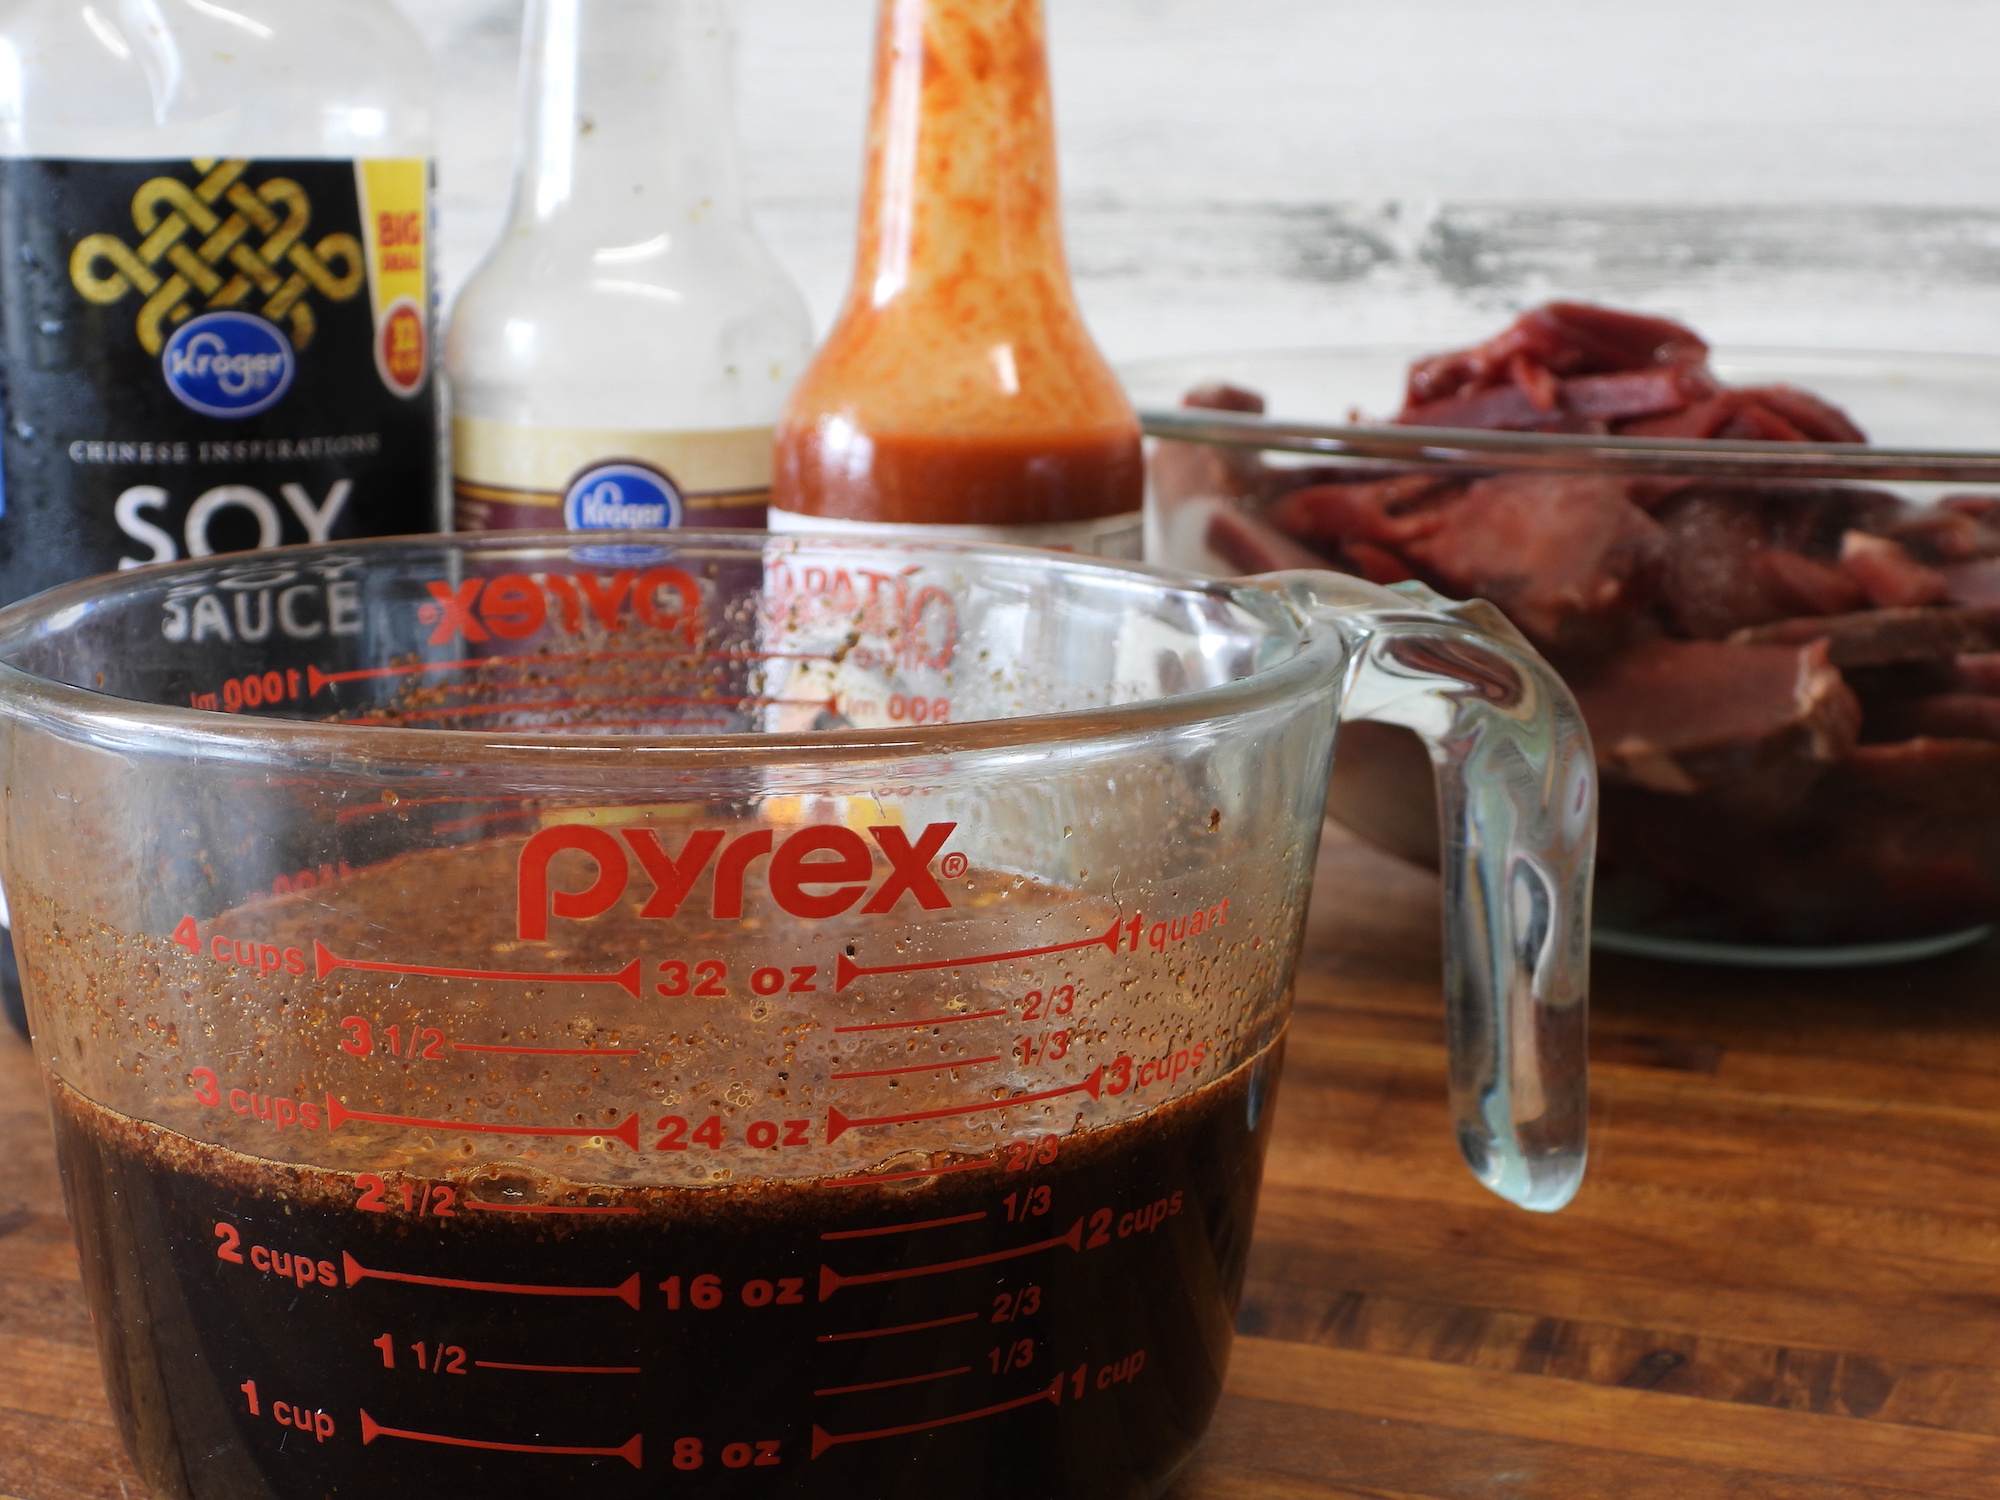
Jerky needs seasoning. That can be salt and spices sprinkled on the raw meat and allowed to rest overnight, or, more popular, a marinade. The best deer jerky has a balance of salty and sweet flavors. Popular ingredients for marinades include soy sauce, Worcestershire sauce, your favorite commercial wild game marinade, hot sauce, brown sugar, BBQ rub, black pepper, spices, honey, maple syrup, coffee, and any number of other flavors that you enjoy.
Adding an acid like citrus juice or vinegar helps to perk up the finished flavor of the jerky. Try mixing and matching until you find a combination that you love. Marinate your jerky for at least 24—and up to 48—hours. Marinade flavors tend to dull a bit as the jerky dries, so make sure yours has plenty of zing to start with. If you enjoy the barbecue flavor of smoked meats, but plan to use your oven or a dehydrator to dry your jerky, then add a few spoonfuls of Liquid Smoke to your marinade.
Does Jerky Need Curing Salt?
When it comes to adding sodium nitrite, known as Instacure #1, Prague powder or pink curing salt, to jerky and other cured meats, you will often run into differing opinions. While it is true that sodium nitrite in relatively large doses can make you sick, so can botulism and some bacterias. And the nitrites help to protect against that. Always use Instacure #1 and other brands of curing salt at the recommended rate, 1 teaspoon per 5 pounds of meat. As long as you follow this rate, nitrites are safe to consume.
Bacterias that cause foodborne illness tend to thrive in the temperatures and conditions you find in most dehydrators. A bit of curing salt is good insurance that your jerky won’t make you or your friends and family sick.
Best Deer Jerky Recipe
- 5 pounds well-trimmed venison
- 1 1/2 cups soy sauce
- 1 cup Worcestershire sauce
- 1/2 cup brown sugar
- 1/4 cup honey
- 2 tablespoons lime juice
- 2 tablespoons freshly ground black pepper
- 2 tablespoons hot sauce
- 2 teaspoons onion powder
- 2 teaspoons garlic powder
- 2 teaspoons red pepper flakes (optional)
- 1 level teaspoon Instacure #1
Step 3: Drying
Once your jerky has marinated, it’s time to dry it. Drying at low temperatures, between 145 and 165 degrees, yields the perfect finished product. Go much lower than that and the meat takes too long to dry and might not dry completely. Much warmer than 165 degrees and the jerky cooks rather than drying, leaving you with a crunchy piece of meat that isn’t very satisfying. The outlier on the normal jerky temperature range is wild pork and bear jerky. Since both of these animals can carry trichinosis, cranking the temperature up to the 165-175-degree range ensures the jerky is safe to eat.
Here are some of the best ways to get the perfect jerky. With any of these methods, leave some space between the jerky slices so that air can pass over them for even drying.
Making Jerky in a Dehydrator
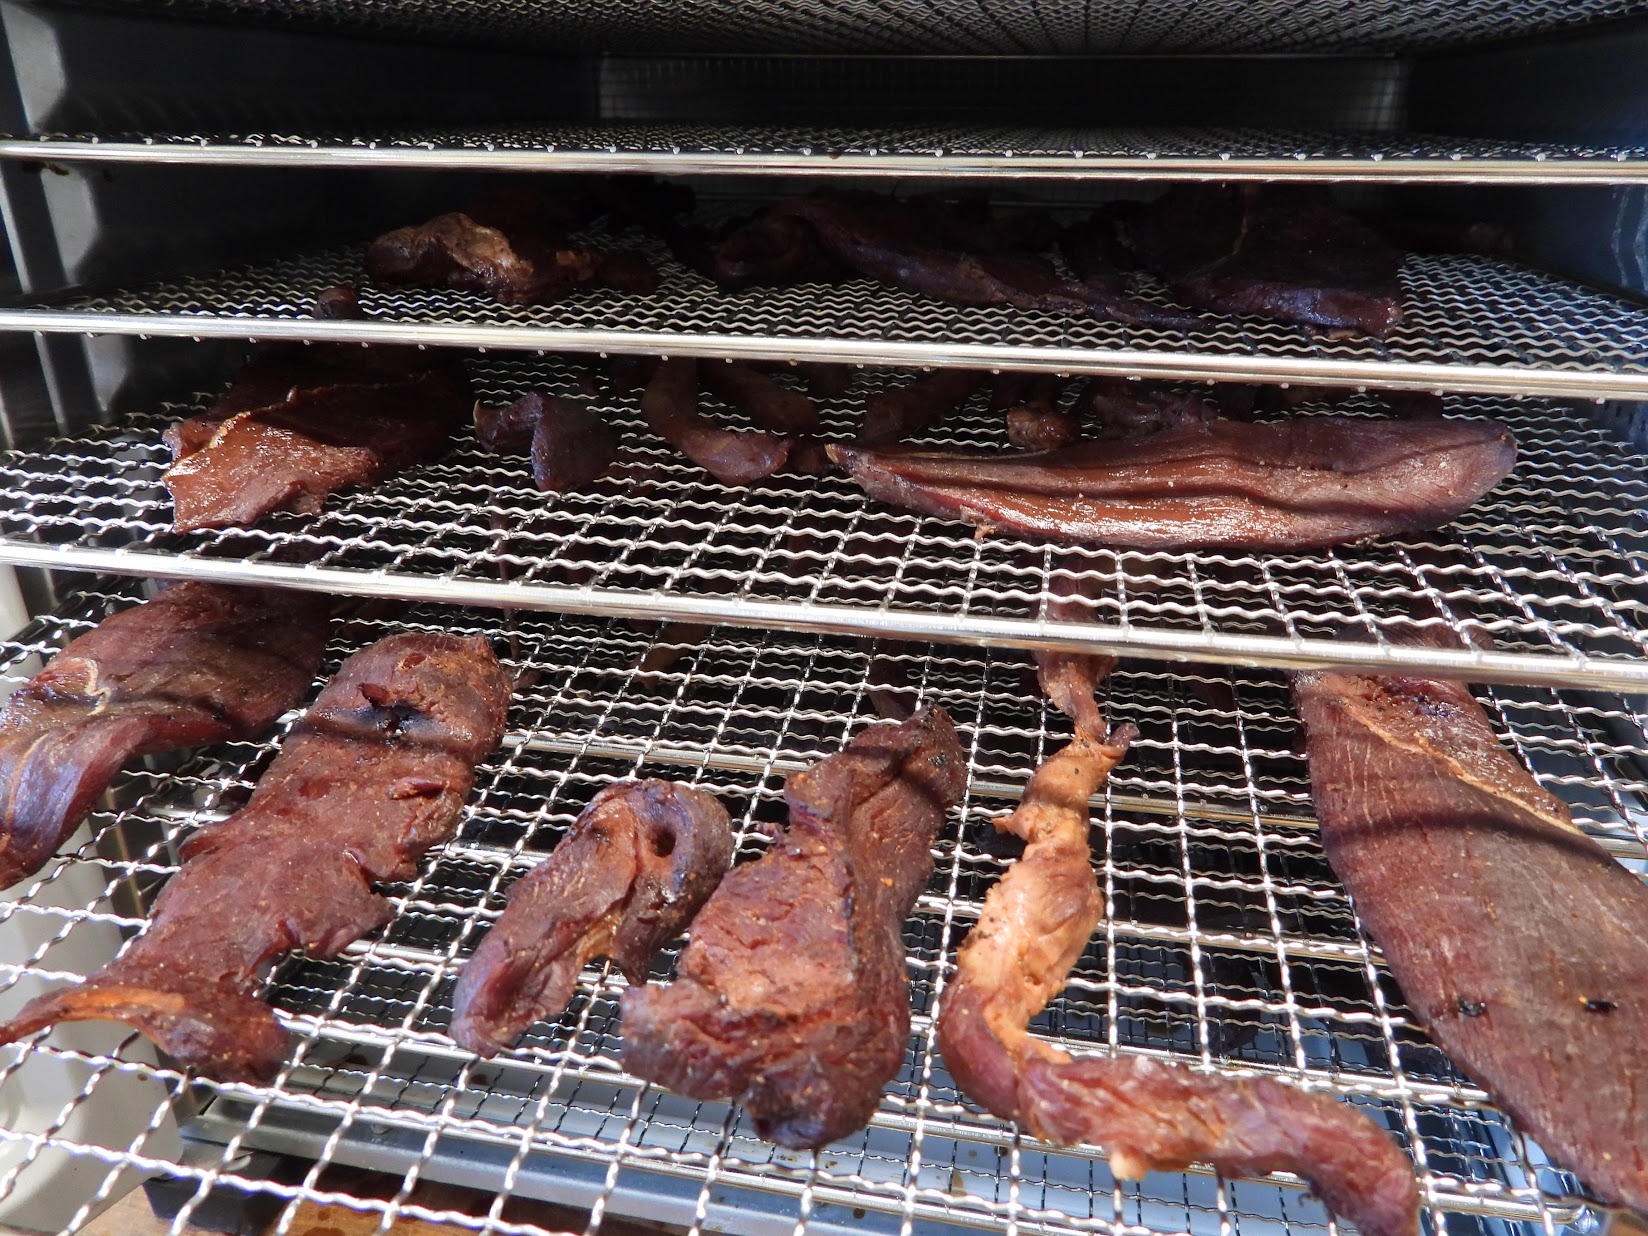
For my taste, a dehydrator is the best way to make jerky. They dry meat quickly without over drying it. Look for a unit with multiple removable shelves, a fan to keep air moving, and a heating element with precise temperature control. Here’s how to make deer jerky in a dehydrator.
With most dehydrators, drying time ranges from 4-9 hours, depending on fan speed and design. When drying multiple racks of jerky in a batch, rotate the trays periodically so that each tray spends the same amount of time closer to the fan and heating element.
READ NEXT: The Best Dehydrators for Jerky
Look for a dehydrator with removable trays for easy cleanup after your jerky is done. Patting the jerky dry once it comes out of the marinade also helps to cut down on cleanup time.
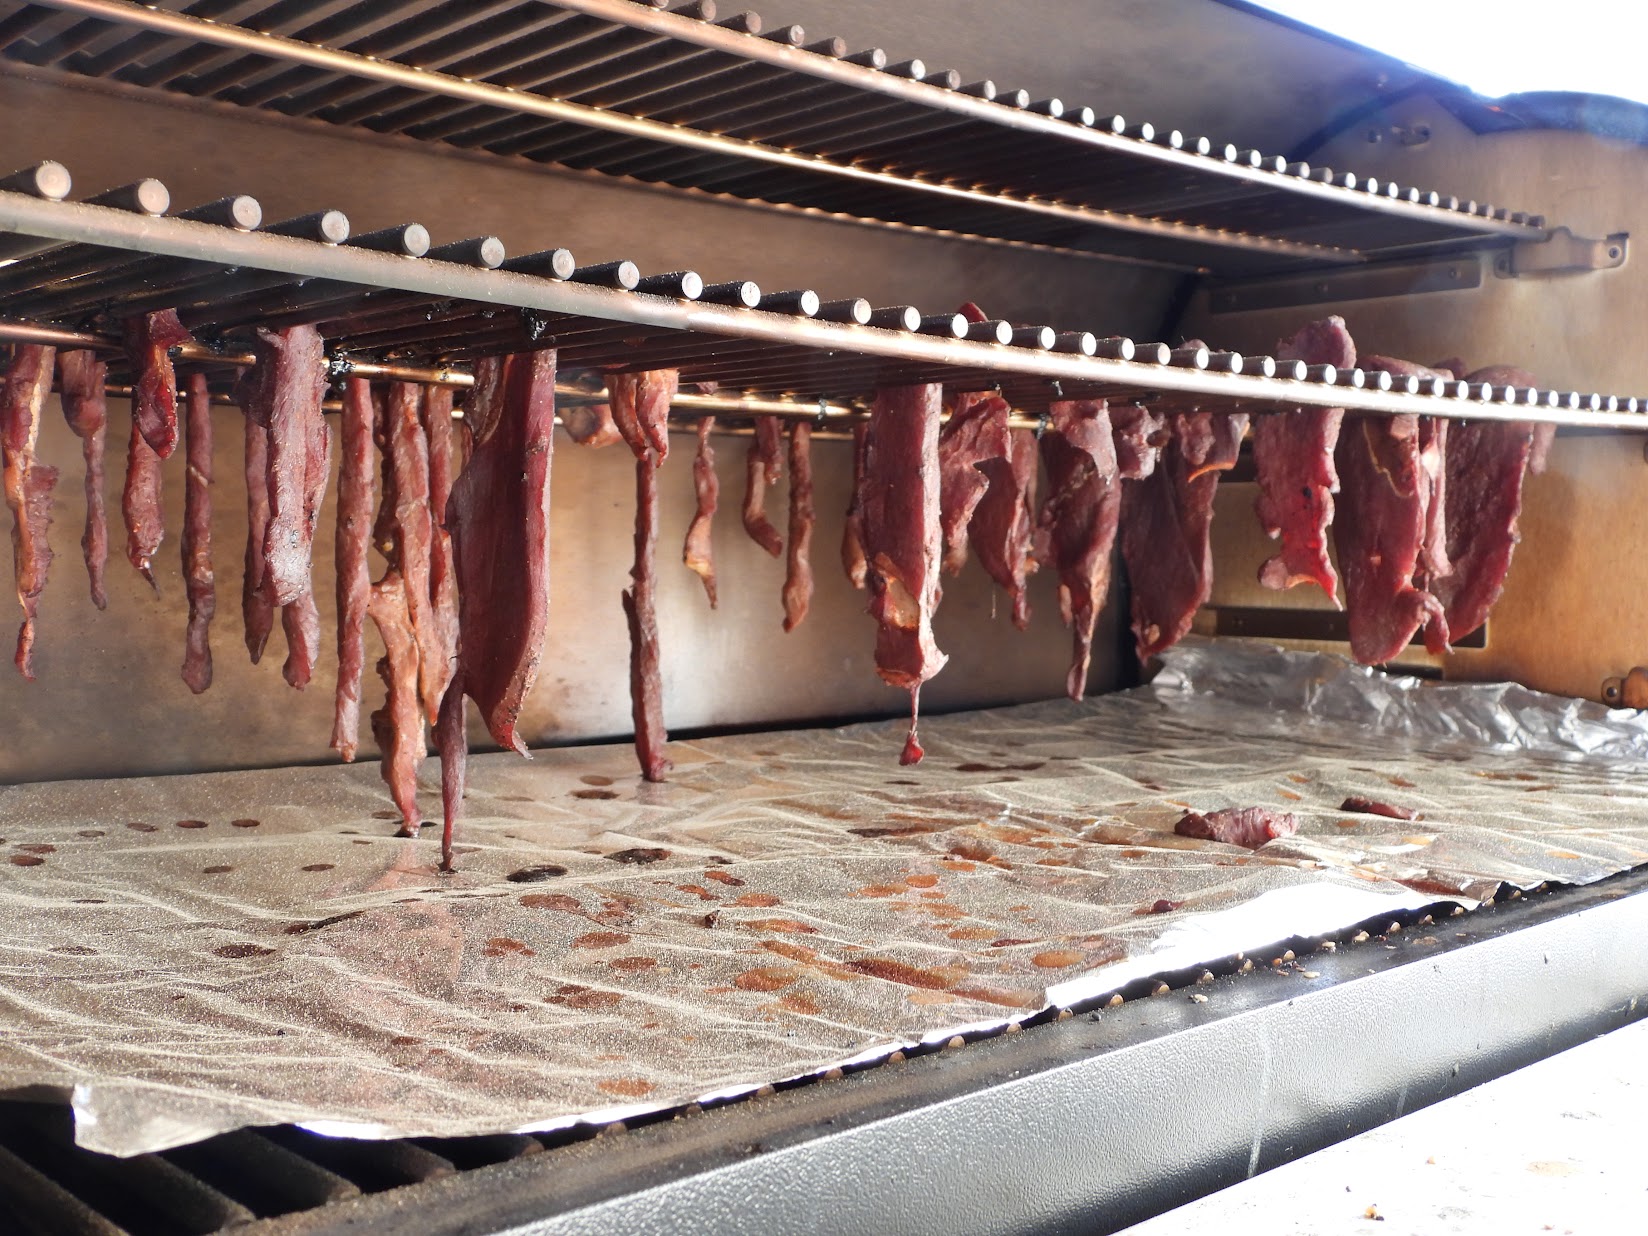
Making Jerky in a Smoker
A close second behind a dehydrator is a smoker. Smoked jerky has a great campfire flavor that is hard to beat. If your smoker has upper and lower racks, cover the lower rack with foil for easy cleanup and either lay your jerky flat on an upper rack or, better, suspend it from the upper rack from wooden skewers.
Read Next: Best Smokers
Simply thread several jerky slices onto a skewer and drop the meat between the grill grates of the rack, leaving the meat suspended from the wooden skewer resting on the upper grate. This method allows you to fit a lot of jerky into a compact area while still letting the smoke hit the entire meat surface for maximum flavor.
Read Next: Best Wood Pellets
Smoke at the lowest temperature setting your smoker will operate at. For my Traeger Pellet Grill, that’s about 165 degrees. Dry for 4-6 hours or until the jerky is dry but still slightly flexible.
Making Jerky in the Kitchen Oven
If you don’t have a dehydrator or smoker, you can make great jerky in your kitchen oven. Treat it just like the smoker, lining the bottom rack with foil for clean up purposes, then suspending the jerky from the top rack on wooden skewers.
Set your oven at the lowest temperature and use a wooden spoon or something similar to prop the door open a bit to allow for air flow. If your oven has a convection feature, use it. If it doesn’t, a small fan resting just outside the oven door and positioned so that it blows into the open crack of the oven door keeps enough air moving to evenly dry the jerky.
Drying times are similar to the dehydrator, but, depending on the oven and lowest temperature available, the jerky can dry quickly. Start checking about 3 hours in so that your jerky doesn’t over dry and get brittle.
Making Jerky Over a Fire
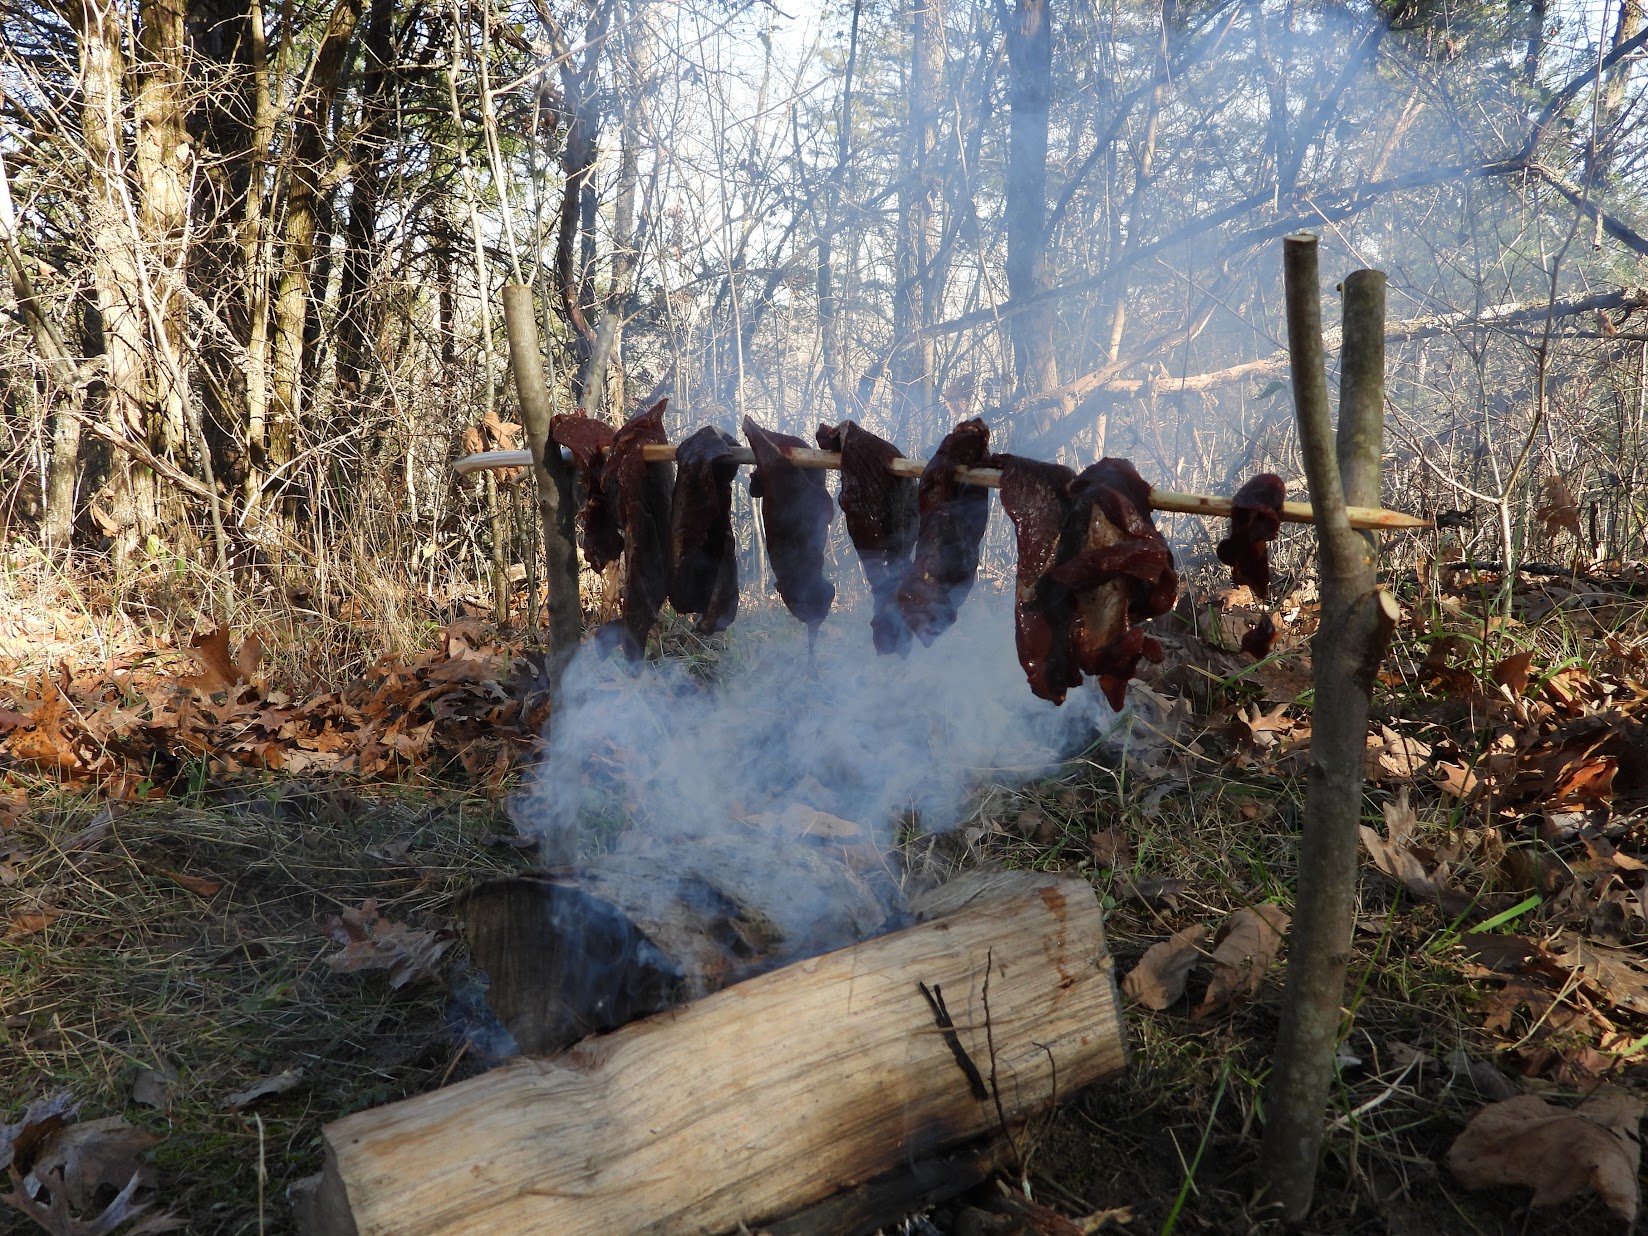
If you really want to go old school, and you have plenty of time, go with a smokey fire. You don’t need a ton of heat, but you want the fire to smolder and smoke.
Suspend your jerky over it on a wire grate or on a wooden spit resting on a couple of Y-shaped sticks stuck into the ground on either side of the fire.
You’ll have to monitor the fire closely to keep just the right amount of heat on the meat without overcooking. You might have to scoot the meat around to keep it in the smoke depending on wind direction. As a temperature guide, hold your hand near the meat. You want it to be hot, about the temperature of hot tap water, but not so hot that you can’t hold your hand in place for several seconds.
Is campfire jerky better than other methods? Not really. But it’s satisfying to make a batch the way our ancestors did from time to time.
How to Store Jerky
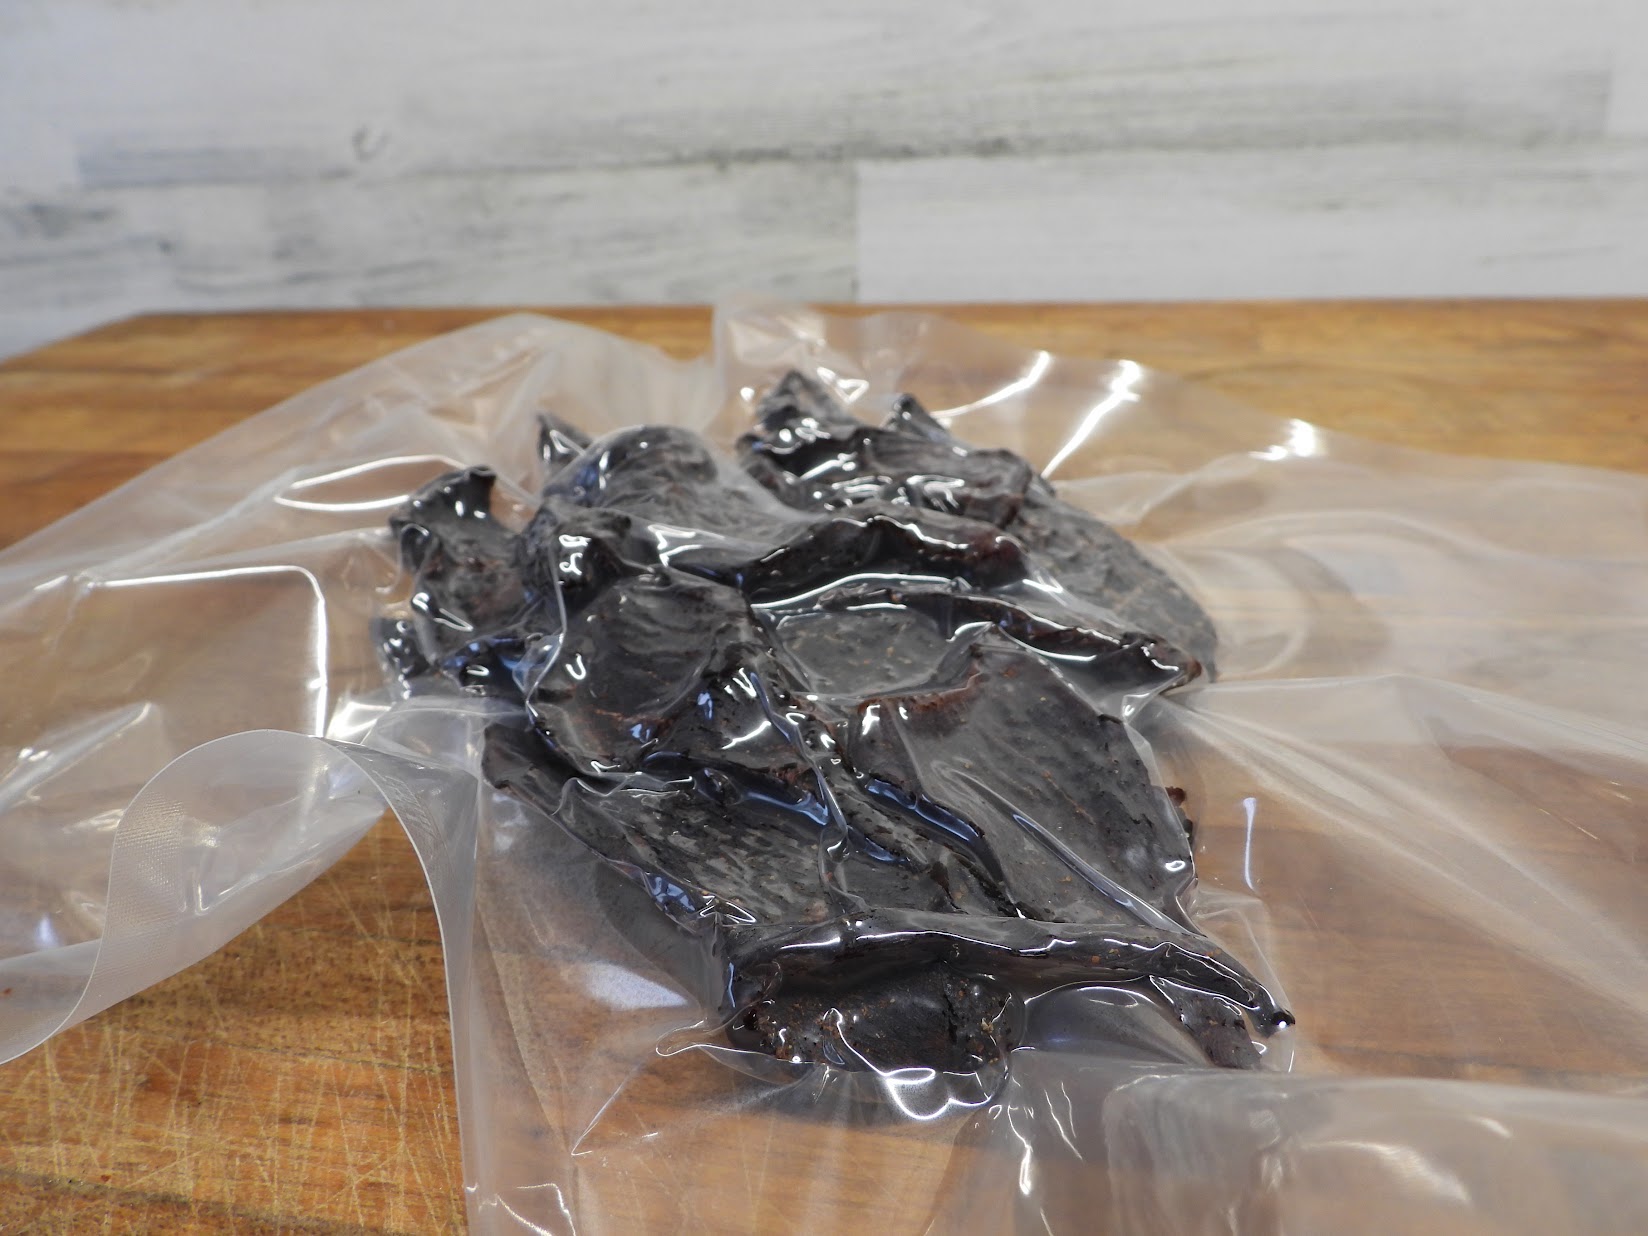
Once your jerky is dry, you need to store it for long-term use. Glass jars with tight fitting lids work, as do plastic food containers with snap on lids. My favorite way to keep jerky is vacuum sealed in packs sized to last a few days on a hunt. You can keep it refrigerated for several weeks, but to get maximum storage, freeze the jerky and take out what you need before each hunt. I have kept sufficiently dry jerky at room temperature for two or more weeks at a time with no issues. Will it last even longer than that? Most likely, but keeping it frozen until I need it removes any doubt.