Winter is upon us, bringing with it harsh conditions that put outdoorsmen at risk. If you find yourself lost in the wilderness, possessing the know-how to construct a snowcave could mean the difference between rescue and recovery. By Rick Johnson. Click "next" to get started. Outdoor Life Online Editor
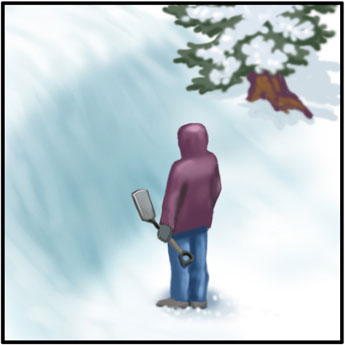
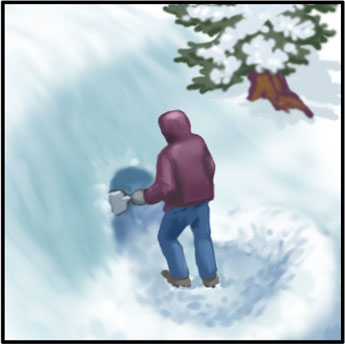
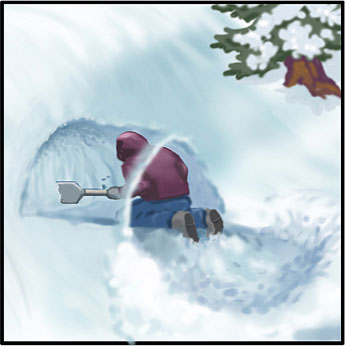
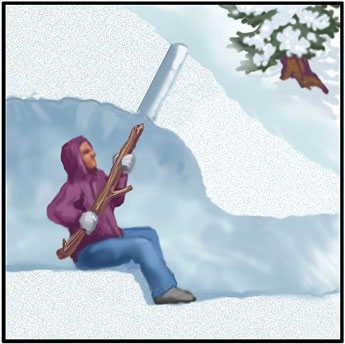
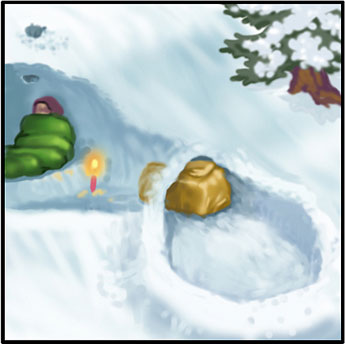
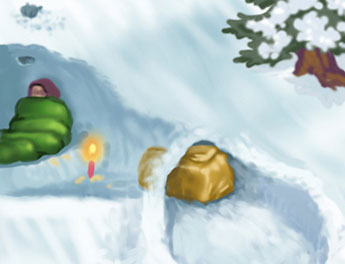
The easiest way to build a snowcave is to find a slope or a drift bank where the snow is at least six feet deep and stable. You don't want to build in an avalanche zone, and if the snow is too powdery, it is not possible to simply burrow into it and have the structure hold up. Old snow is best. Unfortunately, when you are in a snow survival situation, you have to deal with the kind of snow and the type of landscape Mother Nature gives you. You can't always pick and choose the conditions. Note: It is critical that you stay as dry as possible during the entire building process. It does you no good to get soaked (which is easy to do) and then have to fight the additional threat as hypothermia sets in. Outdoor Life Online EditorBegin by stomping down the snow in a wide area in front of the place where you intend to burrow into the slope. You need this stomped-down area as a place to temporarily toss the snow you excavate from the cave. Use whatever tools you have (snowshoes, skis, poles, avalanche shovel, etc.) to carve a horizontal tunnel into the slope. This is the mouth of your cave. Make it large enough that you will be able to crawl inside on your hands and knees, but small enough that you can cover it with a backpack or blocks of snow later. Outdoor Life Online EditorBurrow straight in for about three feet, and then start carving in all directions (upward, sideways and straight ahead) to enlarge the interior. Remove all the loose snow to the outside and use it to create a low windbreak around the area that you stomped down earlier. Note: Be careful to not breach the walls of the cave as you dig. It will be dark inside, and if you start to see a light spot, the wall is getting thin. Try to keep the walls at least 18 to 24 thick, so they will provide good insulation. Outdoor Life Online EditorContinue to enlarge the cave interior to accommodate the number of people in your party. Keep the floor level, and carve out a raised shelf that is big enough for you to sleep on. Colder air will fall to the floor below this shelf, keeping you more comfortable. Finally, use a pole or stick to poke a hole the diameter of a baseball in the roof for ventilation, then use snowblocks or your back pack to cover the tunnel, allowing just a bit of air flow for ventilation. Outdoor Life Online Editor1. Life in a snowcave is quiet, and you might not hear the approach of rescuers. Outside, plant plenty of visible signal devices "" colored equipment, flags on tree limb poles, etc. 2. Now, hunker down and stay as warm and dry as possible. Get in your sleeping bag and conserve your energy. Drink plenty of water to help prevent dehydration, which leads to hypothermia and frostbite. 3. If you have a candle, that will be enough to keep the interior of the snowcave warm and increase your chances of survival. But be careful to not overheat the cave. If the ceiling starts dripping, it's too warm inside and you run the risk of the cave collapsing. 4. Use a foam pad (closed cell is best) to insulate your body from the cold. If that is not available, cut small pine branches from the forest and lay them in a thick layer on the sleeping platform, to serve as an insulating mattress. 5. Stay dry! Avoid all direct contact between your skin and anything that is cold. Stay inside out of the wind (unless you're cooking a meal). Eat hot meals and drink hot fluids to increase your core temperature and help stave off hypothermia. Outdoor Life Online Editor
As winter weather approaches, so does the need for survival skills. OL’s survival expert keeps you informed with this step-by-step guide.