
We may earn revenue from the products available on this page and participate in affiliate programs. Learn More ›
You couldn’t pick a better time to get into traditional archery. There’s a wide variety of good, affordable gear. Plus, there are great online resources for new shooters (more on that in a moment).
However, there are a few hard truths about getting into trad. First, it’s going to be difficult—you will likely have the impulse to hurl that new bow through the woods on more than one occasion. Second, it’s going to take time—it took me about a year of shooting before I was competent with a recurve and another two years before I was really skilled with one. But if you keep after it, you’ll earn the opportunity to experience one of the purest and most exciting forms of hunting.
Starting with a solid foundation is key.
Until recently, there haven’t been any widely-available, standardized resources for learning how to shoot a trad bow. Without established mentors or coaches, most of us have been left to figure it out on our own. This is where Tom Clum Sr. of Rocky Mountain Specialty Gear comes in (read my full story about shooting with Tom here). Tom is a certified archery coach and a bowhunter at heart. He saw how he could adapt a target archery shot for hunting. The standardized “NTS” shot was developed by a US Olympic coach as a scientifically designed, and biomechanically efficient, repeatable shot, and it produces incredible accuracy and consistency.
Tom began teaching this method of shooting a recurve in his shop and has recently released an online class called SOLID Archery Mechanics. A one-time fee will give you unlimited access to all the info you would get if you were getting Clum’s coaching in person. It’s a substantial initial investment at $200, but having gone through the course myself, I can confidently say that it’s worth the money. I wish I’d had this information years ago when I was learning to shoot. It would have saved me years of frustration.
I am fully convinced that a person who goes through this course with a stretch band for a month before even picking up a bow will learn much faster than someone trying to learn by himself. Along with enrolling in Clum’s course, here’s what you need to get started.

1. Stretch Bands
This is probably one of the most underrated tools for the trad archer. Even Olympic-level shooters use stretch bands, and you should too. They can be made in any number of ways, but a basic therapy band that gives you some flexible resistance is all you need. It allows you to simulate draw weight and develop your shot without holding up the weight of a bow, and as a bonus, you can take it anywhere. It’s not for building strength, but for working on all the intricacies of your shot.
When I learned the NTS method of shooting, all of the initial work was done on a stretch band. You will have to teach your brain completely new motor programs, using muscles in ways you haven’t before. This takes a lot of time and slow, isolated movements, which are perfect for the stretch band. You can work on those individual movements, then begin to blend them together into a smooth shot process. One guy I know who has been going through the course struggled and struggled to develop his shot with his bow. I suggested he get a stretch band and work on each individual part of his shot before finally meshing them together. A month later, his form looked way better, all from the stretch band.
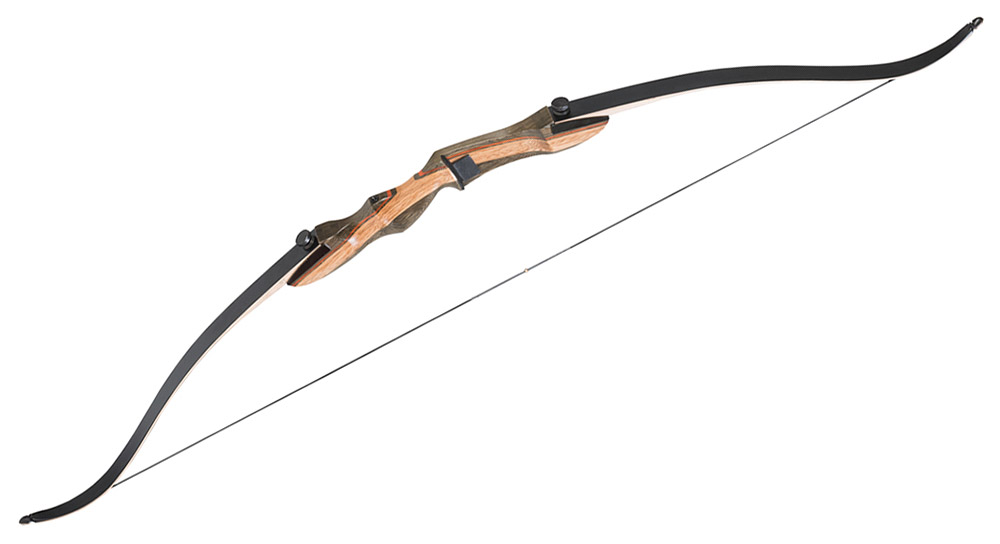
2. Buy Your First Bow
It’s hard to overstate how important it is to pick the right first bow. Most new shooters want a nice bow that they can learn on, but also hunt with, which leads to the most common mistake: being over-bowed. That is, having a bow with a draw weight that is too heavy. It is extremely easy to over-bow yourself. In fact, for most men, it wouldn’t be a bad idea to start with a draw weight of 30 pounds. This sounds super light to a compound bow shooter, but trad shooters need to learn to use different muscles in different ways than they’re used to. The key is learning to draw the bow properly, and it’s easier to do this with a bow that has a low draw weight. Also, you will gain confidence more quickly with a lighter bow. Nothing will kill your desire to shoot trad quicker than struggling to pull your bow back and failing to hit the target.

Cost is another major consideration. Many high-end custom and semi-custom recurves and longbows will run upwards of $1,000. These bows are nice, and many of them shoot wonderfully, but don’t even consider one of these for your first bow. There are many affordable bows that are much better to start with, and there are a couple of reasons for that. First, you don’t want to tie a bunch of money up into something that you may decide isn’t for you. Also, as you become more comfortable and better at shooting, your preferences may change. You really need to have an established shot in order to tell which bow feels right for you. Even if you want to end up with a high-end bow, start cheap, then you’ll be better suited to find the bow that fits you best.
Finally, I recommend a takedown bow to start with. These typically utilize interchangeable limbs. This will allow you to start with very light limbs, and as your skill level and strength grow, you can just get a new set of limbs for the same bow. For any new shooter, I’d recommend bows like the Fleetwood Edge or Samick Sage. These are very affordable recurves with limbs in a variety of weights. They can sometimes have Q.C. issues, but overall, they are fantastic options for new shooters. Start with light limbs, and you can usually find heavier ones for $50-75.
Read Next: Shooting Lessons Learned from a Master of Traditional Archery
3. Buy Your First Arrows
Like your first bow, you want your first set of arrows to be cheap. In the beginning, you’re basically just looking for something straight to send out of your bow. Wood, carbon, or aluminum doesn’t matter, just get what you can afford. If you have the option, select a spine-class that the charts say should be close for your draw weight, but don’t sweat the details. Trying to tune arrows at this point is futile because as you advance, your shot will change dramatically, and your consistency will improve as well. If you shell out big-time for arrows right off the bat, it’s likely that those arrows won’t even be what you need once you become more consistent. Arrow spine, point weight, and tuning will all come into play, but this stuff only matters after you already have a consistent shot. So, wait before you buy the good stuff.
The Hook
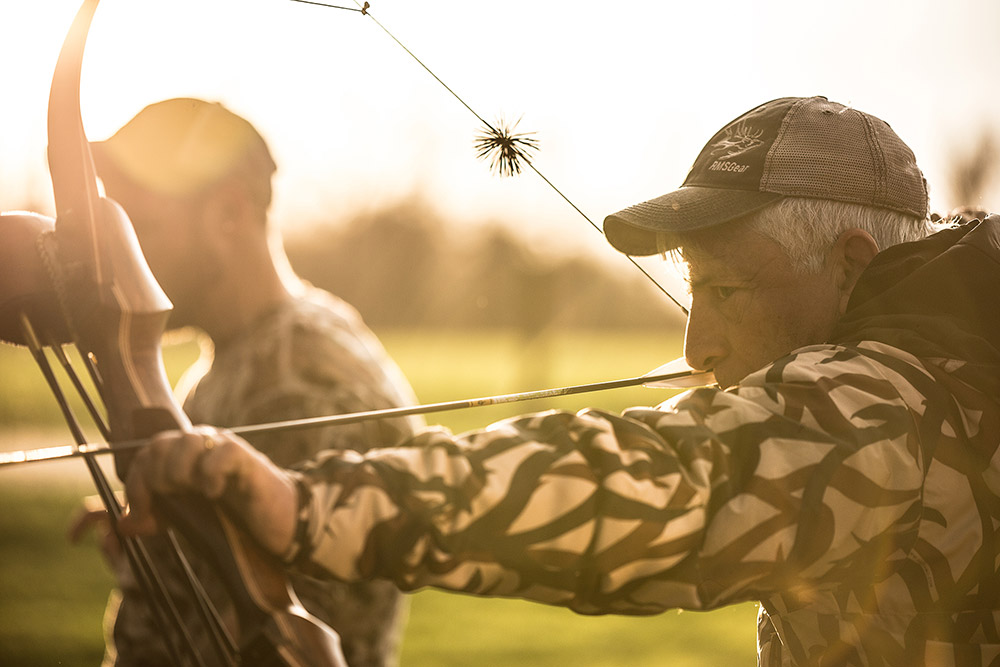
It might look unbelievably simple, but a properly executed shot is much more complex than it seems. Each component of the shot lays a foundation for the next step. It might be difficult to see how one or two details will affect the outcome, but it all matters. It all starts with how you address or “hook” the string. If you’ve always done what feels natural, chances are, you’ve been doing it wrong. I sure was. The basic components of the hook are: 1) where the string sits on your fingers; 2) weight distribution. You want the string just in front of the first notch of your index finger, just behind it on your middle finger, and on the pad of your ring finger. Most of the weight will be on your middle finger, followed closely by your index finger. Finally, your ring finger should be holding just enough weight to keep the string from pinching your middle finger. Too much weight, and you will have added torque on your string and it will slightly change the tiller of the bow. This hook will also be the same for both split-finger and 3-under shooting.
Another critical component to the hook is maintaining what’s called a high wrist. If you think about how you carry a bucket of water, your wrist is slightly bent with your hand curling inward toward you. This is a position of strength. The “natural” way to pull a bow straight back bends your wrist in the opposite direction, into a weaker position (low wrist). Setting up a proper hook can be very uncomfortable at first, but don’t skip it. A proper hook will create the strongest holding position, and allow the string to blow through your fingers efficiently; eliminating sloppy releases. It will get easier, and it is a critical step in learning the rest of the shot.

The Cognitive Shot
Once you’ve got the basics down, the rest is all mental. There are quite a few folks out there who will tell you that the best way to shoot a traditional bow is to shut off your brain and go by feel. This might feel good and comfortable, but it is not a consistent way to shoot a bow.
The mental side of shooting a bow is every bit as important as the physical. Accuracy and consistency come from doing the same thing, the same way, every time, and we can’t do that by going on auto-pilot. You must develop a rigid “checklist” that you run through on every single shot. When you’re learning, the process can seem complex and slow, but as you develop your shot, the checklist becomes more natural.
Cognitively running through your shot also allows you to analyze the process better and determine where you are having problems. When you are shooting cognitively, it’s easier to walk back through a shot that went awry and figure out the issues. Keeping your head in the game will help as you go through the SOLID Archery Mechanics program and learn to shoot, but developing your own cognitive checklist to hit each and every shot will also help you right where you’re at now.