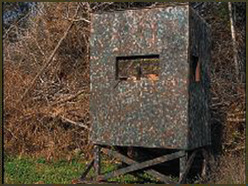
Okay, so you’ve got a great spot for hunting whitetails: a nice property broken up with small stands of trees, meadows and food plots. But, you would like to move around to try different shooting spots. If you follow these step-by-step plans, you can build your own portable camouflaged shooting house for about $400 and roughly two weekends’ work.
Step 1: The Basic Framework
With every step, make sure you’ve taken accurate measurements and cut all pieces to proper size. Build on level ground and square everything as you go. I use mainly self-starting wood screws to attach each piece, but galvanized nails can work fine too.
Cut the two skids to length (96 inches) and round the ends with a saber saw or by making successive angle cuts with a portable circular saw. Using the lag bolts, fasten a front post and a shorter rear post to the inside of each skid two inches from the bottom edge of the skid and 24 inches from either end. Using a carpenter’s square, make sure they are square. Attach the side joists to the posts so that their top edge is 38 inches from the bottom edge of the skid. Cut the outside rafters with their ends to the correct angles and attach them to the post tops of each assembly; position the rafters so the post tops don’t protrude above the rafter.
Screw one end of the front joist to one side assembly, making sure all is square. Then stand the assembly up along with the opposite assembly and fasten the front joist to that side as well. Then attach the back joist to both assemblies. Level and plumb the entire assembly; the assembly should be 72 inches wide across the front and back. Put shims or wedges under the corners of the skids if necessary to make sure they are absolutely level.
Step 2: Flooring, Braces and Steps
Attach the two inside floor joists between the front and rear joists, spacing them evenly. Prepare the plywood floor by cutting notches in each corner to fit around the posts. Position the floor in place and screw it to the joists; the floor should extend to the outside edges of the side, front and back joists.
Attach the front and rear rafter hangers to the tops of the posts, making them flush with the outside rafters. Then screw in place the inside rafters. Attach the front and rear skid braces atop and across the ends of the skids. Screw the 2×4 side braces in place; attach their top edges to the side joist, the bottoms to the skid. Also fasten the side braces to the posts. Attach the front and rear bottom braces to the posts, forming a horizontal “X” shape between each set of posts. Cut the bottom and top angles of the step stringers and screw them into the rear skid brace and the rear joist. Cut the steps to fit and install them.
Step 3: Studs and Window Frames
Cut the two front, two side and three rear studs and nail them in place, notching them to fit around the outside rafters and front and rear rafter hangers. Small blocks can be fastened to the floor to help anchor the studs. The two front studs should be set with their inside edges 20 inches from the outer floor edge and 32 inches apart. Each single side stud should be set 24 inches on center from the rear outer floor edge. Facing the rear of the shed, set the first rear stud 24 inches on center from the right-hand floor edge. Set a second stud 37 inches from the left-hand floor edge. Set the third stud against the inside of the left-hand post. These dimensions create the spaces for the back door and window.
Attach the 2×4 and 2×2 corner-blocking pieces to each post. (Rip two 2x4s to create four 2x2s.) Cut the top and bottom window framing to size for the front, side and back windows and attach them between the studs or between the studs and posts. Cut the cripple studs that fit above and below the front window frame and screw in place (for the siding joint).
Step 4: Walls, Roofing and Door
Install the five siding pieces one at a ttime using No. 4 galvanized nails or self-starting wood screws. (Note the front and back each require one full and one half sheet of siding.) Mark the locations for the window openings. Drill a hole from the inside at each window corner. Use a straightedge and pencil to connect the holes outlining the windows. The simplest way to cut the window openings is to use a saber saw. Insert the saw blade into the drilled holes and cut on the marked lines. Or use a circular saw to make pocket cuts. Hold back the blade guard on the circular saw with the guard tab. Position the front of the saw shoe on the wood surface and start the saw. Slowly and carefully lower the saw blade into the wood and follow the marked lines for the window opening. Stop the saw at each corner and use a handsaw to complete the cut.
Cuts the roof piece to the correct size and fasten it securely in place (the roof slopes slightly to the rear). The roof seam should be sealed with caulking around all of its edges. The roof can be further waterproofed with a layer of asphalt-based roof coating, or use pieces of asphalt roll roofing, sealing the edges with tube asphalt sealant. For the door, I used an old door that I cut and planed to fit (30 inches wide, 74 inches tall) and installed using butt hinges and an exterior lock. But you can also use the piece of siding cut out to make the door opening; strengthen the edges with 2x2s and attach with butt or strap hinges.
Step 5: Final Touches
Cut the inside skid support blocks and fasten them in place with screws. The grain on these blocks must go opposite the grain on the skids. Then bore holes through the skids and support blocks. I strung a piece of aircraft cable through the holes and secured it with cable clamps to create a tow strap for the house, but heavy rope will work too.
Cover the windows with mesh camouflage from the inside, and cut shooting slits in the mesh. Or put Plexiglas windows on hinges inside. These windows can be dropped down or hinged to swing up as needed (in colder climates the covered windows are a plus). Turn buttons can be used to keep the windows open or closed. If using the Plexiglas windows, camo netting should be attached on the outside.
The entire house should be given a coat of dull, flat paint to match the base surrounding colors-brown for deciduous woods, green for pine. Use flat exterior spray paints to make a camouflage pattern of your choice. One method is to spray a pattern of tan blobs and streaks and then set a piece of plastic leaf or fern against the tan and spray over it with a darker color.
I pull the house with my tractor, but a pickup or even a heavy-duty ATV will work just as well. The house is also designed to slide into a six-foot-wide utility trailer for transporting. With today’s powerful battery-powered electric tools, however, you could build the house at camp or near the hunting site.