We may earn revenue from the products available on this page and participate in affiliate programs. Learn More ›
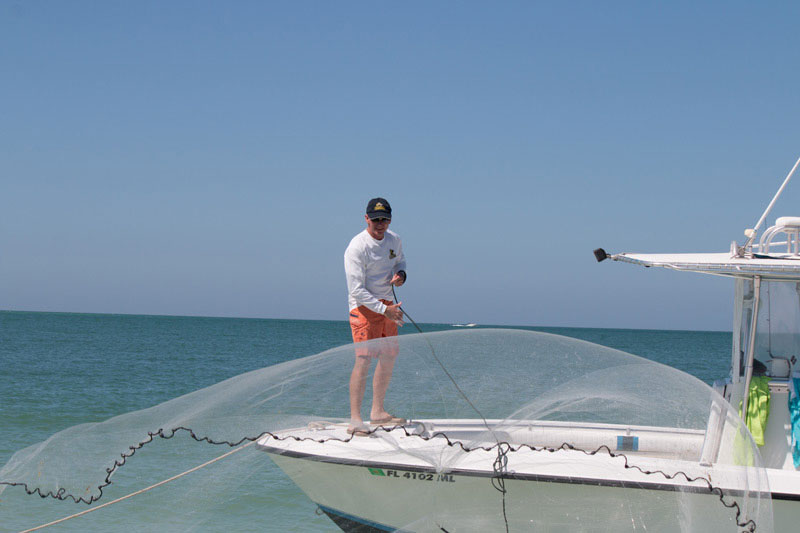
Getting fresh, live natural bait is important to a lot of fishing, in freshwater and saltwater. Catching your own bait with a throw net can save anglers plenty of time, money, and effort. If you can catch live minnows with a throw net in the shallows of your favorite walleye lake, for example, a trip to the bait shop is unnecessary. Moreover, the money spent for bait and gas traveling to-and-from a bait shop is better used for boat fuel. One of the best ways to do this is learning how to throw a cast net. It’s a simple, easy, and fun way to get a wide variety of bait in almost every waterway.
Another plus for catching your own bait with a net is that bait caught from lakes and rivers is “native” to that water. It’s more natural for fish residing in that water to eat lively, resident bait than bait raised somewhere distant in chemical-laced hatchery water.
You’ll see the results on the water. Live “hatchery” shiners used for bass and other species may be productive. But it’s not as effective as shiners living in, and caught from, the water where the bass you want to catch live.
Anglers using cast nets should check state and local laws governing their use. Also, be familiar with what species of bait is lawful to catch and keep when cast netting. In some states, for instance, using a cast net is lawful for catching shiners, river baitfish, and tidewater minnows. But if bluegills, crappies, bass, and other sport species are incidentally caught in a net, they must be released alive immediately. Fortunately, small mesh cast nets rarely entangle or “gill” larger sportfish that are caught. So gamefish that should be released are uninjured and survive well if promptly returned to the water. Here’s what else you need to know about cast nets and how to use them.
How to Throw a Cast Net
There are many great ways to toss a cast net, but the following method is one of the easiest to learn. This is the “Calusa Dry Load” method, perfected by Roy McDermott and Buster McKenzie, who make Calusa Cast Nets.
The “Dry Load” casting method is so simple children as young as age six have learned to throw a four-foot net, with almost instant success.
The following steps (for a right-handed person) are easy to learn, just go slow, and be methodical in their sequence.

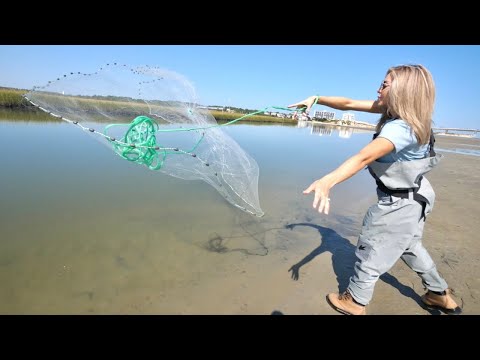
Step 1: Fashion a slip knot at the end of the net’s “throw line,” forming a loop in the line, then slip it over your left wrist and tighten.
Step 2: Form a series of loose coils with the throw line from the slip knot on your wrist toward the net, then grip the coils with your left hand.
Step 3: Now hold the top of the cast net securely just below its large “horn,” as shown.

Step 4: Hold the net by the horn so its lead line weights are just touching the ground, gather the net in your right hand just below your waist, and place the gathered net in your left hand, which is also holding the throw line coils as shown.
Step 5: Reaching toward the net “lead line” with your right hand, slowly begin gathering the net in your right hand, while making sure the net is free of tangles and debris.
Step 6: Gather about half the net mesh in your right hand.
Step 7: With the net half in your right hand, roll that portion of the mesh over your left thumb and net “horn” and temporarily rest it there, as shown.

Step 8: There now are two “halves” of net, a “high” half, and a “low” half.
Step 9: Where the two net “halves” make the transition from “high” to “low” half, grab the lead line (not a lead) with your right hand and put the lead line (between leads) in your lips (not in your teeth) and hold firmly with your lips.

Step 10: Now reach down and using the small finger of your right hand secure the lead line, as shown.

Step 11: While still holding the lead line, reach up with your right hand and grab the portion of the net that has been resting on the thumb of the left hand and the horn of the net.
Step 12: You are now ready to throw the net by making a left-to-right twisting motion, similar to throwing a frisbee.

Step 13: Try to throw the net up-and-out at about a 45-degree angle making it spin. While it takes some speed and strength to throw a cast net, timing and following these steps carefully are most important to successful cast netting.

How to Choose a Cast Net
All cast nets are not created equal. Good ones are pricey, but well worth the money. Yet no single cast net is good for all types of live bait gathering. Net requirements allowing you to best catch marine shrimp in shallow water are a lot different from the best ones designed for catching shiners or mullet in swift current or in big open water like the ocean.
Pick the Right Mesh Size
Using the right mesh size for the bait you’re targeting is important. You don’t want mesh size too large when targeting small minnows, for example, because some baits may head into the netting and their gills foul in the mesh. Removing such “gilled” baits is difficult, and often injures fish. In such a case, smaller net mesh size is best. Sometimes state or area laws dictate mesh size that can be used in various waters. Be sure to check local laws before heading out with a throw net to comply with mesh size laws.
Here’s a quick run-down on what type nets are best suited to various types of bait collecting, according to Roy McDermott of Calusa Cast Nets.
- 1/4-inch mesh net: Best for very small baitfish under 3-inches. An advantage for this net is it doesn’t “gill” baitfish due to its small mesh openings. A disadvantage is it sinks slowly, so should be used in water less than 8-feet deep.
- 3/8-inch mesh net: This is the most popular cast net size and is best used in water up to 12 feet deep for baitfish over 3-inches in length. A good all-around bait net, it sinks quickly and prevents most baitfish from “gilling.”
- 1/2-inch mesh net: Good for water to 20 feet, great around bridges and pilings in swift current because larger mesh allows for a faster sink rate. Excellent for baitfish 5-inches and larger, such as large shiners for bass, shad for striped bass and catfish, alewives for salmon, and menhaden and mullet in saltwater and tidal regions.
- 5/8-inch mesh net: A specially designed net for working very deep water, up to 60 feet in open reservoirs, rivers, and the ocean. Used primarily for large baitfish up to 2-pounds, often in swift current where a fast-sinking net is required.
Other Things to Consider When Choosing a Cast Net
1. A heavy-duty floating net “hand line” is a must for allowing ease of bait retrieval.
2. A large, well-made swivel is required between the hand line and net connection, with chafing gear linking net brails and the net swivel an important plus.
3. A large, round, heavy-duty plastic “horn” is needed to prevent net line breakage during use.
4. Doubled line in the mesh at important stress points at the net horn and along the net lead line will ensure durability. Nets get plenty of abuse. So doubled lines in some places are wise, and are standard on better-quality nets.
5. Net mesh should be soft and supple so a net casts easily and opens smoothly. Most commercial nets are made of quality nylon monofilament line.
6. Net construction should be in “panels,” looking like pizza slices. This ensures that a net lays out “flat” on surface water following a cast. This helps a net open to its fullest, extending completely round, thus able to corral as much bait as possible as it sinks.
7. Net weight should be at least 1.5-pounds per linear foot of net, meaning a 10-foot net should weigh 15 pounds. This allows for a proper net sink rate that collects bait in deep water or swift current. Larger nets used in deeper water require heavier lead lines.
8. Weights should be securely fastened to a net lead line to prevent mesh weights from slipping. Weights on a lead line take abuse during normal bait-catching, so they must be tied in firmly to prevent problems.
Nets that snag bottom obstructions can be big trouble. Snags cause net mesh tears and require repair. Sometimes an entire net is destroyed when fouled deep in debris. Brush, tree stumps, branches, rocky bottom, jetties, sunken docks, pilings, old crab traps and the like are deadly to cast nets. Hard sand, gravel, shell and mud bottoms that are clean from debris are best for cast netting.
9. To avoid snags and make sure nets aren’t damaged or lost, anglers with boat sonar are wise to use it scanning prime locations for cast netting. Forward scanning sonar and standard bottom-probing sonar not only check for net snaring debris, but also help pinpoint deep bait suitable for cast netting. Locating deep bait schools like shad, mullet and even shrimp are greatly aided by using sonar effectively.
10. For deep water cast netting an extra-long main line is needed. A good supple “add on” rope that can be connected via loop to loop to the net main line is easy to set up, and wise to have available if needed.
11. When cast netting deep water, it’s wise to pause briefly before hauling in a net. This allows a net to fully reach bottom ensuring that bait trapped in the mesh is caught. Also, slowly pulling the net line assures it closes uniformly and captures all bait within the mesh.
12. For boaters after deep bait, sometimes it’s important to cut the boat engine before cast netting to prevent spooking bait. Locating bait pods quickly using a boat motor is fine. But when setting up to cast net, shutting off the motor can help keep bait schools tight and easier to catch.
13. Good cast nets aren’t cheap, so it makes sense to spend a few minutes after each fishing trip to properly care for them. Following use, fully spread a net on a snag-free, flat surface, like a paved driveway or lawn. Remove all debris and fish parts from a net. Inspect the net for minor rips, which should be repaired before they become major tears and headaches. Rinse the net with freshwater to remove all corrosive elements like salt and allow to dry before storing. Store a net in a cool, dry place. Hanging a net vertically in a garage or storage area is fine. But be certain a throw net is out of the sun, which can break down and destroy monofilament mesh.
14. Stowing a net in a large plastic bucket out of the sun is good and is a convenient space saver that keeps a net from tangling.
15. If a well-used net feels stiff and brittle, soaking it in a bucket of water having a cup of fabric softener added rejuvenates its supple mesh. Soak the net for 30 minutes, then spread on the ground to dry, spray with a garden hose, dry and store.
Final Thoughts on How to Throw a Cast Net
Throwing a cast net might look complicated, but it’s really not. Just make sure you choose a quality net that’s the correct size and design for your waters and target species. Check your local regulations and get lots of practice on the water. Soon you’ll be hauling in plenty of the best live bait out there.