We may earn revenue from the products available on this page and participate in affiliate programs. Learn More ›
One of the surest ways to enhance the accuracy of a bolt-action rifle is the relatively simple gunsmithing trick known as pillar bedding.
The process is called pillar bedding because the rifle’s action is supported on non-compressible “pillars” that are rigidly bedded in the stock to help eliminate accuracy problems stemming from faulty, action-stressing, metal-to-wood fitting.
Recently Darrel Holland, a manufacturer of accuracy-enhancing gun accessories, introduced a complete system (priced at $289) that makes the process virtually foolproof, even for beginners. The key to Holland’s system lies in replacing your original stock with a stiff, laminated stock that comes completely finished on the outside and pre-inletted for the pillars and custom fitting of your barreled action. The Holland stocks come in both a hunter style and a wide-forend varmint/target style such as the one I used in this Saturday- morning project.
Contact: Darrell Holland Gunsmithing, P.O. Box 69, Powers, OR 97466; 541-439-5155; www.hollandguns.com.
What You Need
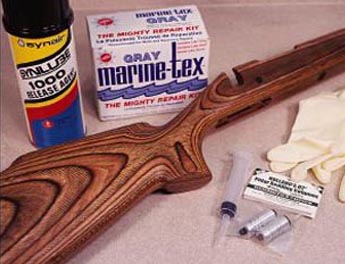
The Holland pillar-bedding system includes about everything needed to make the project fast and simple. Shown here are the Holland aluminum pillars, the resin bedding kit, the syringe for injecting the bedding epoxy into the inletting, the release agent (which keeps the action and other metal parts from being permanently glued into the stock), and even rubber gloves to keep your hands free of epoxy during the final bedding. The Holland pillars also include a new set of action screws that fit the pillars better than the original action screws. The laminated wood Holland stock comes pre-shaped, finished and ready to shoot after the pillar bedding is complete. The action inletting of the stock is pre-cut for fitting the pillars and includes recesses in the inletting for the bedding epoxy.
1. The first step in stock preparation is roughing and enlarging the inletted areas to make room for the epoxy bedding compound. This also ensures better adhesion, since epoxy doesn’t adhere well to oiled or finished surfaces.
[pagebreak] 2.Here I am attaching the pre-finished aluminum pillars to a Remington Model 700 action. Attaching the pillars before fitting them into the stock assures proper alignment of the pillars when the bedding job is complete.
[pagebreak]
3. Once the aluminum pillars are attached to the action, apply a coat of five-minute epoxy to the pillars before inserting them into the stock. Be sure to keep any epoxy from reaching the guard-screw holes underneath.
[pagebreak]
4.When the five-minute epoxy hardens, the pillars are firmly attached to the wood. Now detach the action, leaving the pillars perfectly aligned for proper action fit later. The plastic tape in the barrel channel prevents the epoxy from adhering to the channel ahead of the action. Likewise wrap the barrel with tape to prevent epoxy from adhering and to ensure a “free-floating” fit.
[pagebreak] 5.After removing the trigger assembly, press modeling clay into the recesses to block out any epoxy that might flow into the small openings. This will make cleanup easier after the bedding epoxy hardens. Next, spray the complete action with a coating of bedding release so that the epoxy will not adhere to the metal.
[pagebreak]
6.Spray an epoxy release agent on the receivver to ensure that it will not be glued fast to the bedding when the epoxy hardens. Be sure to spray the release agent both inside and outside the receiver to prevent any of the epoxy from adhering. If necessary, reapply the release agent until the metal parts are evenly coated.
[pagebreak] 7. An easy and virtually mess-free way to apply the prepared bedding compound is to use the syringe supplied with the Holland pillar-bedding kit. (It’s somewhat like decorating a cake.) Stuff the magazine and trigger recesses with paper towels to prevent excess epoxy from flowing into these areas and to make cleanup easier.
[pagebreak] 8.Allow about 24 hours for the epoxy to harden. Once the epoxy has cured, remove the barreled action. Remove the paper towels that stuffed the trigger and magazine openings, then file the edges where the epoxy overflowed until they are smooth.
[pagebreak] Here is a perfect pillar bedding/epoxy bedding job. All you need to do now is drop the barreled action into the stock and secure the locking lugs. I used a thicker Holland recoil lug, as shown here, which is a worthwhile upgrade for the Remington 700 action.
[pagebreak] in place, the bedding pillars and epoxy are completely hidden. The inletting is so close that the wood-to-metal fit looks like the hand-fitting of a skilled stockmaker. Except for the wait for the epoxy to cure, the job took only a few hours.

