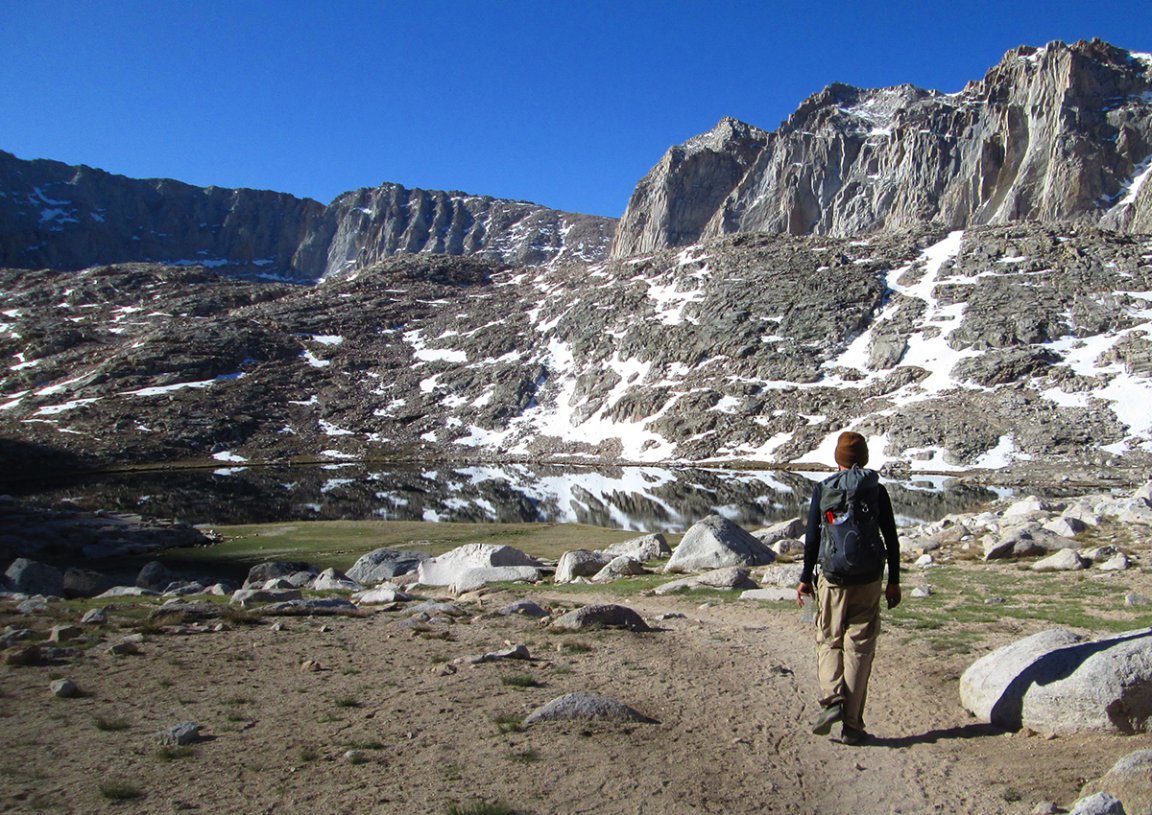
Even among long trails, the John Muir Trail, colloquially called the JMT, is unique. It hovers around 8,000 feet for most of its 211 miles, crossing six major mountain passes in California’s Sierra Nevada range. The trail is named for early 20th-century naturalist and Sierra Club founder John Muir, the JMT parallels the trade route once used by the indigenous Paiute people. Today, what most captivates people about this trail is the drama of the towering mountains coupled with the remoteness of the terrain, including a 150-mile stretch without a single road crossing.
For backpackers, the John Muir Trail is a sort of pilgrimage. Much of the trail’s infrastructure dates back to the turn of the twentieth century, and the seemingly immutable nature of the granite peaks that make up the Sierra Nevada can give the impression that you’ve stepped fully out of the modern era.
You are crossing the same streams of snowmelt, passing the same ice-cold alpine lakes, traversing the same notches in the mountain passes as people did a hundred years ago or even thousands of years ago — at times you’ll feel as if you are the only person who has ever been here. The wilderness is always quiet, but sometimes the silence of the Sierra Nevadas echoes off the cliff faces, swallowing your footsteps until you are one with the landscape. Even for the non-religious, hiking that high into the mountains for weeks on end can become a spiritual experience.
Table of Contents
Read through the whole article, or tap a topic below to jump straight to it.
- Why You Should Trust Me (I Hiked the Trail)
- Step 1: Get Your Permit
- Step 2: Start Training
- Step 3: Get Your Gear Together (and What Not to Bring)
- Step 4: Logistics and Resupply Boxes
- FAQs
- Final Thoughts

Why You Should Trust Me
I hiked the majority of the John Muir Trail myself in 2014, as part of my hike of the Pacific Crest Trail. Even with 700 miles of thru-hiking already under my belt, and a planned 20 percent reduction in mileage through the High Sierra, I finished every day completely wiped, throwing down my sleeping bag as the sun turned the range golden with the last light of the day. It’s one of the few sections of trail that I dream of repeating — and I would certainly plan to take more time through it.

All this might sound intimidating, but hiking the John Muir Trail is eminently doable. It is a well-signed, beautifully maintained trail. Unlike major hikes like the Pacific Crest Trail or the Appalachian Trail, you can get this one done without quitting your job. But it’s also a logistical challenge to hike, and you’ll likely need to be in the best shape of your life to complete it. Here’s what you need to know to get started.
Step 1: Get Your Permit
The John Muir Trail is very popular and, because it is very popular, the park service strictly limits the number of people on it at any given time. You can expect to have your permit checked by rangers multiple times along the JMT, so don’t skip this step. Because it is so competitive to get a slot on this trail, I recommend you apply for both a northbound and southbound permit. If you are so lucky as to win more than one lottery, you can then choose the one that most appeals to you.

The best time to hike the John Muir Trail is from early July through late September. Most of the snow will have melted out by early July (except in exceptionally heavy snow years) and won’t start up again until October. While you can hike the John Muir Trail in June (and many PCT hikers do it each year), it tends to be a more arduous experience due to the deep snow covering the passes.
Unlike other permitted trails, the JMT permit is an entry permit, so you aren’t expected to know exactly how long you will take or where you will camp each night at this time.
Permit Option 1: Hike Southbound from Yosemite Valley
These permits are handled by lottery through the Recreation.gov site here for Yosemite National Park Wilderness Permits. The lottery for each week of the summer opens up 24 weeks in advance. So if you wanted to hike in mid July, you’d be applying at the end of January. (This is why getting your permit is Step 1.) Here is a full list of the dates.
On the website, click on the big blue button that says “Register for Open Lottery.” You’ll be prompted to create a recreation.gov account if you don’t already have one. After you enter your personal information, scroll down to the blue button that says “Enter Choices” and increase the number of dates you are applying for to 8. (Again, we’re trying to maximize the odds you get a permit.) Select “Happy Isle -> Past LYV (Donahue Pass Eligible)” and a date for each of the listings. Cough up the $10 and send up a silent prayer.
Permit Option 2: Hike Northbound from Whitney Portal
The John Muir Trail starts in Yosemite Valley and ends at Whitney Portal, so the second way to hike the trail is north from Whitney Portal. Because these permits are also used by hikers summiting the highest peak in the Lower 48 (Mount Whitney), it is also run by a lottery through Recreation.gov, so click here to get started. The lottery for the entire season’s permits opens on the same date, February 1. You can submit up to 10 different dates at a time.
Other Options
If what you are looking for is a complete end-to-end hike of the John Muir Trail, a southbound hike starting from Happy Isles or a northbound hike starting from Whitney Portal are your only options. If you are more flexible, however, there are dozens of ways to access large portions of the John Muir Trail from Yosemite National Park and Kings Canyon Sequoia National Parks, as well as Inyo National Forest and Sierra National Forest. Consider what’s most important to you, a complete thru-hike of the JMT versus a specific year or timeframe for your hike. If it’s the latter, take some time to familiarize yourself with other options for accessing the trail that are less competitive.
Step 2: Start Training
So you scored your permit. Congratulations! Now it’s time to begin your training.
The more you train before your hike, the better. While common wisdom has it that the best way to train for a thru-hike is to load up your pack and hit the trails, the reality is that most people can’t fit that into their frontcountry lives. The best they can do is load up their pack and hit the trails on the weekend, which isn’t going to cut it on an adventure as long and arduous as the John Muir Trail. I recommend instead looking at your daily and weekly routines and figuring out where you can substitute a trip by car for a trip on foot — getting in a range of 5 to 10 miles a day is a great goal (more is better).
Walk…Everywhere
Can you walk to the grocery store instead of driving? To work? Could you leave your car at your child’s school for drop off and walk home? Consistent high daily mileage is key, as it will both strengthen your muscles for your thru-hike and acclimate your feet and joints to pounding out the miles, which will reduce your odds of a stress-related injury. And yes, by all means, hit the trail on the weekend to get some vertical miles with a fully loaded pack.

Start Using Your JMT Shoes
It’s also important that you train for your thru-hike using the shoes you will actually be wearing on your thru-hike. This is the first, and most important, gear decision you will make before getting started. Finding a pair of shoes that you can comfortably wear all day — no blisters, no stress injuries, no unnecessary soreness — is one of the most critical things you can do to make your hike a success. Do this now.
You may already know exactly what pair of shoes you want to use. But if you do not like your current hiking shoes or trail runners and are thinking about switching, please read OL’s story on the best thru-hiking shoes. Here, thru-hiker and physical therapist Morgan Brosnihan shares what she’s learned over the years from treating PCT thru-hikers. Turns out, different shoes work for different individuals, and pinpointing the pair that will gel best with your particular ergonomics is the key. Consider this essential reading for any aspiring thru-hiker.

Step 3: Get Your Gear Together
While not required, lots of people use an opportunity like a thru-hike of the JMT to rethink their backpacking kit. Like with any arduous long trail, a lighter backpack is generally more enjoyable to carry than a heavier backpack. However, you need to be comfortable and experienced with the gear you are carrying, so don’t commit to a single-trekking pole tent if you aren’t sure you’ll want to set it up in heavy winds.
Read Next: Backpacking Checklist
The Big Three
The biggest weight savings you can make in your kit is with the Big Three: your backpack, sleeping system (sleeping bag or quilt and sleeping pad), and your tent. Outdoor Life has done extensive tests on products in this category, with an emphasis on what ultralight gear works well for those that are new to ultralight gear. I would encourage you to start with your tent, as you can easily shave a couple of pounds off your kit by switching to a best-in-class ultralight model.
Read Next: The Best Ultralight Tents
You’ll want to look at your sleep system carefully as well, since overnight temps can drop considerably on the JMT, especially in the valleys. Be prepared for temps as cold as freezing (colder if you plan on hiking near the end of September). If you need to upgrade your sleep system to account for these lower temps, consider upgrading to a quilt and insulated sleeping pad combination, which is a more efficient way to maximize warmth to weight.
Read Next: The Best Backpacking Quilts
While you can potentially cut a significant amount of weight by switching to one of the best ultralight backpacks, it’s best to only do this if you plan to get your overall base weight below 20 pounds. Most ultralight backpacks tend to be uncomfortable when packed with loads in excess of 35 pounds, and you’re going to have a few substantial food carries on this hike.
JMT Essentials
There are a few items that you’ll need to bring on your JMT hike that may not already be in your backpacking kit:
Navigation and Safety
- Satellite Messenger: This is remote wilderness. You will not have cell phone reception. Bringing a satellite messenger can provide anxious loved ones back home with peace of mind, and to give you the tools you need to reach out to local SAR for help in the event of calamity.
- Map: While you can download some excellent apps with mapping and trail notes (FarOut is generally the most used option for this purpose), in remote stretches of wilderness like the JMT, having a physical map is a must. I recommend the National Geographic version.
Read Next: Best Personal Locator Beacons and Satellite Messengers
Essential Miscellany
- Bear Canister: While OL has tested the best bear canisters, what’s important for you is the list of bear canisters that the land agencies have approved for the JMT. From this list of approved canisters, I recommend you go with either the BearVault or the Bearikade, depending on the size you think you need. The bears of Yosemite are very crafty when it comes to snatching thru-hikers food, so don’t skimp on this required step.
- Microspikes or Ice Cleats: If there is still snow on the passes, you’ll want to carry a pair of lightweight microspikes or ice cleats. In tandem with your trekking poles, these will increase your traction and stability, allowing you to hike faster and more safely. In the runup to your start date, check your FarOut app and group forums on Facebook and Reddit to get a sense of what kind of snow you’ll likely be encountering. If there is still deep snow along the mountain passes (there was when I hiked it), remember that it’s often easier to travel across snow in the early morning, when the snow is still firm. Later in the day you’ll be more at risk for postholing (punching through the snow with each step), which is very tiring and will slow your progress.
Read Next: Best Microspikes or Ice Cleats

Bug and Sun Dope
- Bug Spray: At the peak of summer, when the ground is still damp from melted snow, the mosquitoes can be an absolute nightmare. The worst mosquitoes I have ever experienced were in Yosemite National Park — hundreds of them plastered the mesh of our tent at all hours, just waiting for us to emerge. Because it’s difficult to predict exactly when the worst of the skeeters will occur, you are going to want to come fully prepared. I recommend spraying down all your clothing in permethrin before you leave, and carrying both a head net and the highest percentage DEET you can stand. Note: If you use DEET on your skin, you should not attempt to wash yourself off in any of the pristine mountain lakes you encounter. Try spraying it on your clothing instead.
Read Next: The Best Mosquito Repellents
- High SPF sunscreen. The JMT is very high — often well above 10,000 feet — and most of it is very exposed. Even for individuals who are already tan or who have more melatonin naturally, sunburning can be an issue (my nose peeled for weeks after hiking the JMT). I recommend upping your current go-to SPF by about 20 and bringing along a small tube to apply to more sensitive areas like your nose and the tops of your ears at a minimum. If you know you are prone to burning even at lower elevations then you should plan to reapply every few hours.
Medications

- For almost all aspiring JMT hikers, the elevation will also be a significant hurdle. If you know that you struggle with altitude sickness at elevation, consider speaking with your doctor about whether or not you are a candidate for medications that can help to alleviate this, such as Diamox. Everyone should familiarize themselves with the symptoms of altitude sickness and know what to do in the event they start to feel light-headed.
What Not to Bring
One of the easiest ways to lighten your load on your thru-hike of the John Muir Trail is by eliminating all of the non-essentials out of your pack. A number of these will be easy to identify: hammock, camping chair, mirror, flask. But there are other items that can add up too if you aren’t careful. A full tube of toothpaste, when a miniature version would do fine. A plate and a bowl for your meals. A miniature lantern for your tent in addition to a flashlight. A few months before your hike, experiment with removing everything from your pack that isn’t essential to your health and safety: clothing stuff sacks, hairbrush, french press plunger. See how it feels to wear your now much-lighter pack out on your next training hike. Now you can add back in the gear that you still think you’ll want.
Step 4: Logistics and Resupply Boxes
Once you’ve been training for a while, knocking off 10 miles in a few hours in your thru-hiking shoes, you may start to feel a little ambitious. Maybe you’ll be able to hike more miles a day than you think.
This is wrong. The John Muir Trail is very physically demanding, especially if there is any lingering snow. Whatever your goal daily mileage is, plan to knock it back by about 25 percent. Most people will need about three weeks. If you’re very physically fit, you might be able to get it done in two. But you won’t regret having more time and feeling less rushed on your hike.

While you can, and some people do, plan out where they are going to spend every night on trail, most people find that it’s easier to estimate the number of miles they are comfortable hiking in a day, and plan their supplies and food based on that. The JMT has plenty of beautiful campsites that are clearly marked, so you’ll generally be able to find camp for the night without too many difficulties. The most popular options will be marked on the paper map you’re carrying, but the FarOut app will have notes on the exact location of every patch of dirt that could conceivably fit a one-person tent. Like all trails, there will be weather (such as the potential for afternoon lightning storms at the peak of summer) and terrain conditions (such as lingering snowfields and high rivers) that will also affect how quickly you are able to hike.
A Note on Elevation
While the trail is very high, especially if you’re coming from sea level, the highest elevations are in the southern portion of the trail. Because of that, most people will prefer to start in Yosemite Valley (around 4,000 feet), and make their way up to Cathedral Pass (10,000 feet) over the first couple of days. If you start at Whitney Portal (8,000 feet), you’ll climb up 5,000 feet during the first couple of days (higher if you plan to take the 2-mile detour to the top of Mount Whitney). Your body can and will adjust to the elevation as long as you take it slow, but expect to feel sluggish while you’re adjusting to the low oxygen conditions. Your first four or five days on trail could be very slow, so account for that in your expected mileage.
Resupply Boxes
Three weeks is a long time to be in the wilderness, and you won’t be able to carry all the food you need for the entire stretch in one go. Instead, you’ll need to plan to resupply, which means picking up additional supplies along the way. The caveat: It’s illegal to cache food directly on trail. Below you’ll find resupply options with relevant mileage for southbound hikers. Consider how many days of food you are comfortable carrying at a time, and plan to send resupply boxes (or buckets, depending) accordingly.
Mile 24: Tuolumne Meadows
As you pass through Tuolumne Meadows en route to Donahue Pass, you’ll be within spitting distance of the Tuolumne Meadows General Store and the Tuolumne Meadows Post Office, conveniently located in the same building. You can either send a resupply box to them with the food you’ll want to carry for the next section, or purchase what you want to carry with you. I recommend planning on a mix of both. While catering to hikers and thru-hikers, the General Store’s selection is somewhat limited and expensive.
The only catch here is that they are only open three months of the year, so be sure to double check that the post office is open before sending your box. I recommend calling Yosemite National Park and confirming with a park ranger there both the opening date of the store and the post office as well as the exact address to use.
Mile 57: Red’s Meadows
Privately owned resort Red’s Meadows is just a quarter mile off trail, making it another obvious spot to stop along the John Muir Trail. Follow the directions on their website when sending a resupply box.
Mile 90: Vermilion Valley Resort
Vermilion Valley Resort, often shortened to VVR, is another privately-owned resort that caters to thru-hikers. While VVR does sell some resupply goods out of its general store, the options are somewhat limited. Follow the directions on their website when sending a resupply box. VVR is a few miles off trail, although during high water years they are sometimes able to run a ferry across Edison Lake. Although a little harder to access than other resupply options, getting a beer, a hot meal, and a shower at VVR is a great refresh for the spirits before entering the toughest portion of the trail.
Mile 112: Muir Trail Ranch
Another resort that will hold packages for thru-hikers; however, this one is closer to the trail than VVR is. Note that there is limited to no additional services for hikers. Follow their directions when spending a package.
Mile 178: Kearsarge Pass
Most hikers will need to resupply between Muir Trail Ranch and Whitney Portal, and the best way to do this is by leaving the trail and hiking 6.5 miles over Kearsarge Pass and down to the Onion Valley Trailhead. There are no services at the trailhead, so unless you have someone meeting you there, you’ll need to hitchhike down to Independence (which has a post office but few other services) or further along to Bishop, which has most amenities that hikers will want, including hotels, gear shops, and grocery stores. Hitchhiking can sound intimidating if you’ve never done it before, but the locals who frequent the Onion Valley Trailhead are typically quite generous about picking up and dropping off hikers. In my experience, you can expect it to take about an hour each way.

FAQs
The JMT is a 211-mile hiking route that crosses six major mountain passes in California’s Sierra Nevada range and hovers around 8,000 feet in elevation. It transverses two national parks and several wilderness areas. The JMT is named for naturalist and wilderness advocate John Muir.
The JMT begins in Yosemite National Park and runs through Sequoia Kings Canyon National Park, which fall under the management of the National Park Service. The trail also intersects the John Muir Wilderness and the Ansel Adams Wilderness, which the National Forest Service manages. This area is one of the largest roadless areas in the lower 48.
Yes, you need a permit. This can be a source of frustration for some hikers, but it helps prevent overcrowding on the trail and provides more solitude once you do draw. Click here to see details on how and when to apply for your permit.
Final Thoughts
The John Muir Trail is one of the toughest long trails in the country. It is also one of the most beautiful. If you’ve been thinking about attempting a thru-hike, this trail is a completely achievable goal, and sure to bring memories that you will cherish for years to come. Just remember: Many people who hike the John Muir Trail decide to attempt even longer trails, like the Pacific Crest Trail or Continental Divide Trail.