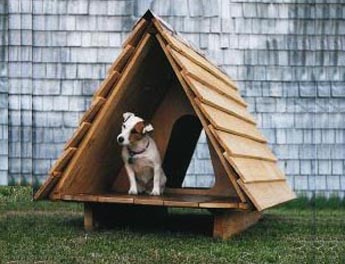
A dog’s house is his castle. He’d design it himself if he could, but he trusts your woodworking skills. The real advantage of the doghouse design offered here is its plywood A-frame, which can be cut to suit any size dog or backyard. The A-frame shape also effectively sheds rain and snow and requires a minimum of structural framing, so the interior can be enclosed or left open to suit the climate.
Step 1: The Platform
For the sake of the designs here, I used 32-inch-wide by 48-inch-long sides and platform for small-size dogs (in my case, Jack Russells) because you should be able to cut three 32×48 pieces out of one standard sheet (48×96 inches) of 3/8-inch-thick exterior- or marine-grade plywood. However, go larger if your dog is big or you want storage space. Just bear in mind that construction is easiest when the two sides and the platform are each a single sheet of plywood.
Cut a 32×48-inch platform from the 3/8-inch-thick plywood. Then cut two 2×6-inch skid beams (basic construction studs), round their ends and screw them to the underside of the platform with self-tapping 13/4-inch drywall screws (see diagram). The skids keep the house off the ground.
Use 3/4-inch-thick, 1×6-inch cedar planks to cover the flooring, allowing for a half-inch of overhang at either end. Cedar planks come in various lengths and widths depending on where you buy them, so carefully calculate how many planks of a given width you’ll need. Screw the plank sections to the platform with the drywall screws (see diagram).
Step 2: The A-Frame
Cut the two 32×48-inch walls of the A-frame and attach them to the platform edge and to each other, securing them at the corners with drywall screws. Then use a block plane or a table saw to bevel the edges of three 3/4-inch-thick timber cleats and fasten them along each interior seam of the A-frame. Using the drywall screws (see diagram), screw the bottom two cleats to the cedar planks and wall and the third along the peak seam, securing it to the plywood walls. The cleats strengthen and bind the walls and flooring.
Step 3: Divider and Wall
Use a piece of box cardboard to pattern the interior divider and back wall (see diagram). Trace on the cardboard the outline for each piece, cut out the cardboard shape and fit it in place in the doghouse, cutting clearance for the floor and ceiling cleats. Trim the cardboard exactly and then outline it on 3/8-inch-thick plywood.
Cut out the divider; then draw and cut out the center opening before installing it in the middle of the doghouse. Cut the bottom edge of the opening low enough that your dog doesn’t have trouble stepping over it. Set it in place and secure it with adhesive sealant caulking.
Cut out the back wall and draw the door opening in the center. Attach a 12-inch piano hinge to the base of the door with brass screws and then remove; after the door is cut out, the hinge should fit exactly (the door should open outward). For a latch, a simple, short, rectangular slat of wood rotating on a nail works fine. Install the back wall with caulk, fitting it just inside the plywood edge.
Step 4: Roofing
You’ve got some choices when it comes to roofing material. You can use steel sheeting, screwing it to the A-frame sides. You can nail cedar-shake or composite shingles to the sides. I used 1×6-inch cedar planks as lap-siding boards, as shown.
Attach the lap-siding boards with drywall screws, overlapping them by one inch. Screw in a 3/4-inch timber cleat along the outer bottom edge of the side wall (see diagram) for the bottom siding board to rest upon. Fold a 6-inch-wide, 48-inch-long strip of copper sheeting to create a ridgepole and secure it to the two top boards with #6 half-inch round-head slotted brass screws, four to a side (see diagram).
Step 5: Final Touches
Drill holes in the skid beam ends and run a cable or rope through the holes so that you can drag the doghouse to move it. Cedar moldings can be attached with small wood nails to cover the flooring edges and butt ends.
With larger doghouses, you can create a mini-attic storage space by cutting off the top of the center divider and attaching a plank with beveled edges to the walls, running it from the front of the doghouse to the back wall. (Be sure it’s high enough for your dog to be able to sit in the front section without bumping his head.)
Contact: For illustrated step-by-step directions for building various sizes, send $6 to Paul Butler, P.O. Box 1917, Port Angeles, WA 98362.