The traditional solar still is a familiar element in survival guides and classes. It was invented about 40 years ago, and it continues to offer a relatively safe method for purifying small amounts of water through evaporative distillation.
But for the classic solar still, you have to dig a sizable hole in damp soil–and that’s not always an option in every survival scenarios. Many years after the solar still’s invention, others developed an inflatable conical distillation unit for use with life rafts in water survival situations. What follows is my land-lubber version of the inverted solar still, suitable for use in a wide range of situations.
The beauty of this gizmo is that it separates water from contaminated sources. Even salt water can be turned into fresh drinking water with this solar-powered setup.
To construct your own, you’ll need three different items:
Plastic Sheeting
The main component of any solar still is the plastic. Clear or milky-looking plastics are required for these units. They allow sunlight to pass through, creating a greenhouse effect inside the structure. The larger the dimensions of the plastic sheeting, the larger the still can be constructed.
Weights
The inverted still is much more susceptible to the wind than the old-school, in-ground still. The wind can be responsible for moving the inverted still, breaking the seal, and dumping out the water. Clean objects are needed inside the still to secure the plastic and create the cone shape of the still unit. Select weights that will not foul the water, and are free of sharp edges or corners that might pierce the plastic. Smooth stones work well.
Supports
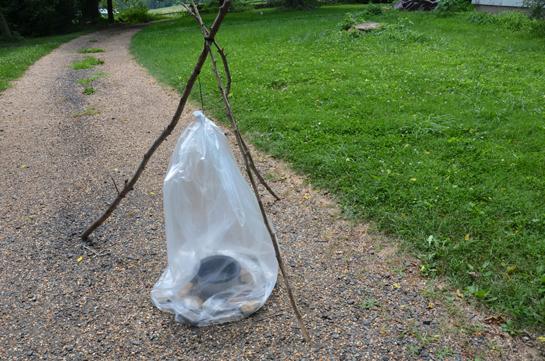
These can be virtually anything that can hold up the cone-shaped still without blocking sunlight. For this example, I have used three sticks and some string. A small rock placed in the center of the plastic sheeting can serve as a tie-off point for the rope.
Building the still is fairly simple. Tie off a small stone or similar object in the center of the plastic sheeting. This will serve as the “point” of the cone. Set up your supports (a tripod, in this case) in a spot with full sun that’s also protected from the wind.
Suspend the plastic sheeting by the tied rock with ample sheeting leftover on the ground to tuck underneath the cone. This loose plastic sheeting will become the circular reservoir inside the unit. Set up something internally to allow the plastic sheeting to make a round, gutter-like water catchment. In terrain with flat ground and loose dirt, simply dig a round trench. On solid surfaces, make a ring from bricks, rocks, debris, or anything else. Use your weights inside the unit to keep it in place.
Place containers of dirty water or wet material inside the unit, making sure that no dirty water contaminates the circular reservoir. Wait for the water to evaporate and condense on the plastic, and run down into the reservoir. This water is distilled and ready to drink. Keep in mind that it may taste or smell a little funny, since the enclosed unit also traps odors that can permeate the clean water.
Have you used solar stills? Tell us how and why you rigged yours below.