

We may earn revenue from the products available on this page and participate in affiliate programs. Learn More ›
Kitting out your backpacking gear closet for the first time is pricey. Just getting together the basics—tent, sleeping bag, and backpack—can easily run upwards of $1,000 if you aren’t careful. For that reason, you might be looking at your tent as a place to cut back so you can splurge on the rest of your kit. To help you narrow down the best budget backpacking tents, I reviewed low-cost options from top gear manufacturers.
- Best Overall: Kelty Discovery Trail
- Best Lightweight: Sierra Designs Lost Coast
- Best Ultralight: Durston X-Mid
- Best Upgrade: Marmot Catalyst
- Most Spacious: ALPS Mountaineering Lynx
- Best for Bad Weather: Decathlon Forclaz
- Best for Winter: Marmot Fortress
| Tent | Price | Weight | Dimensions | Doors | Wetout Test | Floor Abrasion Test | Pole Bend Test | Warranty |
| ALPS Mountaineering Lynx | $160 | 5.8 lbs | 90″ x 60″ x 46″ | 2 | Pass | Fail | Pass | Limited lifetime |
| Decathlon Forclaz | $170 | 5.7 lbs | 82″ x 47″ x 41″ | 1 | Pass | Pass | Pass | 2 years |
| Durston X-Mid | $280 | 2.4 lbs | 92″ x 52″ x 48″ | 2 | Pass | Pass | N/A | 2 years |
| Kelty Discovery Trail | $130 | 4.9 lbs | 87″ x 54″ x 42″ | 1 | Pass | Fail | Pass | Limited lifetime |
| Marmot Catalyst | $230 | 5.3 lbs | 88″ x 53″ x 44″ | 2 | Pass | Pass | Pass | Limited lifetime |
| Sierra Designs Lost Coast | $130 | 4.6 lbs | 84″ x 50″ x 44″ | 1 | Pass | Fail | Pass | Limited lifetime |
Testing the Best Budget Backpacking Tents
For this test, I focused on budget backpacking tents that were made by reputable manufacturers and backed by at least a two-year warranty—if a company is only able to guarantee your tent for a year or less in the field, then it’s probably not one you want to rely on to protect you from the elements.
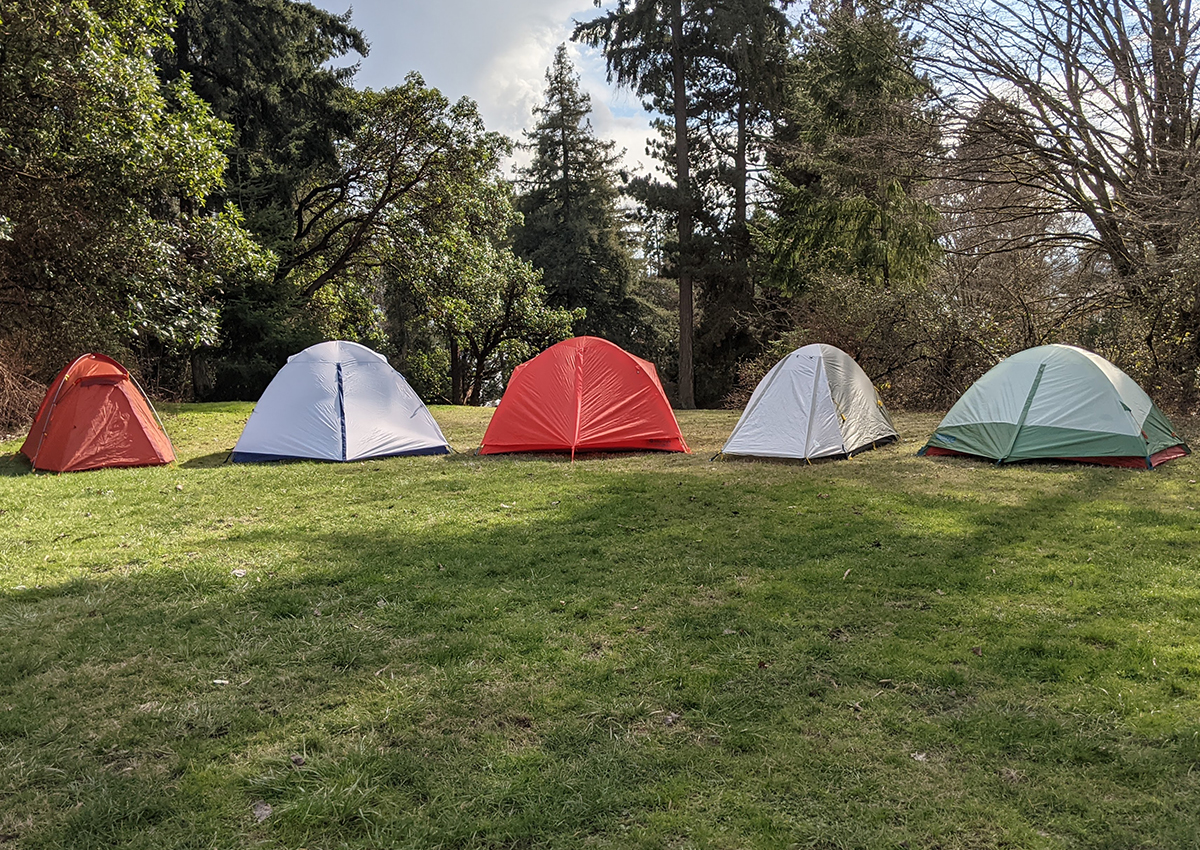
After setting up and tearing down the tents to get a feel for their ease of use and any potential pain points (or benefits) in the design, I put the tents through a series of simple stress tests to see if there were any failure points or weak spots. The first was a wetout test of the rainfly. Similar to what I did for the best backpacking rain jackets, I left the rainfly outside with a puddle of water on top of it (covering a seam) for 16 hours, then checked to see which, if any, had moisture drip through to the other side.

Next, I tested the strength of each tent’s poles by attempting to touch the ends of each pole together—a quality pole should be able to do this without breaking. Finally, I checked the durability of the floor of each tent, which can scuff easily, by dragging a textured rock over a single spot three times at medium strength, and then checking to see if any holes had appeared by shining a light through the other side. After testing, and removing optional items, I checked the weight of each tent against manufacturer specifications.
My best ultralight pick is from the OL test of the best ultralight tents and further testing done by OL contributor Jac Mitchell.
Best Budget Backpacking Tents: Reviews & Recommendations
Best Overall: Kelty Discovery Trail
Best Overall
Kelty Discovery Trail

Pros
- Easy to set up
- Very affordable
- Lighter weight
Cons
- Did not pass the floor abrasion test
- Only one door
Key Features
- Weight: 4 pounds, 14 ounces (just under 5 pounds during testing)
- Materials: 68D polyester, aluminum poles
- Door: 1
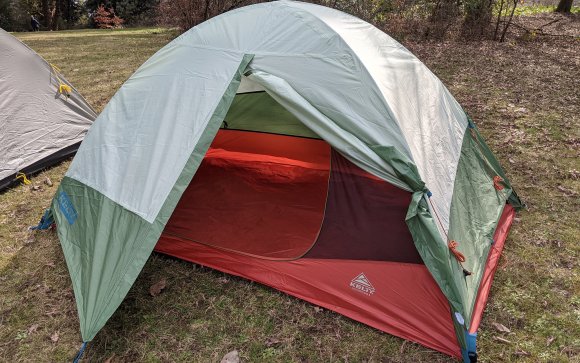
If you’re new to backpacking, it would be hard to go wrong with the Kelty Discovery Trail. It’s very affordable and is fairly lightweight given its spacious interior (two average-sized men would fit comfortably in this tent). It’s also a breeze to set up. With most backpacking tents, you insert a pole into a metal grommet at one corner and then bend the pole until you can insert the other end into the grommet kitty corner from it. Inevitably you end up doing this a couple of times as the pole slips out of one or the other grommets. Instead of grommets, the Kelty Discovery Trail has nylon-webbing pouches at each corner, preventing the poles from slipping out as you set up your tent. I also appreciated that the corners of the body of the tent were color-coded with the fly, making it significantly easier to line up than it would have otherwise been.

While the Kelty Discovery Trail 2 lacks the second door that you would expect with a two-person tent, it did have the rest of the full suite of features I would expect: roomy vestibule, guylines with extra stakes, vents along the rainfly, and pockets for storage in the interior. Consider purchasing the Kelty Discovery Trail footprint to accompany this tent, as it did pick up a couple of very small holes during the abrasion test. Finally, the Kelty Discovery Trail 2 weighed just under five pounds during testing.
Best Lightweight: Sierra Designs Lost Coast
Lightest
Sierra Designs Lost Coast
Pros
- Comparatively lightweight
- Low cost
Cons
- Less floor space than other models I looked at
- Tent floor is not especially robust
- Rainfly must be carefully positioned
- Heavier than claimed weight during testing
Key Features
- Weight: 4 pounds, 10 ounces (just under 5 pounds during testing)
- Materials: 68D polyester, aluminum poles
- Doors: 1
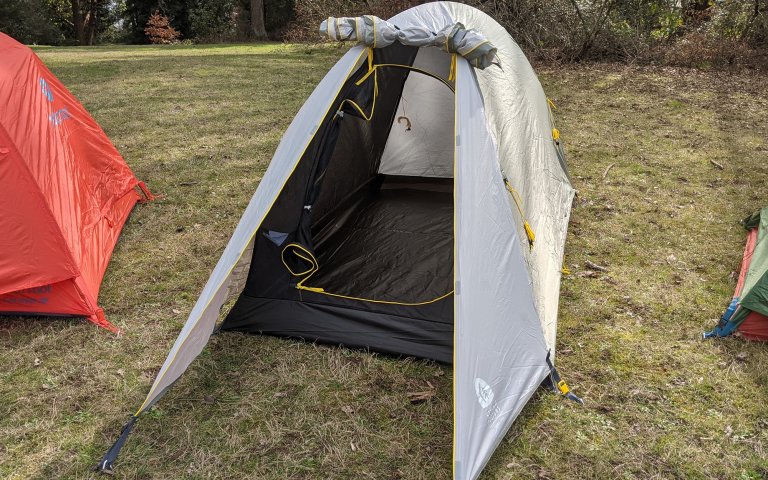
One of the biggest downsides to budget backpacking tents is that they are significantly heavier than higher end models. The Sierra Designs Lost Coast tent was not only the lightest model I looked at for this test (although it’s claimed weight did not quite equal its measured weight), but it was also one of the least expensive. Part of the low weight of the Sierra Designs Lost Coast is that it’s simply a smaller tent than others out there. Its 50 inches of width in the interior can fit two of the best backpacking sleeping pads but not much else; if you’re going to share this tent, make sure it’s with someone you don’t mind cuddling with.

While setting up the Sierra Designs Lost Coast was straightforward, there were a few small design issues. Unlike other tents in this test, the top clip was only large enough to hold onto one of the cross poles. More concerning was the coverage of the rainfly. When I first cinched down straps at the four corners of the tent, I noticed that there was mesh visible along the back and one of the sides. Carefully adjusting the rainfly so that the tensioners were evenly distributed on all sides fixed the problem, but the shorter rainfly here means you’ll want to take care if you are setting up in or expecting inclement conditions. Finally, given the results of the abrasion test, you’ll likely want to spend a few extra dollars on the Lost Coast 2 footprint if you plan to camp in the desert or on rocky surfaces.
Best Ultralight: Durston X-Mid
Pros
- Best-in-class ultralight tent
- Two doors and two large vestibules
Cons
- More expensive than other picks on this list
- Trickier setup that classic cross-pole designs
Key Features
- Weight: 2 pounds, 6.4 ounces
- Materials: 20D polyester, poles not included
- Doors: 2
What if I told you that you didn’t have to choose between quality and cost? The Durston X-Mid was a favorite of almost everyone on OL’s test of the best ultralight tents: it had a roomy interior with excellent vestibules. It was surprisingly sturdy. And it was very lightweight. So it was a major surprise to find out you get all that at such a low price point. If you are planning to go backpacking more than a couple of times, I highly recommend that you spend a couple of extra dollars upfront and skip straight to the Durston X-Mid.
Read Next: Durston X-Mid: A Beginner-Friendly Ultralight Shelter
Even for avid campers, the setup of the Durston X-Mid is going to take some getting used to. While our testers on the OL ultralight backpacking trip found the instructions to be comprehensive and useful, several struggled with getting this tent taut on the first go. If you’ve never used a trekking-pole style tent before, this one will take some getting used to. But once you’ve got the hang of it, this could be your new tent for life.
Best Upgrade: Marmot Catalyst
Best Upgrade
Marmot Catalyst
Pros
- Passed all three durability tests
- Great interior pockets
- Two doors open wide
Cons
- Most expensive tent I looked at
- No vents
Key Features
- Weight: 5 pounds, 4 ounces
- Materials: 68D polyester, aluminum poles
- Doors: 2
The Marmot Catalyst has a number of extra features that elevate it beyond a budget tent—multiple storage pockets for each person, two doors with different tieback options, an included footprint—while still coming in at a budget (if slightly higher) price point. It also proved more durable than other budget models during testing, and it was one of only two tents I looked at to withstand the floor abrasion test without developing holes. If you consistently use the footprint with this tent, it should last for many years.

I tested the three-person version of this tent, which weighed (with the included footprint) in at over 7.5 pounds—over a pound more than its claimed weight. Another issue with this tent is the lack of vents, which may trap moist air inside. That means that on cold nights, when the temperature on the inside of the tent is significantly warmer than on the outside, you can expect significant condensation to form. When possible, leave both doors partially open at night to maximize airflow and prevent condensation.
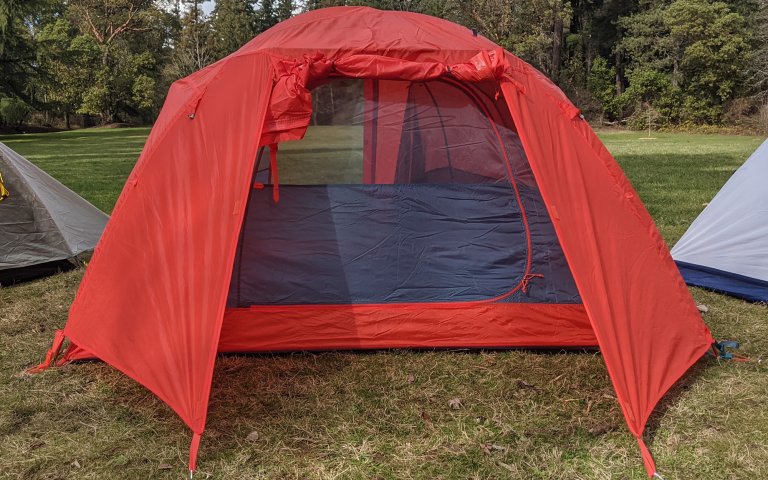
Most Spacious: ALPS Mountaineering Lynx
Most Spacious
ALPS Mountaineering Lynx

Pros
- Largest two-person tent I looked at
- Easy to set up
- Two doors and two vents
Cons
- Fairly heavy
Key Features
- Weight: 5 pounds, 12 ounces (5 pounds, 14.5 ounces in testing)
- Materials: 75D polyester, aluminum poles
- Doors: 2
If you’re purchasing your first-ever backpacking tent, it might come as a surprise to find out how little space some manufacturers think you need for two people. More often than not, two-person tents are actually pretty cramped for two people, even if the people in question are on the smaller side. But that’s not the case for the ALPS Mountaineering Lynx. At 90 inches long for the two-person version of the tent, it can accommodate even the tallest individuals, and at 60 inches wide there is plenty of space for a buffer between separate sleeping pads. It also has two doors—again, not a given for a two-person tent—which means easy access to either of the two vestibules, and all the gear you are storing inside.
In addition to being fairly large, it was also one of the easiest tents in my test to set up. While I ended up tugging or readjusting the fly on several to achieve the taut profile you’ll want to ensure winds and rain don’t unnecessarily batter your tent, the ALPS Mountaineering Lynx looked nearly perfect from the moment I buckled in the rainfly.

Like with other tents in this story, the relative fragility of the floor means that you should both purchase and use its matching footprint, which in this case pushes the weight well over six pounds. In addition to failing the abrasion test, there is a seam running along the bottom of the Lynx (also is true of the Sierra Designs Lost Coast). While this is protected with a seam-sealing tape, it represents a potential failure point and may need to be reseam-sealed or taped before the rainfly, given the comparative amount of abrasion it’s likely to experience.
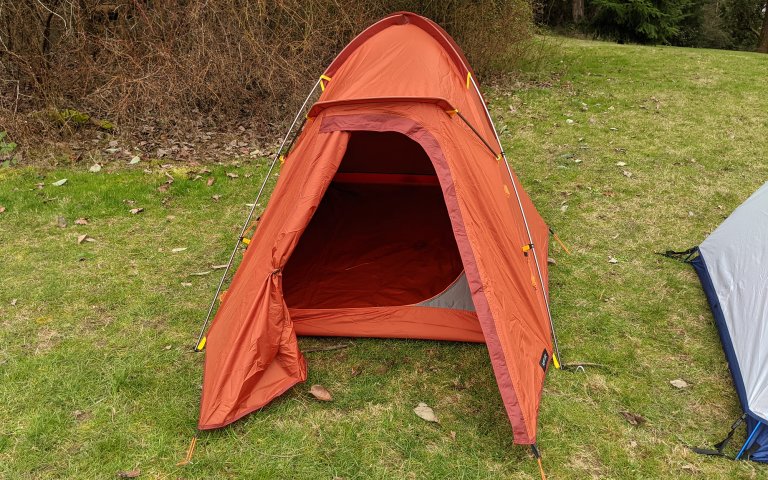
Best for Bad Weather: Decathlon Forclaz
Best for Bad Weather
Decathlon Forclaz
Pros
- Best vestibule in my test
- Keep dry while breaking down during a storm
- Passed all three durability tests
Cons
- Irregular assembly may take some time to figure out
- Third pole is difficult to insert
- Tight fit for two people
- Lack of mesh and attached rainfly inhibits views
Key Features
- Weight: 5 pounds, 11 ounces
- Materials: polyester, aluminum poles
- Doors: 1
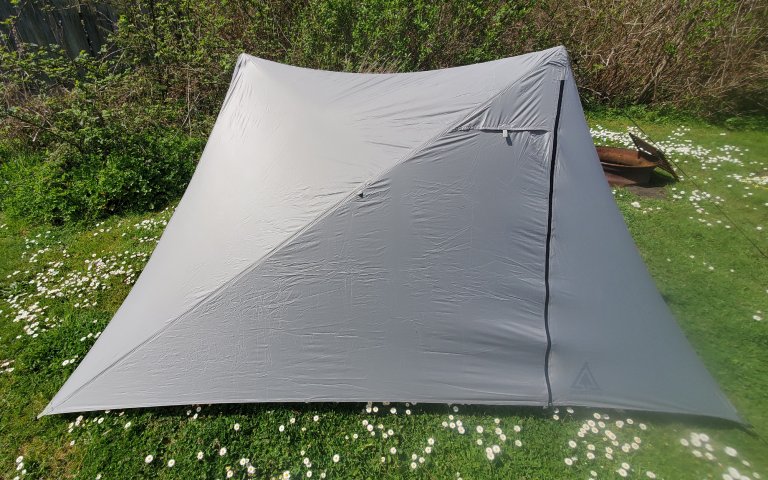
There are several notable ways in which the design of the Decathlon Forclaz varies from the other backpacking tents that I looked at. To start, the poles for this tent don’t attach to the tent body, but to the rainfly itself. The body of the tent, which is made entirely from a breathable fabric, rather than mesh, is attached to the underside of the rainfly using simple clips.

Most of the time, this design choice will help to simplify setup. You just leave the body clipped to the fly and once the fly is up, your tent is ready to go. But in the event of foul weather, it has an important benefit. Now you have the option to take down the body of the tent while still protected by the fly. You could even stash the dry tent body inside your pack separate from the wet rainfly, poles, and stakes. Then when you need to set up your tent later, the inside of your tent will be completely dry.

There are a few downsides to the Decathlon Forclaz. It was one of the heavier backpacking tents I looked at, while also having a comparatively small interior square footage. The third pole, which goes along the top front to increase the coverage of the vestibule, was also surprisingly hard to snap into place. After several attempts I found that it worked best if you unsnap the yellow clips from the two main poles first, then reattach them after the pole is in place. Finally, this one does need additional stakes to achieve a storm-ready profile.
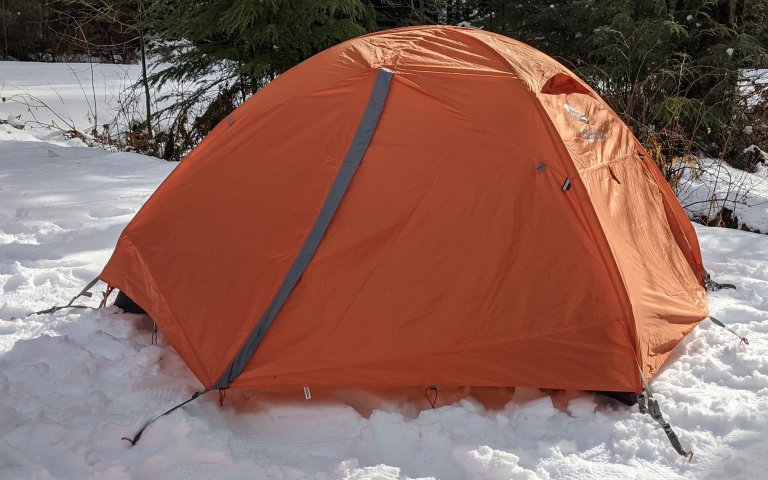
Best Budget: Marmot Fortress
Best Budget
Marmot Fortress
Pros
- Affordable
- Spacious
- Easy to set up
Cons
- Somewhat heavy
- More difficult to achieve a storm worthy profile
Key Features
- Weight: 5 pounds, 5.5 ounces
- Materials: 68D polyester and aluminum poles
- Doors: 2
Our budget pick for four-season tents was the Marmot Fortress, which, while more expensive than other tents on this list, is still considerably less expensive than a standard winter tent. If you’re outfitting yourself for treks that could see snow, the Marmot Fortress provides plenty of protection for entry-level winter adventuring at a cost that won’t set you back on rent.

One thing to note about this tent is that it was difficult to achieve a taut structure, even after fiddling extensively with the complicated tensioner system at the pole ends. While the Marmot Fortress does come with an adequate number of guylines, unusually, these must be pre-assembled before heading out. Individuals who choose this tent should stay below the treeline on their initial excursions until they are practiced at staking out and guylining this tent to achieve a storm-worthy visage.
How to Choose the Best Budget Backpacking Tent
Overall Budget
Before you commit to purchasing the best budget backpacking tent, it’s worth looking at your overall budget for outdoor gear. In some cases, it may be a smart move to invest more on a lightweight backpacking tent, rather than purchase a heavier budget one to start only to replace it at a later date.
Second-Hand Gear Shops
If you’ve got time before your big trek, it’s worth taking a look at second-hand gear shops in your area to see if you can score a lightweight backpacking tent at a great price. Besides online marketplaces for used gear, including REI used gear and Gear Trade, there are also a number of used gear shops spread out across the country, such as Wonderland Gear Exchange (Seattle), Wilderness Exchange (Denver), or Next Adventure (Portland).
Warranty
Your backpacking tent is your shelter—your home—in the wilderness. Backpacking tents, even budget backpacking tents, should be built to last and withstand reasonable abuse from the elements. For this story, I only looked at backpacking tents with at least a two-year warranty.
FAQs
The main differences between camping tents and backpacking tents is weight and space. Camping tents tend to have more square footage for the same claimed capacity (typically measured as one, two, or three person) while backpacking tents tend to be lighter weight.
You should use a footprint with your backpacking tent if the manufacturer recommends it, as not all tent floors are equally durable. You should also consider purchasing and using a footprint for your backpacking tent if you will be camping on rocky or otherwise rough or spiky surface, including the volcanic regions, such as rocky mountainous regions and the high desert.
When deciding what to look for when buying a tent, you should first start with your priorities. Generally, there will be tradeoffs between price, weight, durability, and comfort.
While backpacking tents can get down to surprisingly low weights (as little as a pound per person), the upper end of the spectrum is much less well defined. If you are only planning to backpack a mile into camp, you could carry almost anything. On the other hand, if you are planning to hike upwards of 15 miles in a day, you’ll want to keep the weight of your tent between two and four pounds per person, depending on your personal size.
Final Thoughts on the Best Budget Backpacking Tents
If you don’t mind carrying an extra couple of pounds, there are plenty of budget backpacking tents available. We put the tents on this list through a series of tests designed to look at their functionality in typical backcountry conditions, and we’re confident that any of them would serve you well on your next expedition:
- Best Overall: Kelty Discovery Trail
- Best Lightweight: Sierra Designs Lost Coast
- Best Ultralight: Durston X-Mid
- Best Upgrade: Marmot Catalyst
- Most Spacious: ALPS Mountaineering Lynx
- Best for Bad Weather: Decathlon Forclaz
- Best for Winter: Marmot Fortress