We may earn revenue from the products available on this page and participate in affiliate programs. Learn More ›
Knowing how to fell a tree is a valuable skill set. But firing up a chainsaw and ripping into a tree is also very dangerous. So, whether you’re clearing land, removing a hazardous tree from your yard, or just stocking up on firewood, safety should always be at the front of your mind.
In this guide, we’ll introduce the basics of how to fell a tree with a chainsaw successfully and safely. But by no means should this be considered a DIY guide for how to fell any tree anywhere. If you haven’t done it before, read this story, but don’t stop there: You should either take a training course before cutting down a tree or tag along with an experienced person. (You should never attempt to fell a tree for the first time on your own.) Also keep in mind that some felling jobs are best left to the professionals.
How We Prepared This Guide

Most of my experience felling trees comes from my time with the U.S. Forest Service. During my 20s, I worked on a seasonal trail crew in Gifford Pinchot National Forest in Washington State. Most days were spent either making or maintaining trails, and we used chainsaws to clear downed trees and cut down hazard trees. As a requirement of the job, I received a Level 1 S-212 certification, which is the standard chainsaw training for wildland firefighters in the U.S.
Separate from that position, I also worked for a privately-owned arborist company in southwest Washington, where I helped maintain, trim, and fell trees in residential areas.
Read Next: The Best Cordless Drills, Tested and Reviewed
I was joined in preparing this guide by my father-in-law, Ed DeCarlo, who has significantly more experience around trees than I do. DeCarlo is a career forester and retired USFS employee who spent 32 years working on timber sales and wildfires in the Western U.S.
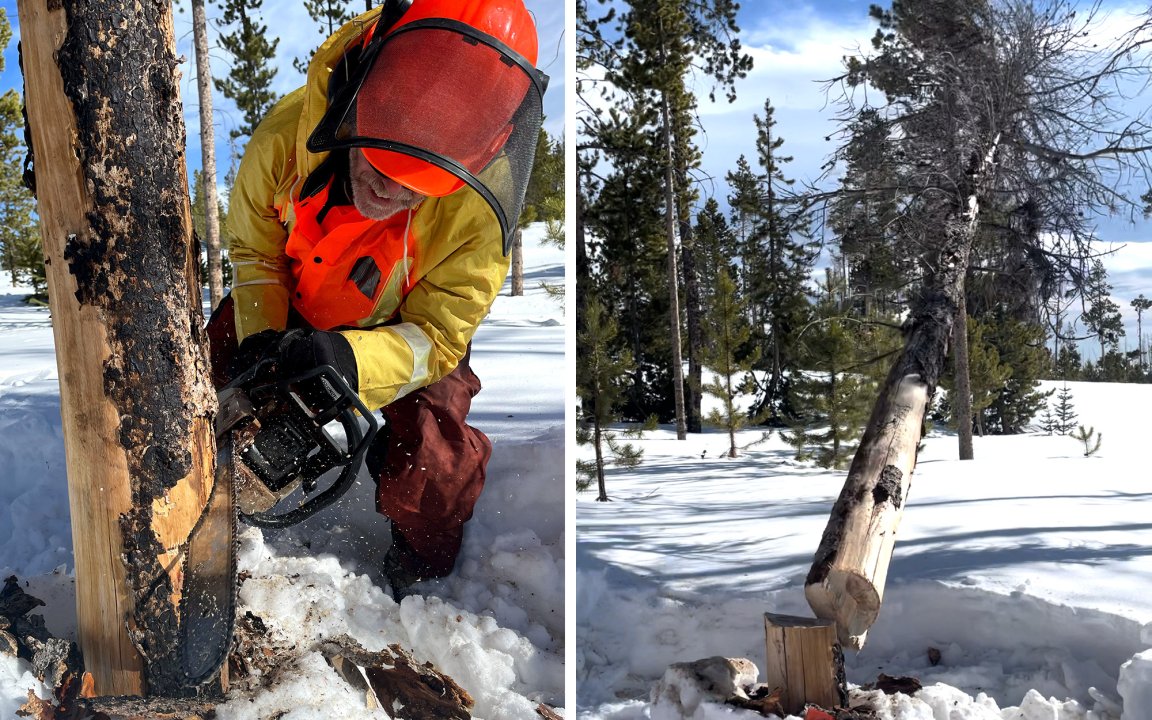
To provide real-life examples for how to fell a tree, DeCarlo and I went into a national forest in southern Wyoming, where we cut down dead lodgepole pine trees. We then bucked these trees up into manageable-sized logs and brought home roughly half a cord of firewood.
How to Fell a Tree
Step 1: Prepare Yourself and Your Tools
Being prepared to fell a tree means first understanding the tools and techniques required to do the job right. We’ll cover techniques in the following section.

Below is a list of essential items you’ll need to fell a tree safely. Personal protective equipment is listed first because you should never try to operate a chainsaw without this equipment.
Safety Gear
- Eye protection. A good pair of wrap-around safety glasses will work, although some people prefer steel mesh goggles for cutting in hot weather. Avoid regular sunglasses and eyeglasses, which still allow sawdust and other debris to enter through the sides.
- Ear protection. Earmuffs are best, but foam earplugs will work, too.
- Head protection. Keep your noggin protected with a basic hardhat or step up to an arborist helmet. Some of the best options have built-in earmuffs and a mesh screen to protect your eyes and face.
- A pair of leather gloves for grip and to protect your hands.
- Sturdy leather boots.
- Full length pants paired with protective chainsaw chaps and a long-sleeve work shirt.
Cutting Tools
- Chainsaw. We used an older Stihl MS250 for this guide. Any good gas-powered saw will work, and some of the best electric chainsaws will do the job as well. The bar of your chainsaw should be longer than the diameter of the tree you’re felling.
- A sharp chain and a file kit. Read up on how to sharpen a chainsaw here. It’s always a good idea to carry a spare chain (either a new or freshly sharpened one) with you.
- Fuel and bar oil. Always bring more than you think you might need.
- A falling ax. The best camping axes will work great. We used a smaller, hatchet-sized Hunters Axe.
- Tree felling wedges. Carry a few of these in various sizes.
Other Important Items
- A length of rope or cord.
- A shovel and a jug of water, especially if you’re in a fire-prone area.
- A foldable hand saw. This isn’t essential for felling a tree, but it can come in handy for cutting out a pinched chainsaw bar that would otherwise be impossible to get unstuck.
- A first-aid kit stocked with trauma supplies.
Step 2: Assess the Tree, Establish a Falling Lane, and Consider Your Escape Route
If you’re cutting in a public forest like we were, you’ll have to first pick out a tree to cut down. You’ll also need the proper permit to legally harvest trees on public land. Alternatively, if you’re cutting down a specific tree that requires felling on private property, you won’t have to worry about choosing one (or getting a permit.) Either way, you’ll want to assess the tree and formulate a plan before you even think about starting your saw. This is a critically important step, so take your time.

The most important things to focus on during this assessment are:
- Your surroundings. Check for power lines, people, cars, trails, or other things that you wouldn’t want the tree to hit or obstruct. Also be aware of other nearby trees as you don’t want your tree to get hung up on its way to the ground. If there’s a good chance the tree will fall on any of these things, either move onto another tree or call in a professional.
- The lean of the tree. Stand a good distance away from the tree and study it from top to bottom, paying special attention to the direction the trunk is leaning. You can also use your ax as a plumb by holding the ax straight up and down in front of you and lightly gripping the end of the handle while keeping the ax head down. Then, walk a circle around the tree and look at how the lean of the trunk compares to your ax handle.
- Consider the slope of the ground and the wind direction. Both things will influence which direction the tree will fall.
- If you can, identify the tree species. Softwoods like pines and firs are generally easier to fell than hardwoods like oaks and hickories, for example. Certain tree species also make better firewood than others, so take that into consideration if that’s your primary goal.
After assessing the tree, you should have a pretty good idea of which way the tree “wants” to fall. This is less of a concern if the tree has little to no lean. Generally speaking the straighter the trunk the easier the job because it allows you to choose which direction you want the tree to fall.
In an ideal scenario, a tree’s lean will line up with an open falling lane, where the tree can fall safely without doing damage or getting hung up on another tree. In some scenarios, you can clear this falling lane by directing people, moving objects, or clearing other, smaller trees out of the way. It is possible to fell a tree in a different direction than the way it’s leaning, but this is much more difficult and riskier for a beginner faller.
Once you’ve established a falling lane for the tree, you’ll want to establish an escape route (or ideally, multiple routes) for yourself. This route will be opposite the direction of your falling lane, but the more escape routes you can have, the better, in case something goes wrong. Make sure there are no trip hazards or other things that could slow you down if you need to get away from the tree in a hurry.
Read Next: 10 Underrated Survival Skills That Will Save Your Life
As you’re doing your assessment, don’t forget to look up in the canopy for any breaks in the tree top along with dead or hanging limbs that could fall on your head while you’re cutting. Loggers refer to these as “widow makers” for a reason.
Step 3: Make a Cutting Plan and Fell the Tree

At its most basic level, felling a tree consists of making a hinge in the tree trunk and using this hinge to direct it safely toward the ground. This requires making three basic cuts with your chainsaw.
Importantly, you want to use the strength of the wood to your advantage. One of the worst things you can do is cut too much wood out of the trunk, which could compromise your hinge. When this happens, you’ll lose control of the tree and put yourself in a risky situation.
Remember: You can always cut more, but you can’t put the wood back in the tree.
The Three Basic Cuts
The first two cuts are the undercut (also known as the “gunning cut”) and the top cut (or “sloping cut”), which together create what’s known as a “face cut.” Although there are a few different types of face cuts, the basic idea is the same. You want to cut a wedge out of the trunk, with the open end of the face cut facing the direction you want the tree to fall.

The First Cut: Make your undercut by cutting horizontally into the tree trunk. This should be done at a comfortable height — ideally somewhere around your waist. While keeping your bar as flat as possible, cut roughly a third of the way into the trunk but no farther. This is because the strongest part of the trunk is in the very center. This is known as your “holding wood” and it helps direct where the tree falls. It’s very important to keep this wood intact.

The Second Cut: Make your top cut by cutting down diagonally into the tree trunk. You want to start above the undercut and cut down at a roughly 45-degree angle. This angle can vary slightly, and a smaller-diameter trunk will require a steeper angle. Ideally, these two cuts will meet in the exact same place, forming a right-triangle-shaped wedge that comes out of the trunk with little effort. If your angle is too steep, you’ll create what’s known as a “dutchman,” which can be cleaned up (carefully) with your saw. Taking too shallow of an angle and cutting past your horizontal cut is much worse, as you’ll risk taking away some of your holding wood.

The Third Cut: The third and final cut to fell a tree is known as the back cut. This cut is made on the side opposite your face cut and should be parallel with your undercut. It should also be at least two inches above the undercut. This height difference between these two cuts is known as your “stump shot,” and a difference of two inches or more helps prevent the tree from kicking back toward the faller. Just like your undercut, you never want to cut more than a third of the way into the trunk during your back cut.

Finishing the job: It’s possible to fell a tree just by using your chainsaw and stopping your back cut when the tree starts to fall. However, it’s much safer to use felling wedges to “wedge the tree over,” as this helps keep your holding wood intact. These wedges, along with your ax, should be within arm’s reach of where you’re standing near the trunk.
After you’ve finished your back cut, take the smallest (shallowest angle) wedge in your kit, and insert it directly into the opening created by the back cut. Use the back (flat) end of your ax to drive the wedge into the cut. Always look up after each hit to check for breaking branches and to ensure that the tree doesn’t start falling in an unexpected direction.

Sometimes one wedge is all it takes, and the tree comes over after a few smacks of the ax. But most of the time, you’ll need to get at least one more wedge into the back cut to get the tree to fall. It also helps to gradually increase the size and pitch of your felling wedges. When you have multiple wedges in the trunk, alternate your hammer strokes between them or else you’ll knock one out.
You’ll know when to stop hammering your wedges because you’ll hear the trunk start to crack as the tree gives way. When you hear this sound, you should walk away from the tree using one of your pre-determined escape routes. Then watch as the tree falls exactly where you intended it to.
As a final step, consider cutting what’s left of the stump. This just requires one flat cut from the back of the trunk toward the front. Try to get the stump as close to the ground as possible. Just make sure you don’t run your saw into the dirt.
Tips for Using a Chainsaw to Fell a Tree

- When planning your cuts, you can use your ax to score lines on the tree. These can serve as rough guidelines to ensure that you don’t take more wood than you should.
- Cut slowly and methodically. Learn how to “feather” the trigger of your chainsaw instead of ripping into the wood at full throttle.
- Pause frequently to check your cuts and to look up in the canopy for any falling branches or movement in the top of the tree. Better yet, have a partner constantly watching the top of the tree so they can let you know if the tree starts to fall prematurely.
- Try to make your cuts as flat as possible. This all starts with the undercut. It’s much easier said than done, though, and if your first cut isn’t perfectly flat, it’s OK. Just try to line up your other cuts accordingly.
- Keep a close eye on the “off side” of the tree, which is the side opposite you’re standing on. It’s easy to take a little too much or too little wood with the tip of your chainsaw. Try to avoid this and keep your cuts even.
- Keep your chain sharp and your saw filled with fuel and bar oil. I like to sharpen every time I refill. You want big noodly shavings coming out of the trunk, not fine sawdust.
- Always have an escape route (or multiple routes) and don’t be afraid to use it. Step away from the tree immediately if you hear any cracking sounds or see the top of the tree shift. Walk if you can. Run if you must.
Most people would use a gas-powered chainsaw to fell a tree. An exception would be commercial loggers, who use feller bunchers, harvesters, and other heavy machinery to fell trees.
But people were cutting down trees with axes and crosscut saws long before this equipment was invented. Trail workers still use crosscut saws today in public wilderness areas, which prohibit the use of all gas-powered equipment (including chainsaws) except during wildfires.
You could even use a small hand saw and a hatchet to fell a tree using the same techniques explained above.
Yes, but it’s much more difficult and riskier. Professionals sometimes use what’s known as a “tree jack” to do this. There are other, more complicated techniques that require rigging, ropes, and/or machinery. Arborists have to deal with this all the time when felling trees in crowded residential areas.
It depends on where the tree is. You don’t need one if the tree is on private land and you have permission to be there, but if you’re inside a national forest or on another piece of public land, you will need to get a permit before you fell a tree or harvest any other forest products.
For the purposes of this guide, we acquired a firewood permit from a local U.S. Forest Service office that allowed us to cut standing dead or downed trees inside the Medicine Bow National Forest in southern Wyoming. These offices will typically provide a map showing areas that are off-limits to cutting. The office we went to charged $5 a cord for permits and they’re valid for 12 months.
Final Thoughts on How to Fell a Tree

Make no mistake. Felling a tree is dangerous work. The U.S. Bureau of Labor consistently ranks tree trimming and logging as the two most hazardous jobs in America. In terms of fatalities, logging ranked No. 1 in the Bureau’s 2022 study, while tree trimming ranked No. 1 in 2023.
Learning how to fell a tree can be done safely, however, with the proper guidance, tools, and techniques. The first and most critical step in the process is assessing the tree, formulating a plan, and making sure you have an escape route. If you aren’t 100 percent confident in your assessment, your cutting plan, your tools, and your escape route, it’s best to walk away from the tree and call in a professional.