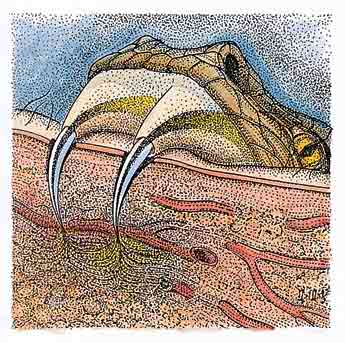
SNAKEBITES Traditional measures (tourniquets, incision and suctioning) are fraught with danger. Here's what to do:
1) Get out of striking range. If you think you were bitten by a coral snake, apply a constricting band loosely, so that it barely indents the skin. (Use a shoelace.)
2) Use the sawyer extractor, if you have one.
3) Immobilize the bitten extremity, and keep it at heart level.
4) Let the extremity hang down in a dependent position and get the victim to a hospital. 5) Bring the snake so it can be identified.
Outdoor Life Online Editor
SCALP WOUNDS Many wounds are best left open in a wilderness setting. No matter how meticulous you are in cleansing the wound, it is virtually impossible to remove all contaminants when your operating table is a bed of pineneedles. However, it is generally safe to close facial and scalp lacerations. Large scalp wounds usually have to be closed to control bleeding. The simplest way to do this is to tie clumps of hair across the wound until the bleeding stops. (Hair doesn't hold a knot well, so use double square knots to help close the wound.) Outdoor Life Online EditorHOOKED The "Backout Technique" works best for removing small fishhooks: 1) Loop a 12-inch length of string or fishing line around the bend of the hook, and wrap the ends around the index finger of your other hand.
2) Push down on the hook shank to disengage the barb from the flesh.
3) Maintain pressure on the hook and align the loop with the shank.
4) Pull on the string and the hook will pop out through the entrance wound.
5) Treat with antiseptic. Outdoor Life Online EditorBURNS 1) Cover small burns with cool or iced water. (Caution: Never apply ice directly to a burn. That only adds frostbite to a thermal injury.)
2) Wash the burns with mild soap and water.
3) Use a cotton ball to gently remove dirt and debris, and scissors and forceps to remove loose tissue and blisters (which contain chemicals that inhibit blood flow to the skin).
4) Apply a 16-inch layer of silver sulfadiazine cream (antibiotic ointment), and cover the burn with a gauze dressing. Bandage fingers and toes individually; Leave burns of the face, neck and genitals uncovered. Outdoor Life Online EditorEYE INJURIES 1) Have a partner check the eye for abrasions. (Check for symmetry of the pupils, do a rough check of vision by counting fingers.)
2) If it is abraded, cover the eye until you get to a doctor (an abrasion feels exactly like a foreign body in the eye).
3) If you are sure there is grit, sand or embers in the eye, try to flush it out with a gentle stream of clean water.
4) If that doesn't do it, pull the upper eyelid down over the lashes of the lower lid. As a last resort, try to lift the foreign body off the eye with the corner of a cloth or q-tip. Outdoor Life Online Editor** FRACTURED TOOTH** If there is no bleeding from a fractured tooth, no emergency treatment is necessary. If you see blood in the center of the tooth or the pulp is exposed, the tooth must be attended to by a dentist within 48 hours.
1) If the tooth is loose but in a good position, or has been pushed in, leave it alone. If it is out of position, reposition it and splint it with express putty (made by 3m).
2) If the tooth has been knocked out, it can be replaced, ideally within 30 minutes. Pick it up by the crown, rinse it off, and work it back into the socket. Hold it in place with wax. Outdoor Life Online Editor** DENTAL PROBLEMS** After months of planning and dreaming, you're in a spike camp near the continental divide ready to hunt elk when, "Arrrrgghhh!" You lose a filling, exposing a nerve. The planes, boats and autos can't get you home fast enough, and after you finally get to a dentist, you regret a lost dream trip. Okay, stop sweating and relax. Dr. Jan Stahl, a New York dentist with 27 years' experience, has developed a dental first-aid kit. Called the emergency dental kit (EDK), it includes toothache drops, temporary fillings and denture repair products. The EDK even comes with step-by-step, illustrated directions on how to treat various emergencies. And if someone else in camp has trouble, just tell them to open wide.
Click HERE for more info on the kit. Outdoor Life Online EditorDISLOCATED SHOULDER (METHOD ONE) The key to fixing ("reducing") the dislocated joint is to get the rounded head of the upper arm bone (humerus) back into the shoulder socket before the muscles go into spasm. Use constant, gentle traction.
1) Place your socked foot in the injured person's armpit. Hold the wrist with both your hands and, keeping your leg straight, slowly lean back. Give a long, steady pull on the arm while pushing with the heel of your foot.
2) After about five minutes, pull the victim's hand across his body using your heel as a fulcrum. The head of the humerus should slip back into the shoulder socket with an audible click. Outdoor Life Online EditorDISLOCATED SHOULDER (METHOD TWO) 1) Lay the injured person face down on an elevated surface such as a table or a log.
2) Tie a 10- to 20-pound weight to the injured arm and let it hang over the edge. After 15 to 30 minutes, the shoulder should reduce. It is important that the victim not try to rush the procedure as he feels the bone shifting.
3) After a successful reduction, put the arm in a sling and bind it firmly to the chest.
4) Get the victim to a doctor. Outdoor Life Online EditorMAKE YOUR OWN CAST What do the polish army, the special olympics and the U.S. Secret Service have in common? (No, this isn't a joke.) The answer is Sam Splint, a thin, foamy material that the above organizations and many others use to make temporary casts for broken limbs. Sam Splint stiffens when it's bent into an arc, making it an ideal instant cast. Invented by Dr. Samuel Scheinberg, an orthopedic surgeon from Oregon, the product weighs 4 ounces and is waterproof and cutable. It's so light you won't notice it in your pack, and if you're ever unfortunate enough to need it, you'll be glad you didn't have to use saplings and rope. www.samsplint.com Outdoor Life Online EditorHEAD, NECK, AND SPINAL INJURIES One way to detect possible head injury is to see whether the victim's pupils constrict when a flashlight is shined into his eyes. Outdoor Life Online EditorTEST FOR NECK INJURIES Run your fingers down the victim's spinal column,feeling for deformities or tenderness. If everything feels normal and the victim can move his neck painlessly, you can safely move him. If movement is painful, don't move him. Immobilize the neck (as shown at right) and send for medical help immediately. Outdoor Life Online EditorIMMOBILIZE THE NECK 1) Position sandbags (sacks stuffed with clothing or filled with dirt) on either side of the head.
2) Secure them with 2-inch adhesive tape. Outdoor Life Online Editor
From snake bites to sore teeth, this guide will help you tackle almost any accident.