New hobbies can be expensive. Remember the cash you had to shell out the last time you took up something new? It was probably painful. But I’m here to tell you that doesn’t have to be the case with backyard blacksmithing. Sure, you usually get what you pay for, but you can still have a lot of fun smithing for cheap. Here’s how I just set up a budget backyard forge for only $30.
Get Started
Aside from hammers, fire, and steel, the two most important parts of the blacksmithing equation are the anvil and the forge. The broken anvil I’m using is a loan from my dad, though you may find your own at a scrapyard for as little as 20 cents a pound. As for the forge, many people get by just fine making a forge from a vehicle brake drum. Braze some legs onto the sides, add an old hand crank forge blower and fill it with fire.
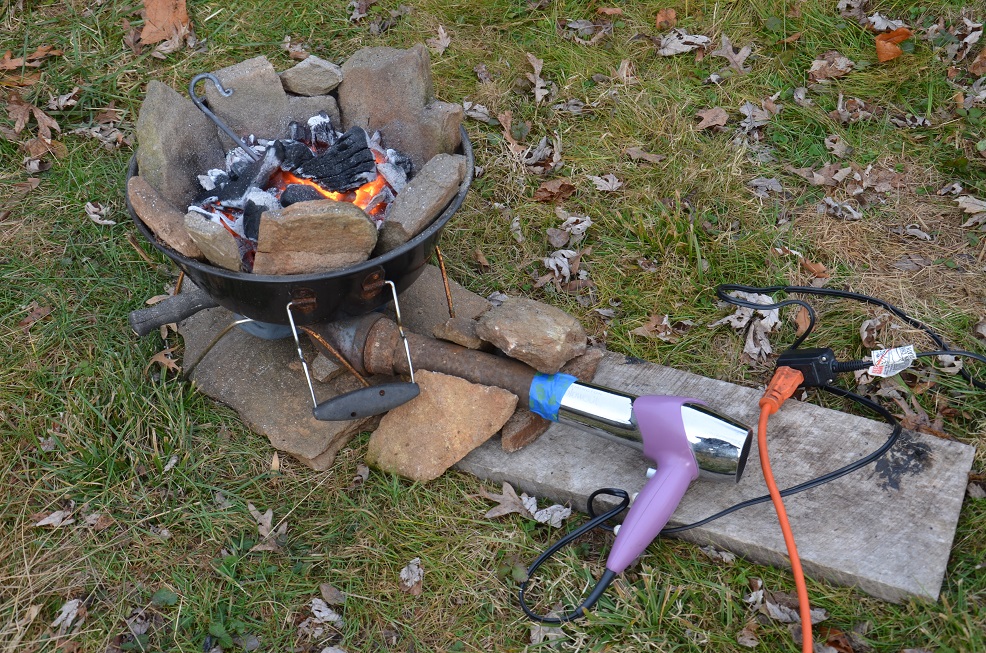
But if you can’t score these junkyard treasures, you can make a forge with the materials you have at hand. For this experiment, I used a $5 yard sale Hibachi hamburger grill and some local rocks that I know to be fire safe. Make sure you get your rocks from a dry location and test them in a campfire (while you’re at a distance) to make sure they don’t explode. NEVER use rocks you collected by a waterway (high rate of explosion). As for my forge blower, my daughter’s purple hairdryer works great. It even has variable speeds! I taped it to a pipe that goes into a fitting attached to bottom of the grill. And what does this eyesore burn? I’m using the same fuel that frontier blacksmiths used – hardwood charcoal. Yes, it burns up fast and it won’t get your metal too far past orange heat. However, the price is right, the availability is there, and it burns very clean. It’s clean enough, in fact, to cook my lunch over the dying embers when my work is finished.

Take It Further
Smithing is a complex craft, full of variables, and you’ll go farther and faster with some expert tutelage. If you can study with a pro, your learning curve will be shorter. But if all you have is a book on smithing, you can gain the basics with a little reading – and some trial and error. My favorite books on the subject of beginning smithing are Edge of the Anvil by Jack Andrews, and The Black Smith’s Craft by Charles McRaven. With a little book research, a few well-chosen supplies and some imagination, you can create your own backyard blacksmithing forge for a lot less than you might think. Here’s a breakdown of my supply list.
Anvil – I borrowed a broken one from my dad – FREE
Stump under the anvil – compliments of my yard – FREE
Hamburger grill – this will act as a forge frame – yard sale find for $5
Rocks to line the grill – gathered from the area – FREE
Sack of Charcoal – for use as an alternative to coal – $9.39
A new hammer – for beating the metal – $10.45
Scraps of 2 inch pipe – for air flow, found them in my barn – FREE
Hair dryer – to act as a blower for the forge, borrowed from my kids – FREE
Pliers and vice grips from my tool box – to act as tongs – FREE
Painter’s tape – to attach the dryer to the pipe, without the sticky goo of duct tape – $3.15
10 pounds of old files from the scrap yard – to act as raw material for projects – $2.09
Grand total price – $30.08, and it all works
Have you tried backyard forging? Tell us your story by leaving a comment.