Maybe this sounds familiar: you’ve identified a great place to deer hunt, but you can’t quite figure out how to hunt it. Maybe there’s no suitable tree to hang a stand from. Or, a ground blind doesn’t give you a good enough view of the area. Or maybe you prefer to be out of the wind, rain, and snow. The only shame in that last one is not being tough enough to admit it.
All of these signs point to the same destination: You need an elevated deer blind. You could grab a tent-style ground blind for $150; they’re great for hiding you, but they don’t give you a good view of the area. You could buy a pre-made elevated blind, but prepare to spend a couple thousand bucks. Plus, many of those box blinds are so massive that you need a skid steer to transport and mount it on a platform. (See OL’s guide to the best hunting blinds, here) Or maybe… you like to save money and build shit?
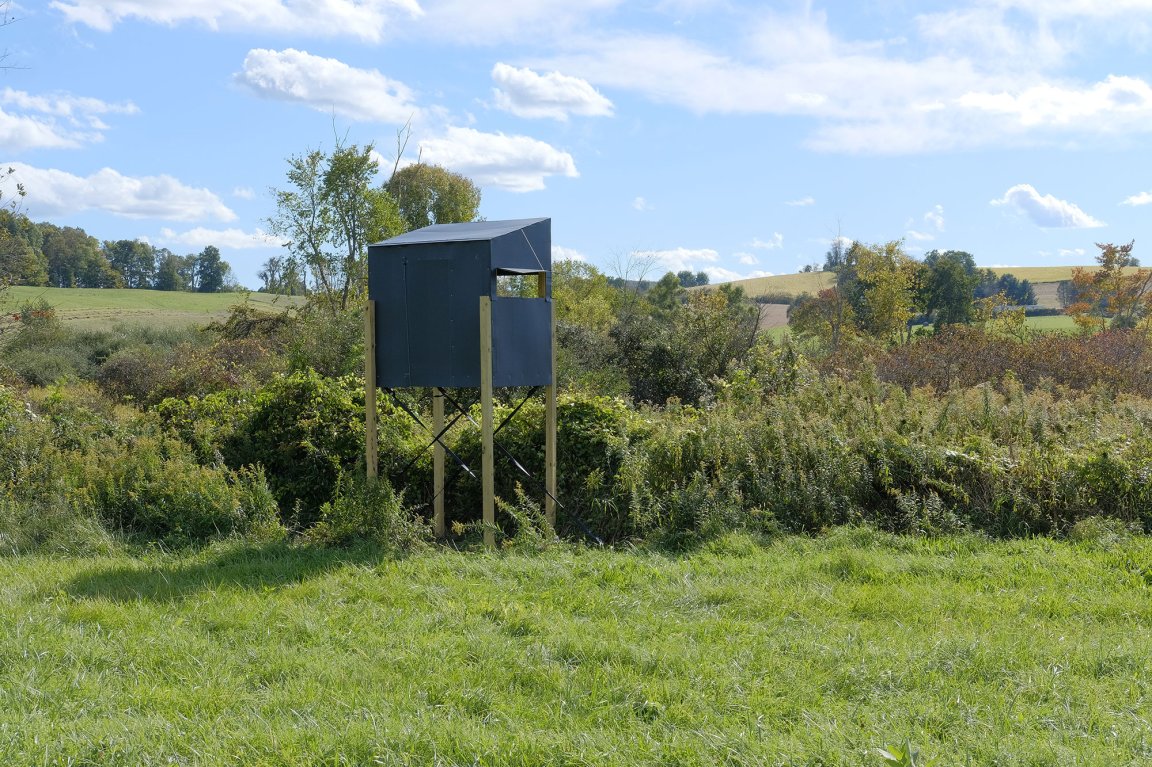
We are Derek and Joe, two hunting buddies from Columbia County, NY, and we like to build shit. We set out to create a badass elevated deer blind for around $500, and that’s why we are gathered here today. We call our project the DJ Stand. Get it? Here’s how to build a deer blind that is light enough to be moved around a property in a pickup truck.
How to Build a Deer Blind, Our Mission:
- Buildable in a weekend, with common tools. You don’t even need to own power tools to build this blind, though if you can borrow a chop saw and a drill-driver, you’ll be done in time for football.
- Made of stuff you can get at Home Depot for $500. Pandemic prices were a killer, but we got close with our build and have a version that comes in under five bills. We used common lumber, though, so if you have some around, it could save you some scratch.
- Portable. More or less. Like all hunters, we have an idea where our local deer hang out. Like all hunters, there’s a good chance we’re completely wrong. We designed the DJ Stand to easily fit in the bed of a full-size pickup. Specifically, we designed it to fit in an F-150, because that’s the most common truck in America and we have that whole “common tools” theme going.
- Protected from the elements. In our region, pre-dawn hunts are usually below freezing and sometimes below zero. In our area, the wind is no joke. Our blind makes long sits a lot more bearable.
- Make it Badass. This thing looks like it was born of the 2001 monolith and fits two big, heavily armed dudes. How much more badass are you looking for?
The other key aspect of our build is that it’s totally customizable. Our DJ Stand sits 7 feet off the dirt, to give us a chance at spotting the deer hiding in the tall grasses in the wetlands that snake through our properties. (We’re neighbors.) But you could easily build it to sit on the ground. Our version is for two people, but you could halve the horizontal measurements and make it a single. Ours is clad in black corrugated plastic, to retain heat and mask noise, but if you live in a warmer, drier climate, you might choose camo netting or canvas. Here’s how we did it:
First, a message from the lawyers: Derek and Joe are not engineers. There was beer involved in the conception of the DJ Stand, and though its designers have tested it and found it to be safe, you could be putting yourself at serious risk by undertaking this project. This Stand is certified to kick ass, but that’s not a safety rating. Building and using this stand is at your own risk. Please be careful and stay within the limits of your abilities.
The Floor
If the DJ booth were an animal, the floor would be its spine. It’s the structural core of the entire project, so we built it like we were building a house. In fact, it’s exactly like a residential subfloor. If you’re going to make this a ground blind, you might consider pressure-treated 2x4s, which will better withstand contact with wet ground. Because we planned to have our DJ Stand up in the air (and we’re cheap), we went with basic stud lumber.
The 60 x 48” box is composed of [4] perimeter 2x4s, bolstered by [3] 2×4 joists placed 16” apart, on-center, spanning the box’s narrower dimension. We fastened this together with common nails to handle the expansion and contraction our frame will experience while sitting out in the elements, and we capped it with half-inch, pressure-treated plywood that can handle our wet boots. This is almost certainly over-built, but if you’re going to be up in the air, overbuilding is the way to do it.
Cuts:
- [2] 2x4s @ 60”
- [4] 2x4s @ 45”
- [1] Plywood @ 60” x 48”

The Walls
The walls rise up from the floor, and their tops are cut at 15-degree angles to accommodate the pitch of the roof. The tops of the front (longer) posts should be 78.5” from the top of the angled cut to the top edge of the floor’s perimeter 2×4 joist (78” to the floor); the tops of the rear (shorter) posts should be 66.5” from the top of the angled cut to the joist. We did a little experimentation around how the posts connect to the floor, and that impacts how long you’ll make these.
If you’re handy with a saw and want to shave a few pounds off your blind, you might try what we did on one side of our demo blind: Cut a 2” square tenon into the bottom 3.5” of your wall posts and a 3.5” square out of each corner of your ½” plywood floor. This allows the post to sit directly on the perimeter joists, its tenon extending through the plywood and nesting in the corner of the box that will become your floor. This is a very strong joint, and keeps the face of the wall even, which is crucial for attaching the exterior cladding. The carriage bolt that secures the legs through the frame also passes through this tenon, further integrating the structural elements.
If you go this route, your 4×4 posts should be 82” tall in the front and 70” tall in the back. Here’s a photo of how this attachment looks:

The longer of the coated, corrosion-resistant ½-inch carriage bolts that hold the legs on bolt straight through the tenons.

The other option is to just sit your post on top of the plywood floor. For this method, cut your posts to 77.5” in front and 65.5” in back (if you want your blind to be the same height as ours). To beef up the structure, we added another 2×4 under the floor, up against the perimeter joist like this:

The rest of the walls’ structure will very closely resemble the walls in your house. We nailed the assemblies together and screwed them to the posts, to create a tight fit but still allow for movement. To save on weight and material, we didn’t make our wall suds 16” on-center. In the front, we have one stud, smack in the middle. In the rear, we have two studs 13” in (center) from each outer stud, to create a 24” door opening in the middle. That’s the minimum width we thought we could give a bundled-up hunter. Our side walls don’t have any vertical studs aside from their perimeters. It’s not like we’re trying to mount a flat-screen in here.
We ended up with three separate frame sizes. You can go by our measurements, but we’d recommend installing your four corner posts first and measuring between them. The fewer big gaps you have, the less the blind will move around. (It’s going to move around no matter what you do, but tight fits help.) Our three walls were the following sizes: Front wall: 53”w x 78”h; Rear wall: 53”w x 66”h; 2 x Side walls: 41”w with sloping top. Cuts:
FRONT
- [2] 2x4s @ 53” (bottom and top studs)
- [2] 2x4s @ 75”, (vertical studs) tops cut at 15-degree angles across the longer dimension of the 2×4. Make sure the high point of the angled cut is 75”
REAR
- [2] 2x4s @ 53” (bottom and top studs)
- [3] 2x4s @ 63”, (vertical studs) tops cut at 15-degree angles across the longer dimension of the 2×4. Make sure the high point of the angled cut is 63″
SIDE
- [2] 2x4s @ 41” (bottom stud)
- [1] 2×4 @ 75” (front stud) tops cut at 15-degree angles across the shorter dimension of the 2×4. Make sure the high point of the angled cut is 75″
- [1] 2×4 @ 63”, (rear stud) tops cut at 15-degree angles across the longer dimension of the 2×4. Make sure the high point of the angled cut is 63”
- [2] 2×4 @ 42.7″ (roof support studs)

We built in horizontal window sills 36 inches off the floor both for structural stability and to provide a place to rest a gun. To attach them, we screwed some 2×4 scraps into the studs, and screwed the sills onto those. (We experimented with angling the sills down, to better shed water, but it was a total pain in the ass when it came to attaching the cladding.) The sills also indicate where our window cutouts will eventually be. We didn’t put any sills in the back.
The size of the blocks that support the 2x4s don’t matter, as long as they’re more than a couple inches tall. The length of the sill would be the size of the gaps between your studs. In our build, that gave us the following cuts:
- [2] 2x4s @ 24.25” (front sills)
- [2] 2x4s @ 38” (side sills)

The Roof
We chose a very simple, single-pitch roof. It’ll shed water, and only has an overhang on the backside—it keeps water from running into our door, and means you can lay it on three of its four sides without crushing anything. Because we don’t have to worry about much debris, ours is not structural in any way. We made the taller side 6’6” and cut the posts and the top wall studs at a 15 degree angle, ending in a shorter side that is about 5’6” tall. It’s straight-up roomy in there!
We sided the roof the same way as we sided the walls. The only support our roof has comes from the tops of the walls, and we’re a little nervous about the snow, to be honest. If this is a concern for you, maybe add a center brace. We tried to keep ours as lightweight as possible.
The Skin, Windows, and Door
We went back and forth a lot about the cladding. Derek wanted to use corrugated metal roofing: it is fairly lightweight, cheap, and imparts a ton of rigidity to the overall structure. Joe, who is fidgety, was afraid he’d sound like a pinball bouncing around in a snare drum and spook every buck in North America if you put him inside a metal box.
Compromise: we experimented with corrugated asphalt roofing material. It had a lot of the advantages of its metal counterpart, but without the noise penalty. In fact, it would help mask a lot of noise. Once we attached it, though, we realized how difficult it was going to be to make the structure even remotely weathertight. The peaks and valleys in the material would let in everything smaller than a rabbit.
We ended up choosing corrugated plastic. It’s pretty cheap and light, and it sheds water. We bought it in black, to add a little solar heating action, and secured it to the frame with weather-tight roofing screws that pretty much keep the skin from leaking. (It’s not seaworthy or anything, but it keeps the rain out pretty well.) The directional quality of the corrugations added some structure, and those same structural ribs also function as hinges for our doors and windows. That saved us a ton of weight and engineering.
Because the skin has to fit like, well, skin, we used observed measurements rather than a tape to size our cladding, and we’d endorse this method: We put our sheets up against the completed frame, and marked the beginning and end of each intended cut. We used a straight edge to connect our marks.
The corrugated plastic is so easy to work with—you just need any kind of straight-edge and a utility knife. We oriented the ribs horizontally on the walls where we wanted windows:

And we ran the ribs vertically on the back—the shorter side—where we cut our door.

We sealed the seams with that staple of all quality field engineering: duct tape.
To operate our windows, we created simple pulls. We tied a single piece of string to center of the bottom edge of each window flap and ran it through a small hole we punched in the top of the wall. We pull it and it uses the plastic skin itself as a sort of pulley, pulling the window open. We tied the string to a small stick to keep the string from bending the flap when we pulled it open. And we tied it off on a not-quite-flush screw in the frame.
To keep the windows closed when we’re not using them, we tied strings onto the two bottom corners of each strap and tied those off on popped-up screws as well.

Looks pretty slick, right? Yeah, that proved to be a bit of an issue when lifting the blind into position. The plastic cladding doesn’t offer much in the way of handholds. To help with this, we screwed a piece of 1×2 onto the front of the blind, right in front of the roof. We can grab it when moving the thing around.
We chose to skin our blind with the legs attached, and trimmed the sheeting around the legs. The reason: A wood-on-wood interface will remain more stable in the field and do a better job of keeping the elements out. We cut flaps to divert water and snow away from sensitive areas—like the end grain of the legs.

The Legs
We bought [4] 10-foot, pressure-treated 4x4s and didn’t even trim them. (It’s not like we’re posting up on a dance floor.) We ran the legs three feet up the sides of the blind, elevating us seven feet off the ground.
We attached each leg with [3] 10-inch-long ½” carriage bolts; two per side go through above the floor, securing to the corner 4×4 posts of the blind walls.
And one per side extends through the perimeter of the floor itself, tying into the strongest rectangle in the blind.

Transporting It
Our blind is designed to fit, tailgate down, in the smallest-available bed of a modern Ford F-150—because pretty much everybody either has one or knows someone who can loan them one. With the legs attached, it’s probably not safe to drive on the highway, but you could bump around your own property (we did, and it was fine) or cruise down a gravel road. Just make sure to strap it down really well.

It’s far safer to take the legs off. There’s enough room that you can jam ‘em into the space between the bed rails and the blind.
However you choose to transport it, the blind was designed to be erected from the bed of a truck. It’s really easy: Two guys get up against the cab and lift. Once it reaches a certain point, the blind is doing the driving, and one guy will have to jump out and keep the blind from going all the way over. We’ve set this thing up from the ground, too, and that was fine as well.
Securing It
Once your blind is up, it’s probably a good idea to use guy lines to anchor it. We used 15” ground anchors and tied them to the carriage bolts where they extended through the floor frame. Please don’t just stand this thing up and call it good. It’s pretty stable until you get two guys up there or there’s a 30 mph wind. Use the guy lines.

Misc Details
We keep our door shut with a bungee cord that goes into an eye hook on the underside of the blind. Once inside, we have a tie that keeps it closed, just like on the windows.
You might have noticed that we didn’t build a ladder? Why build a ladder when you probably have one kicking around the house that you can donate to the blind for a couple months. Remember to leave it out for a while so the deer get used to it.
Shopping List
We bought everything for this project at Home Depot. We’re not shilling for those guys, but wanted to make something almost anyone could buy. If we weren’t doing this for The Masses, we’d support our local hardware store. Shoutout to Herrington’s! Anyway, here’s a list of stuff you can get at Big Orange and turn into a DJ Stand:
SHEATHING
[1] Corrugated plastic sheeting, black, 10-pack (you’ll have extra) $210.60
Note: You can’t get the black sheets as singles from Home Depot, but you can get white that way. If you buy 6 white corrugated plastic sheets (and paint them camo? Eh? Slayer logo, too?), you can knock $75 off the final tab.
[6] Corrugated plastic sheets, white $22.74 each = $136.44
Weather-tight roofing screws, 100-pack $11.98
FLOORING
[1] 1/2″x4’x8′ plywood pressure treated $32.78
FRAMING
[22] 2x4x8 white wood stud $3.48 each = $76.56
Floor: 5
Walls: 12
Roof: 2
Extra (just in case): 3
[4] 4x4x8’ framing lumber (doug fir) $16.66 each = $66.64
[4] 4x4x10′ #2 Ground Contact Pressure-Treated Timber $13.88 each = $55.52
HARDWARE
1/2″x 10″ zinc-plated carriage bolts
[1] 10 pack @ $26.00
Total = $31.78
[1] bag zinc-plated 1/2″ flat washers $5.94
[12] 1/2″ zinc-plated hex nut (coarse thread) @ $0.24 each = $2.88
[2] 3.5″ zinc common nails (1lbs box) $5.84 each = $11.68
[1] 5 lb box #9 3″ decking screws $37.98
[1] roll black duct tape (60 yds) $8.42
Grand Total: $552.76 (or $478.60 if you go for the cheaper options).
Final Thoughts On How to Build a Deer Blind
You don’t have to follow our plans exactly. Take our design as inspiration for your own perfect box blind and get building. If you plan it out carefully, you’ll end up saving money and you’ll have a blind that you can move around your property (within reason) without heavy machinery.