Guns Rifles

Sniper School Part 1

Alex Robinson Avatar

We may earn revenue from the products available on this page and participate in affiliate programs. Learn More

httpswww.outdoorlife.comsitesoutdoorlife.comfilesimport2014importImage2011photo10013215791_127.jpg
SNIPER SCHOOL PART 1
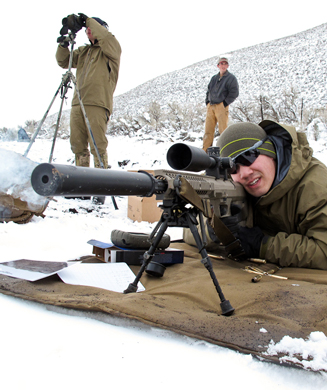
I had just fired my first round on day one of sniper school when the instructor came over to me. "Son, you need to start breathing or you're going to pass out," he said. It was the easiest task we would have to do all week: shoot five rounds into a 100-yard target from the prone position. I was already overexcited and shaky. I had been training and waiting for this trip for weeks and now that I was finally behind the rifle, anticipation took over. Was it possible to give yourself buck fever while shooting at a paper target? I guess I would find out. Photos by: Sean Utley, Derek McDonald and Alex Robinson
httpswww.outdoorlife.comsitesoutdoorlife.comfilesimport2014importImage2011photo10013215792_124.jpg
Myself and a handful of other gun writers flew to a rifle training course called Sniper Country in Utah where we would test our gear, shooting skills and perseverance. The event was sponsored by SureFire and from the start Derek McDonald, the company's VP of marketing, called it Operation Winter Fury. It lived up to its name.
httpswww.outdoorlife.comsitesoutdoorlife.comfilesimport2014importImage2011photo10013215793x_8.jpg
Our head shooting instructor was Jacob Bynum from the Rifles Only shooting school. This man could talk about guns and shooting for days straight … and he did.
httpswww.outdoorlife.comsitesoutdoorlife.comfilesimport2014importImage2011photo10013215794x_7.jpg
Our second instructor was Cody Carrol, a Marine who teaches classes in shooting, wilderness survival and tracking. As you can probably guess, he knows a thing or two about how to shoot a rifle.
httpswww.outdoorlife.comsitesoutdoorlife.comfilesimport2014importImage2011photo10013215795_119.jpg
On day one, after an in-depth safety instruction, we zeroed our guns. We were shooting Nightforce 3.5-15X50 scopes with a mil-dot reticle.
httpswww.outdoorlife.comsitesoutdoorlife.comfilesimport2014importImage2011photo10013215796_110.jpg
Which brings us to our first sniper school lesson: the mil does not stand for millimeters or military but rather milliradians, which is simply the measurement of an angle. The large hashes on the crosshairs you see here are mils and the small ones are half mils. At 100 yards a mil equates to about 3.6 inches and you can multiply this out to about 36 inches at 1,000 yards. On the scope, .1 mil equals one click. So to move up one mil you crank the scope 10 clicks.
httpswww.outdoorlife.comsitesoutdoorlife.comfilesimport2014importImage2011photo10013215796a_1.jpg
Believe it or not, this system requires you to do virtually no math. On the first day we zeroed at 100 yards and then shot at 100-yard increments out to 600 hundred yards. For each distance we wrote down how many clicks we moved the scope up for future reference. For example, this quick cheat sheet (hit enlarge photo) let me know that in order to hit a target at 300 yards I would dial up 13 clicks or 1.3 mils (remember 1 click equals .1 mils). Or if there was no time to adjust the scope I could easily hold 1.3 mils high.
httpswww.outdoorlife.comsitesoutdoorlife.comfilesimport2014importImage2011photo10013215797_119.jpg
You can practice this exact exercise at your local shooting range. Once you have your cheat sheet filled out, tape it to your rifle stock.
httpswww.outdoorlife.comsitesoutdoorlife.comfilesimport2013images2011038_27.jpg
One of the most basic principles we practiced was getting straight with the rifle, not angled off to one side. According to Bynum, the rifle should run parallel to your spine when you're shooting from the prone position.
httpswww.outdoorlife.comsitesoutdoorlife.comfilesimport2013images2011039_25.jpg
We also practiced from the kneeling position. In every case it's better to have bone to bone contact so the gun is supported by your skeletal structure and not your muscles (in the next photo you'll see how my elbow is resting on my knee). This is because bone is more stable than muscle, which gets tired and shaky quickly.
httpswww.outdoorlife.comsitesoutdoorlife.comfilesimport2014importImage2011photo100132157910_115.jpg
In fact, the only muscle that should really be flexing is your right bicep (vice versa if you are a southpaw) holding the gun into your shoulder. Let all of your other muscles relax.
httpswww.outdoorlife.comsitesoutdoorlife.comfilesimport2014importImage2011photo100132157910a_0.jpg
This includes relaxing your face (which I am clearly not doing here). Some of the best advice I got from Bynum was to think of yourself as a piece of meat after you pull the trigger. Be calm, relaxed, almost dead, just like a big piece of steak. Doing so will keep you from flinching or pulling your head off of the gun. It sounds simple, but it takes some serious mental practice to convince yourself that you are nothing more than a chunk of ribeye.
httpswww.outdoorlife.comsitesoutdoorlife.comfilesimport2014importImage2011photo100132157911_109.jpg
One trick I learned while shooting in improvised positions was to grab a piece of your jacket with the four fingers on your left had and then wrap your hand around the stock and grip it with your thumb. This holds the gun much steadier than if you held it at the forearm and ensures that it sits tight against your shoulder (see how my left hand is placed on my right arm in this photo).
httpswww.outdoorlife.comsitesoutdoorlife.comfilesimport2014importImage2011photo100132157912_110.jpg
This range card allowed us to know exactly how far the targets were. Notice there is one out at 1,800 yards (we'll get to that later).
httpswww.outdoorlife.comsitesoutdoorlife.comfilesimport2014importImage2011photo100132157912a_0.jpg
This is what we were looking for: silver silhouette targets placed along the hillside. There was no sound more satisfying than the hollow "clang" my bullet made after flying into one of these steel plates.
httpswww.outdoorlife.comsitesoutdoorlife.comfilesimport2014importImage2011photo100132157913_106.jpg
After lighting up targets at the "Known Distance Range" we headed up into the hills to shoot at targets of unknown distance. In teams of two we hiked up a ridge and stopped at different stations to glass for targets that were setup along the opposite ridge out to 600 yards.
httpswww.outdoorlife.comsitesoutdoorlife.comfilesimport2013images20110314_18.jpg
My partner was Brent Wheat, a freelance gun writer and police officer from Indiana. He was a better of a shot than I was, but I had an easier time finding the targets and hiking the hills … we made a good team.
httpswww.outdoorlife.comsitesoutdoorlife.comfilesimport2014importImage2011photo100132157915_96.jpg
The spotter's job is just as important as the shooter's. The spotter is in charge of ranging the targets, calling shots and wind. As Brent shot I would watch for trace to see where his bullet hit. I would then instruct him where to hold on his next shot …
httpswww.outdoorlife.comsitesoutdoorlife.comfilesimport2013images20110316_18.jpg
… and he would do the same for me when I was behind the gun.
httpswww.outdoorlife.comsitesoutdoorlife.comfilesimport2014importImage2011photo100132157917_88.jpg
The basics that we learned on the range, like not taking your head off the gun to work the bolt, became even more important during our shoot on the ridge. In real life sniping, taking your head off the the gun to "turkey peek" could mean giving up your position and have some lead fly in your direction. In hunting it means you'll lose the animal in your scope and potentially miss out on a follow up shot.
httpswww.outdoorlife.comsitesoutdoorlife.comfilesimport2014importImage2011photo100132157918_84.jpg
So how did we go about hitting a target 600 yards away across a ridge?
1) Find the target with patience and a good spotting scope
httpswww.outdoorlife.comsitesoutdoorlife.comfilesimport2014importImage2011photo100132157919_80.jpg
2) Hit it with a laser rangefinder (we zapped each target three times to make sure we had the correct range and weren't hitting a branch or bush near the target). Even a mistake of 30 yards can mean a miss or wound when you're shooting long range.
httpswww.outdoorlife.comsitesoutdoorlife.comfilesimport2014importImage2011photo100132157921_73.jpg
3) Then we either consulted our cheat sheet or or plugged the range into this small computer that calculated how we should dope the scope. The cheat sheet was way quicker, but the computer took into account wind and elevation, which made it a bit more accurate.
httpswww.outdoorlife.comsitesoutdoorlife.comfilesimport2013images20110322x_2.jpg
4) Dope (or adjust) the scope and shoot
httpswww.outdoorlife.comsitesoutdoorlife.comfilesimport2013images20110323_17.jpg
5) Watch for trace to see where the bullet hits and either call for a different hold or shoot again. 6) Move on to the next target
httpswww.outdoorlife.comsitesoutdoorlife.comfilesimport2013images20110324_11.jpg
The exercise tied back directly to hunting. However in a real life hunting situation there would probably no be time to punch ranges and wind speeds into a computer. There is also little likelihood of a good follow-up shot or multiple targets at one time. This is why most people advocate for not taking shots at game from farther than 400 yards (and even that is a stretch in most field scenarios).
httpswww.outdoorlife.comsitesoutdoorlife.comfilesimport2013images20110325x_2.jpg
It helps to be in decent shape for shooting exercises like this. The quicker you can catch your breath and slow your heart beat, the quicker and more accurately you'll be able to shoot (this translates to hunting too).
httpswww.outdoorlife.comsitesoutdoorlife.comfilesimport2014importImage2011photo100132157929_30.jpg
On day two we started a dot drill exercise. It was a timed exercise where we started standing next to our rifles and then dove behind them at the call of "gun!" From there the shooting began.
httpswww.outdoorlife.comsitesoutdoorlife.comfilesimport2014importImage2011photo100132157929a_0.jpg
We shot this target at 100 yards in five different rounds. You have a set amount of time to shoot out each row of the target (for example 30 seconds to shoot out the dots on row 2). Then you reload get up and get ready for the next round.
httpswww.outdoorlife.comsitesoutdoorlife.comfilesimport2014importImage2011photo100132157930_28.jpg
The times you designate to shoot each row of dots don't really matter, so you can set this drill up to match your own ability.
httpswww.outdoorlife.comsitesoutdoorlife.comfilesimport2014importImage2011photo100132157931_21.jpg
What's important is that the drill forces you to shoot quickly and efficiently. Any flaws in your shooting are soon exposed (I had trouble shooting at the bottom of my breathing cycle which caused me to shoot either high or low). This is a great drill to set up with a partner at your local shooting range. You can easily find these targets online and print them from your home computer.
httpswww.outdoorlife.comsitesoutdoorlife.comfilesimport2013images20110332_6.jpg
The drill also teaches you recoil management and how to stay on the target after the shot.
httpswww.outdoorlife.comsitesoutdoorlife.comfilesimport2013images20110333_4.jpg
All of us could use more practice with this drill.
httpswww.outdoorlife.comsitesoutdoorlife.comfilesimport2014importImage2011photo100132157935_19.jpg
In the next exercise Bynum taught us about shooting with the barrel resting on a hard surface. Resting your barrel on a hard surface, like say the handrail of your treestand, disrupts the barrel's harmonics. When you fire a rifle the barrel vibrates a bit like a tuning fork. When you rest it against a hard surface this ruins that natural motion.
httpswww.outdoorlife.comsitesoutdoorlife.comfilesimport2013images20110336_4.jpg
In our case resting the barrel on a bench caused shots to hit 5 to 8 inches high at 100 yards. However, resting the forearm of your rifle on a hard surface and shooting will not ruin your shot since most rifles have free floating barrels.
httpswww.outdoorlife.comsitesoutdoorlife.comfilesimport2013images20110337_4.jpg
httpswww.outdoorlife.comsitesoutdoorlife.comfilesimport2014importImage2011photo100132157938_11.jpg
A quick note on the gear … The cans you see attached to the barrels of all the rifles are made by SureFire. I had never shot with a suppressor before, but I was suprised to see just how much they cut down on noise and muzzle flash. We all wore ear plugs as a precautionary measure, but after four days of shooting there wasn't a single ringing ear in the group. The gun I shot was a Desert Tactical SRS in .338 Lapua. Although I did have a nice bruise on my shoulder after four days of non-stop shooting, the recoil was definately manageable and the gun was a forgiving shooter.
httpswww.outdoorlife.comsitesoutdoorlife.comfilesimport2014importImage2011photo100132157939_12.jpg
To see part 2 of Sniper School come back to outdoorlife.com on Thursday.

For four days I did nothing but shoot, spot, hike and reload at a sniper school in the mountains of Utah. Here’s what I learned.