We may earn revenue from the products available on this page and participate in affiliate programs. Learn More ›

Spend a Saturday afternoon watching outdoor television and you are bound to see a few “celebrity” bro hunters killing big ol’ bulls and bucks at extended ranges with a rifle. As cool as it may seem to see a deer tip over at 700 yards, it’s not a shot most hunters should take. It’s also irresponsible for the TV hunters to promote such a false narrative, because you should be able to stalk within 300 yards (or closer) of most game. I actually used to work for two outdoor TV networks, and can attest that the guys oozing machismo on those shows miss more long shots than they connect on—the whiffs just never make it to TV.
The kill shots they do air set a bad example for novice rifle shooters. It makes us think that long distance shots are the norm, when in reality, newer shooters like you and me should never pull the trigger on an animal past 300 yards. Because, truth be told, becoming precise with a rifle inside 300 yards requires a hell of a lot of practice. It takes real skill to make an ethical killing shot on elk or deer at longer distances, and many folks don’t put in enough time (or simply aren’t good enough) to make such a shot with any amount of consistency.
For the past two summers, I have gone to THE SITE Training Center in Illinois to try and become better with a centerfire rifle. I’ve learned quickly that shooting accurately past 300 is hard. You have to keep track of so many things at once: your shooting position, the wind, breath control, point of aim, and more. It all needs to be precise, and gets more difficult to coordinate the further you move away from the target.
Fortunately, there are plenty of practices, drills, and rules to know before you head out to the range and, later, a hunt. Here are the keys to becoming more accurate inside 300 yards.
1. Make Sure Your Rifle is Dialed
When you buy a rifle, it needs to be bore-sighted, and then sighted in at the range. Bore-sighting is fairly simple, but first-timers should have a gunsmith do it. When sighting in your scope, it’s definitely smart to have an experienced shooter with you at the range. They can help you crunch the numbers to adjust your reticle, review your shooting position, etc.
Also, keep in mind that the screws on the scope and the screws under the rifle (typically near the trigger) need to be torqued properly with a torque wrench. If they’re not, your rifle may not shoot accurately. I didn’t understand the importance of this when I first started rifle shooting, and it caused my gun to shoot inaccurately. You need to find out, either by talking to your gunsmith or the gun manufacturer, what the inch/pound torque ratios are for your gun and scope mount. Now, the gunsmith should be able to torque the screws for you, but make sure you talk to him or her about it, and that it’s done properly—I like to watch the gunsmith do this. This may seem a bit confusing now, but a good gunsmith can walk you through this process. If you don’t take the time to do it before going to the range, it will lead to a lot of frustration and wasted ammo.
2. Sight In at 200 Yards
Most new (and old) rifle hunters sight in at 100 yards and call it good. Jim Kauber, my friend and former Navy SEAL Master Chief, taught me it’s smarter to get the rifle on paper at 100 yards first and then sight it in at 200. That way whether you are shooting an animal at 50 or 200 yards, all you have to do is center the vitals in the crosshairs; you don’t have to account for holdover. It also makes it easier to account for holdover if you move out to 250 or 300 yards when gravity has more effect on the trajectory of the bullet. (You will understand holdover a bit better as you start to learn more about ballistics and the specifics of MOA and MILs.)
3. Shoot a Duplex Reticle Scope

When you’re starting out, you want to keep it as basic as possible, and a scope with a duplex crosshair is just that. There a variety of scope reticles to choose from, but the duplex is the most simple (I use a Leupold VX 3i 3.5-10x40mm). Duplex reticles are good for limiting shots to 300 yards because they allow for quick target acquisition and don’t require much calculation to be accurate at shorter distances.
I sight the gun in at 200 yards so I can center any target inside that distance in the crosshairs and pull the trigger with confidence. Then, if I go to 300 yards, I simply put the space between the crosshair and the very top tip of the bottom post (it’s thicker and looks like the Washington Monument), in the animal’s vitals and I’m good, because I have calculated the bullet drop, which you can do with a ballistic calculator app.
4. Flinch Drills

One of the biggest hurdles I still have to overcome, and you likely will to, is flinching or tightening your body up when pulling the trigger. We all do this at one time or another in anticipation of recoil. Flinching is less of an issue if you’re shooting a shotgun, but not a rifle, because your bullet placement must be precise—especially at longer yardages. A lot of shooters tense up before pulling the trigger, causing them to jolt forward at the shot and thus shoot low. Dry-firing helps train you to stop flinching.
With the gun unloaded, put the crosshairs on the target. Prepare for the shot the same way you would if there were a live round in the chamber. I take two deep breaths before I shoot and then on the third, deep breath I exhale slowly as I pull the trigger. Keep the crosshairs on the target all the way through the trigger pull. If the crosshairs suddenly move off target when you press the trigger that means you are flinching and it will cause the bullet to miss. The more you dry fire, the less you will flinch, so just keep at it.
For the second drill, grab a buddy. Give your friend the unloaded gun, with the safety on, then turn away and put on hearing protection. Your friend should either load one round or leave the chamber empty and simply close the bolt. When he hands you the gun back, it’s up to you to shoot the same way you’ve been dry firing. You need to learn to pull the trigger the same way every time without tensing up, and this drill conditions you to do that. If the chamber is empty and you flinch at the break of the trigger, or the bullet misses the target, then you need to return to dry firing.
5. Floating the Reticle
It’s important to remain steady when shooting a rifle, but it’s impossible for most of us to stay completely still. Kauber taught me that if you can keep the point of aim inside the target, that it is an acceptable amount of “drift.” You can practice this by spray painting the size of the animal’s vitals on a target, looking through the scope, and trying to keep the crosshairs or your holdover point inside the vitals. You can also add dry firing to this. When you break the trigger, follow through by continuing to watch the target through the scope to see where your point of aim ended. If it is inside the spray-painted vitals, you are good.
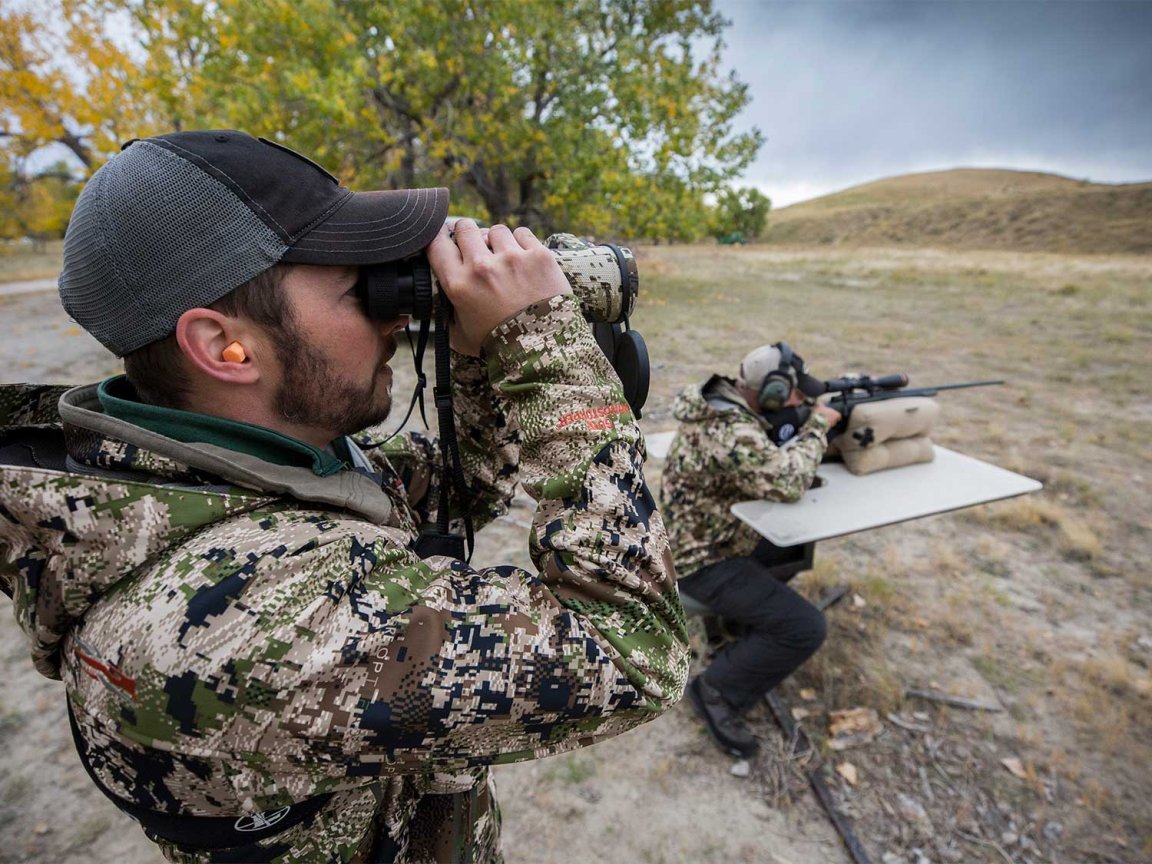
6. Shooting Off Packs and Sticks

At the range, most folks shoot off a benchrest. Others attach a bipod to their rifle and shoot prone. You should definitely try these positions to start. But you also need to practice how you will actually shoot on a hunt, which is likely off your backpack or from shooting sticks. To practice, start by shooting prone by using your pack. This is a very steady position. I like to put my pack on top of something solid, like a concrete pad or railroad tie or just the ground. In the field, I carry a second pair of old binoculars in the outside pouch of my pack because they offer a wide and steady platform for my rifle. Stuff a spare, lightweight parka in the pack as well. It will provide more elevation in the field, especially if there’s tall grass that could obstruct your view.
Shooting off sticks takes a bit more skill, because it’s harder to remain solid. I use Primos Trigger Sticks or a BOG DeathGrip tri-pod, because they offer plenty of stability. Both of these supports might be more cumbersome to carry, but they’re much easier to shoot from than a bi- or mono-pod. Sit cross-legged and set the sticks in front of you. Put your pack in your lap, too, which offers a stable rest. Use your non-shooting hand to manipulate the stock into the correct position as you acquire the target in the reticle.
7. Shooting at Different Distances from the Same Spot
Set up 250 to 300 yards away from a target, and place a second target at 150 to 180 yards. From your pack or the sticks, shoot the long target first, then move to the closer target, switching between the two every few shots. This helps with target acquisition and your point of aim at varying distances. (Just remember the more you shoot, the more your barrel heats up. This causes accuracy to suffer, so be sure to let the barrel cool after a few shots.) At 300 yards, you have a holdover to account for, but at 150, you can center the crosshairs and touch off a round. It’s a good reminder that you need to adjust your aim at different yardages. That way, you can react quickly on a hunt without second-guessing yourself.