We may earn revenue from the products available on this page and participate in affiliate programs. Learn More ›
The signal whistle is probably the most useful piece of survival gear that people are NOT usually carrying today. Sure it’s natural for us to crave a wicked looking survival knife. And your instincts are right on the money if you want to have explosive fire starting tools. But that humble signal whistle can end up catching someone’s attention, and draw in your rescue team if you are too banged up to be using that survival knife or fire starter. And that rescue is your ticket home.
Before we get rolling, you should always have a whistle or two within easy reach when you are moving through the back country or the wilder parts of your backyard. But what if you needed one and didn’t have it? Since ancient times, people have made whistles out of bamboo and other hollow stalked plants and hollow bones. With a little bit of woodcraft skill, you can too.
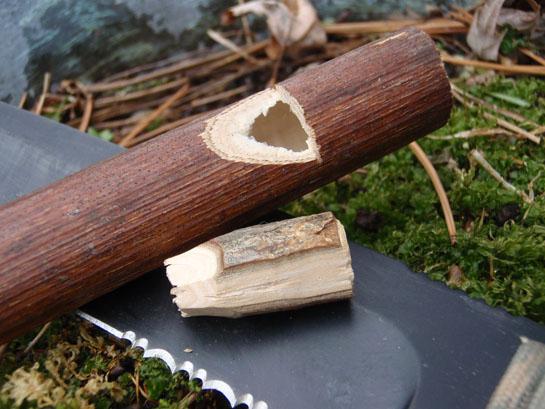
To get started, you need some hollow material like bamboo, knotweed, reeds, hollow bone or pithy wood branches that you can ramrod clean. Then you’ll need a sharp knife, and it doesn’t hurt if the blade has a serrated section to handle some of the trickier cuts. Cut a section of whistle body about 6 to 10 inches long and less than 1 inch in diameter. The skinnier the whistle is, the sharper and higher the noise will be. It’s ideal if the tube is closed at one end, such as a node in bamboo or knotweed. If it’s completely hollow like a piece of pipe, then you’ll have to plug one end completely.
About one inch from the open end, make a 1/4-inch deep cut across it. A serrated knife, fine toothed saw or good file will make quick work of it. Then use your knife to cut from the center of the whistle body toward the first cut to make your whistle opening. Start about 3/4 inch from the saw cut. This cut should look something like a “U” with the bottom of the U being very crisp and sharp.
Now you need to make the mouthpiece. Cut off a piece of soft wood about one inch long, from a piece of stick whose diameter will fit snug inside the whistle body. Now comes the delicate work: you must cut a “ramp” alongside of the plug. Remove about 1/8 of an inch on one end of the plug (the end where your mouth will blow air into the whistle) narrowing down to about 1/16 removed on the end of the plug that goes inside the whistle. Slide the plug into the whistle and try blowing softly down the hole where the opening of the plug. There should be a whistle sound. If not, then try moving the plug around. You can also try rotating it a little. If that doesn’t work, shave a little more off the plug’s ramp. It may take some practice to get the right fit and blow at the right pressure for your whistle; but this is a fun craft for the kids and a handy piece of survival gear too.
Try it out, and let us know how it works for you by leaving us a comment below.