We may earn revenue from the products available on this page and participate in affiliate programs. Learn More ›
I got my first pocket knife when I was five years old, and it didn’t take me long to say, “Hey, this thing doesn’t cut so well anymore.” However, it was several years before I got serious about properly maintaining a sharp pocket knife all the time. A dull pocket knife is frustrating and next to useless. If you want to learn how to sharpen a pocket knife, I’ll take you through two reliable methods I always use as a professional knife sharpener and outdoorsman.
The good news: There are so many knife sharpeners commercially available today that you have many options. The bad news: There are so many options that it can be hard to figure out where to start. Use this as your guide.
How to Sharpen a Pocket Knife with a Stone

We will begin in the beginning, or at least where I began. My first foray into sharpening was with the tried-and-true Arkansas stone. But this general technique will apply to Japanese waterstones, Arkansas stones, diamond stones, ceramic stones, and really any other sharpening stone you can find. Some stones will require lots of water, even a trickle on them while you sharpen; some require oil, and some won’t require anything. Follow the manufacturer’s instructions for whatever stone you choose.
What You Need
Step 1: Profile the Pocket Knife’s Edge

When you’re learning this technique, it makes life easier when you mark the entire edge of the knife with a Sharpie. This way, you can see if your angle is correct, and that you are fully reaching the apex of the edge. When profiling the edge, you can make back-and-forth motions on the stone to quickly remove material. Some people prefer a swirling motion, some just a back and forth. Whatever motion you choose, just be sure to keep the angle consistent. This is the key to sharpening with stones.

Regularly check the edge to see if you removed all the marker from tip to heel. Keep going until all edge rolls and chips are gone, then switch to the other side and profile it the same way. Before changing sides, check for a “burr” on the edge. You should be able to feel it by gently dragging your finger across the edge. It will feel smoother when dragging towards the side not being worked on, and “grabby” when dragging towards the side you are working.
Step 2: Refine the Edge

After you have raised a burr on both sides, and any damage is removed, you can begin to refine the edge. Instead of using the swirling or back-and-forth technique on the stone, switch to one-directional passes. You can make these with the edge “leading” or “trailing.” Edge leading means the edge is going forward “into” the stone, and trailing is the edge going away from the stone. Either way is acceptable and will work, provided you keep the angle consistent. Understand that this part takes practice. Some people pick it up more easily than others. It can be frustrating and time consuming to build this skill, but it’s a useful skill to have. Every well-rounded outdoorsman should know this method.

Make these refining passes, and alternate side to side until the burrs are totally gone, and the edge feels the same whether dragging your finger from the left or the right. If you are wondering whether or not you are keeping your angle correct, you can mark the edge with your marker again and make a few passes and check. This will help you build the muscle memory to keep the angle consistent so you don’t wander too shallow or too steep. Also, if you have more than one stone, you can move to the finer grits and keep repeating this step until you’re out of stones or until you’re satisfied with the cutting performance.
Step 3: Strop (Optional)

A leather strop with some good compound can really take your pocket knife to the next level of sharpness, and will also maintain your edge for a long time to keep your time on the stones to a minimum. This will work just like step two with alternating passes, but the edge always has to be trailing. If you make a pass with the edge leading, you’ll have a nice big slice in your new strop. If your knife doesn’t have a lock, take extra precaution and don’t use a lot of pressure because your knife could close on your fingers. Keep making these alternating passes, and you will see the edge really start to shine, and even become mirror like (assuming the stones were sufficiently high grit), and you will see increased cutting performance. As always, keep the angle consistent pass to pass, and keep it the same as you used in steps one and two.
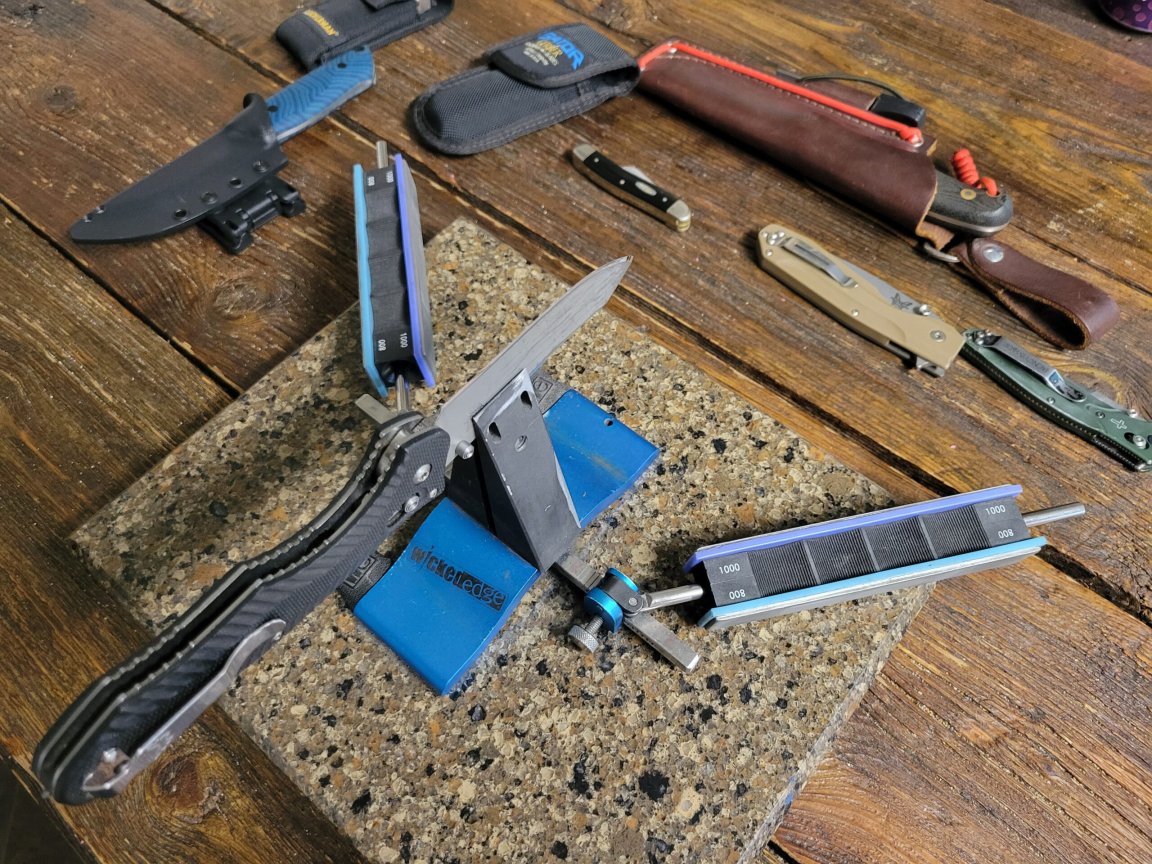
How to Sharpen a Pocket Knife Using a Guided System

There are more than a few guided sharpening systems available today, but they all have a few things in common, and these steps will be applicable to whatever system you choose. My first guided system was the Lansky 5 Stone Guided Sharpener, and I currently work with a Wicked Edge Pro system, but I have used others, and there are good options out there for almost any budget.
Other Recommended Guided Systems
- Work Sharp Precision Adjust Sharpener (original, professional, or elite)
- KME Sharpening System
- Edge Pro
What these systems all have in common is that they hold the knife in a fixed position, and keep the stones at a given angle that you choose. They take the guesswork out of sharpening, and yield very consistent results. That’s not to say they require no technique, but it’s a much easier learning curve for most people.
Read Next: Best Knife Sharpeners
Step 1: Profile the Edge
Yes, this is pretty much the same as step one when you’re using regular stones. However, guided systems let you first choose the angle you want, and make it much easier to re-profile the edge to what you want it to be. If you want serious performance, you can drop the angle down to 15-17 degrees, or if you want a really tough edge, you can choose somewhere between 22 and 25 degrees. Whatever you choose, clamp the blade into the system, pick the lowest grit stone and work up a burr from heel to tip with a back-and-forth motion. You’ll find what works best with a little practice. Do that on both sides and don’t be afraid to use the marker to ensure you got it all. If you’re going to a shallower angle, understand that removing the extra material will take some time, and your edge bevel will be wider. It may take some work before you reach the apex.
Step 2: Refine the Edge

After the edge is profiled on the lowest grit, move to the next one and either repeat the burr on both sides, or switch to alternating passes until you have removed the scratch pattern from the last stone/set of stones. Either way works well, and it’s just preference. Only the final grit will require alternating passes if you choose the burr method. Repeat this process until you have worked through all of the stones, and by the end, you will most likely have a nice mirror-like finish on there. If your system includes a strop/strops, use them now and really polish and refine the edge. If your system does not include strops, you can unclamp the knife and use a separate strop with the same technique described in the Stone Method. Your edge should still be ready for action if you don’t have a strop.
Read Next: Best Pocket Knives
FAQs
No! For me personally, I have never wished that my knives were not as sharp as I had them. Now, a knife can have too thin an edge geometry for a given task, but its not too sharp. A blade that sees hard use is better suited with a slightly steeper edge geometry, so its less prone to damage.
That really depends on what it’s being used for, but for a general use knife, I have found 18 to 20 degrees per side is the sweet spot for durability and performance.
Usually. I have, however, come across some real junk steel that just won’t take a good edge. If you’re strapped, buy a cheap knife from a reputable brand, and stay away from no-name gas station knives. A $20 Kershaw has way better steel quality and heat treatment than the $10 no-name.
Yes. I have seen a lot in my years with a sharpening business, and I have seen knives ruined. Usually it’s by someone using a bench grinder or belt grinder and removing too much material or getting it too hot and ruining the heat treatment. That being said, most improperly sharpened knives can be saved with some work.
Final Thoughts on How to Sharpen a Pocket Knife
We use our pocket knives for all kinds of creative tasks, and many of those jobs will dull a blade quickly. But this is no excuse for carrying around a dull knife. Once you’ve learned how to sharpen a pocket knife properly, do so often. Sharpening your knife regularly will make the job quicker and easier, and it could even prolong the life of your blade.