
We may earn revenue from the products available on this page and participate in affiliate programs. Learn More ›
Learning how to tie a fishing knot that allows your lure or bait to work properly—and won’t fail under pressure — is a critical skill for any angler. In fact, it may be the single most important and underrated part of tackle preparation. We spend hours poring over catalogs to find rods, reels, and the best fishing line. You can have all of those things dialed in perfectly, but if your knot fails, all of that research won’t make a bit of difference.
Of course that starts not only with the right type of line — braid, fluorocarbon, monofilament, or a combination thereof — but also tailoring the knot to the way you will be fishing. Are you looking for pure strength? Or, perhaps a knot that maintains strength while allowing your lure more freedom of movement? Some knots have to pass through guides or pair two different kinds of line. A series of “granny knots” won’t cut it, and even a good knot won’t excel if utilized in the wrong circumstances. Here are the best fishing knots you need to know how to tie and when to use them.
Best for Beginners: How to Tie an Improved Clinch Knot
Pros
- Easy to learn
- Works in wide range of circumstances
Cons
- Not close to 100% strength
- May suffer with braid, where slippage is a problem
Description
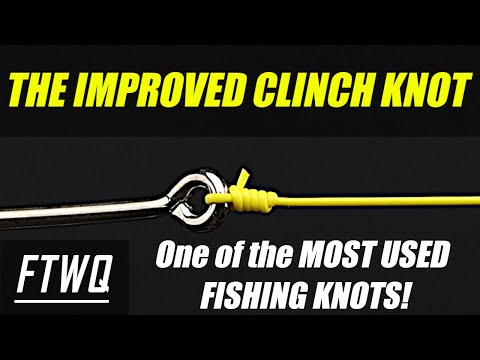
Everyone needs to know how to tie a fishing knot that is effective in a wide variety of circumstances, and can be tied in the dark, in the wind, or under other duress. The improved clinch knot is the first one that many anglers learn, and for good reason—while it might not be the best in every circumstance, it’s relatively easy to get it close to max potential in every circumstance. Kids can tie it—as can adults—with confidence that it will do yeoman’s work all over.
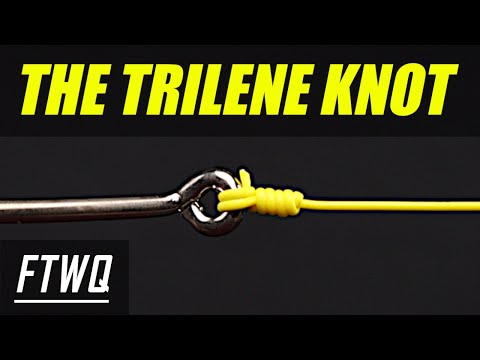
The Improved Clinch requires an angler to stick the line through the eye of the lure or the terminal tackle once, create a loop at the eyelet, and then wrap the tag end five or six times around the mainline going up the line. Then, take that wrapped tag end, run it through the original loop, creating a second loop. Run the line through that loop, cinch it down, wet it, and then gently slide it closed. For those anglers who like the improved clinch but want something slightly stronger, try the “Trilene knot.”
Best Knot for Monofilament: How to Tie a Palomar Knot
Pros
- Easy to tie
- Incredibly strong
Cons
- Need to tie properly to avoid slippage
Description
The Palomar knot is simple to tie and is one of the strongest fishing knots. It does require a slightly greater level of care to make sure that it seats properly and thereby provides all of the promised benefits, but that’s a small price to pay for the extra strength and peace of mind.
For a knot with an incredible array of applications, the Palomar knot is remarkably simple. Double your line through the eyelet of your lure or terminal tackle item, leaving 12 to 18 inches of line to work with, then take the loop you’ve formed and create an overhand knot with the doubled line on the opposite side of the eyelet. Pass the lure, hook or swivel back through the initial loop, then cinch everything down gently and evenly. Read our full guide on how to tie a Palomar knot, here.
Best Knot for Fluorocarbon: San Diego Jam Knot
Pros
- Easy to tie
- Works with various kinds of line
- Quick and secure
Cons
- No loop to allow for full range of motion
Description
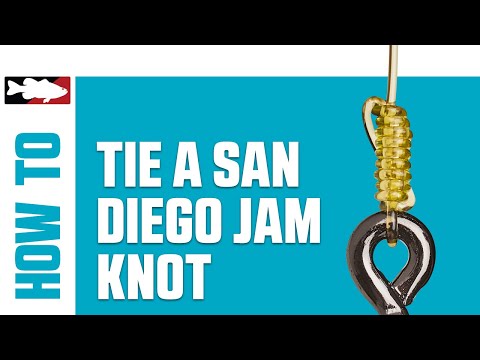
If you’re looking to learn how to tie a fishing knot that can hold up to the rigors endured by long-range tuna fishermen out of Southern California, look no further. The San Diego jam excels with all kinds of fishing line, and it’s particularly good with fluorocarbon, which is brittle and can break if tied in a compromising fashion.
Pass the line through the eyelet and create a loop. Then make multiple wraps around the double line, with the wraps headed down toward the eyelet. After four to six wraps, depending on the diameter of the line, pass the line through the initial loop located closest to the eyelet, then take the tag end and pass it up (along the main line) through the loop created furthest away from the eye. Moisten, cinch it down, and trim. It is critical with fluorocarbon that the wraps around the dual line do not overlap one another.
Best Knot for Braid: Berkley Braid Knot

Pros
- Extremely strong
- Minimizes slippage
- Doubled line adds certainty
Cons
- Can be difficult to learn or tie in harsh conditions
Description
Braided fishing lines are extremely strong and have minimal stretch, so prudent anglers have adopted them for a wide variety of applications, but they’ve also realized that one of the characteristics that makes it so good—the slippery exterior—can be a nightmare with typical knots. They slip at the wrong time, letting the fish get away. That’s why you need a bear-trap of a knot to keep them buttoned with certainty.
READ NEXT: How to Pick the Right Kind of Fishing Line
Run a double loop of braid through the hook eye or lure. Starting from the top of the mainline and working toward the eyelet, loop the tag end around the main line eight times, leaving a loop at the bottom. Next take that double loop and run it through the remaining loop at the bottom. After tightening the knot, trim both the initial tag plus the two ends of the double loop, leaving 1/8 to ¼ inch on each.
Best Knot for Connecting Braid to Fluorocarbon: FG Knot

Pros
- Retains strength
- Slim structure flows through guides easily
- Works well with lines of different diameters
Cons
- Difficult to learn to tie
- Tough to tie in a rocking boat in windy conditions
- May require specialized finishing steps
Description
Combining a braid main line with a fluorocarbon leader is increasingly popular in a wide variety of applications, from heavy saltwater use down to deep water smallmouth finesse fishing. The fluorocarbon cushions the braid’s non-stretch material and provides a nearly invisible section to help tempt reluctant biters, but the braid not only ensures rock solid hooksets and eliminates line twist problems, but lasts a long time, saving anglers’ precious dollars. All of those benefits go away if the lines separate when put under stress. The FG knot is an ideal solution.
The FG knot operates like an old school “finger trap,” meaning that the tighter you pull to separate it, the more it snugs back on itself. Hold the tag end of the braid in your teeth, keeping tension on it. Place the end of the fluorocarbon on top of the braid, then wrap it over, then under, and so on, until you’ve made approximately 20 wraps. Tie a half hitch with the braid over the two lines to hold the knot in place, then snip the tag end of the fluorocarbon. Finishing steps vary, but the easiest is to tie four or so alternatives (i.e., one over, one under) half hitches over the end of the knot, then pulling on both ends to cinch it down. Cut the tag end of the braid as close as possible. Some anglers burn it with a lighter not only to get it close, but also to build a “bead” at the end.
For Connecting Braid to Fluoro: How to Tie a Double Uni Knot

Pros
- Maintains great line strength
- Based on the uni knot, which most anglers already know
- Easy to tie
Cons
- May not slip through guides as easily as other line-to-leader knots
Description
If the FG knot has you befuddled, or you just don’t think it’s worth the extra effort, many top anglers and guides still think that the double uni is just as good for connecting two lines. It doesn’t necessarily go through guides as cleanly, but overall, it’s a fine choice, and much easier to tie.
Run your braid and fluorocarbon in opposite directions, with the tag ends overlapping, giving you enough line to make multiple wraps and still be manageable. Double back the first line over the overlapping section, wrap it three or four times around both lines. Then place it through the loop that action formed and tighten that end. Take the second line, double it back over the overlapping section, and wrap it three or four times around both lines. Then place it through the new loop and tighten that end, the mirror image of the other side. You now have two separate knots, but by pulling the main lines on either side away from the knots they’ll slide together to form a single unit. Clip the tags.
Best Knot for Flipping: How to Tie a Snell Knot

Pros
- Retains strength
- Maximizes hook up percentages
Cons
- Not as quick or as easy to tie as some other popular knots.
Description
When flipping a big tungsten weight into heavy cover on a short length of line, a vicious hookset sometimes blows the fish’s mouth open, expelling the lure. With a standard knot, the sinker, hook and soft plastic stay in a streamlined package, but with the snell knot rigged on a straight shank hook, the hook will kick up, catching the roof of the mouth, right in line for a perfect landing.
After threading the line through the hook eyelet on a straight shank hook, run the line down the shank of the hook and past the end. Next, bend the line back upward, creating a loop that mirrors the bend of the hook. Take the tag end and, starting about halfway up the shank, make six or seven wraps around the line and the hook shank, working toward the eyelet. This will create a loop down near the hook bend—pass the tag end through that loop and pull tight on the line above the hook eye, snugging the loops up toward that eye. Trim the tag end and you have a very clean, very effective snell.
Best Knot for Creating a Loop: Rapala Knot

Pros
- Maximizes side-to-side action
- Easy to learn
Cons
- Not ideal for all lure categories
Description
A do-everything knot like the Palomar or improved clinch will allow most artificial lures to work efficiently, but you’ll want to tie a loop knot for fishing certain artificial lures to get full range of motion. This knot is best not only for Rapalas, as the name would suggest, but also for a wide range of topwater lures.
After tying an overhand knot within a few inches of the end of your line, pass the remaining tag line through the eyelet and then back through the recently-created overhand knot. Working away from the lure, take the tag end and make three or four loops around the main line. Bring the line back toward the lure, creating a loop. Pass the tag end through the loop of the overhand knot, then through the loop created by the wraps around the main line. Finally, snug it all down by pulling on the tag end and the standing line.
Best Knot for Attaching Line to Spool: Arbor Knot

Pros
- Simple to tie
- Applies to any kind of reel
Cons
- Limited applications beyond reels
Description
If line is not securely attached to the spool of your reel, it’s possible for a hard-charging fish to leave with your lure and all of your line. Even if they never make it that deep into your line capacity, the slippage that results will mess with your drag, causing you to lose fish at the most inopportune times.
READ NEXT: How to Spool a Spinning Reel
Wrap the tag end of your fishing line around the arbor of the spool and tie the tag end in a simple overhand knot around the main line. Tie another overhand knot exclusively in the tag end a bit above (i.e., away from the spool). Pull on the main line gently so that the first overhand knot sits flush with the spool and the second overhand knot prevents the first from coming free. Cut the tag end as close as possible.
Tips for Tying Knots
The best time to learn how to tie fishing knots is not when you’re on the water, facing a 30 mile per hour wind, and rampaging fish. Fortunately, all of these can be practiced and perfected in the comfort of your own home, even in front of the television. Use step-by-step charts or YouTube tutorials if you must, but never settle for a subpar knot. If it looks wrong, it probably won’t live up to its maximum potential. Don’t be intimidated, though, even by knots that seem to require three (or more) hands. Once you get the muscle memory down, most of them are surprisingly simple to get right.
Tools for Tying Knots
All of these knots can be tied well with just your bare hands (and maybe the assistance of your mouth in some cases), but there are tools to make them even better. Various apparatuses exist to aid in knot tying, some for specific knots like the FG, and others that are more universal. There are knot tensioning tools, too, which may help you tighten down your creations smoothly and evenly. Finally, in some cases a drop or two of adhesive may prevent your best work from unraveling, and while there are knot-specific formulae, simple super glue is a cheap and readily available alternative.