The quest for perfectly cooked venison never ends. For every degree past medium-rare, flavor potential drops exponentially. But we still want that hearty crust on the exterior to give us that, as you steak lovers might call it, “desired mouthfeel.” Logically, this would mean cooking wild game at very high temperatures for a short amount of time. But is this really the best way to cook venison?
I decided to test if the highest amount of heat possible truly is the best way to cook hindquarter, backstrap, or inner loin cuts.
Inspiration for this test comes from Los Angeles steak chef Evan Funke, who said he relies on high, dry heat to cook a steak. Funke will take an hour to cook a 35-ounce steak if given the opportunity. He lets the meat rest between applications of very high heat, working within intervals of grilling and resting. I always wondered how this might work for venison cuts best served medium rare.
Understanding Carryover

For those who aren’t familiar with carryover, you’re not alone. This is the most overlooked variable in cooking a good steak (whether beef or game). Carryover occurs when meat is removed from a hot heat source. Because the exterior of meat is still hot, it will continue to cook the inside while it rests. Here’s the concept: For a steak grilled over high heat, pull it at an internal temp of 115 degrees Fahrenheit, rest it for 10 minutes (which is key to letting juices redistribute throughout protein), and the internal temp can rise as much as 20 degrees. This creates a perfect medium-rare chunk of meat. Yes, there are other factors at play, but the bottom line is if you remove your meat when it hits medium-rare on the grill, it will shoot up to medium, potentially medium-well, if allowed to rest.
But other methods exist for cooking a steak, too. For years now I have been a proponent of the reverse-sear. The method: slowly roasting or smoking meat at no higher than 200 F, then once it hits 108 to 110 F internal temp, pulling it and searing each side over high heat (700 to 800 F) for 1 minute each side, allowing to rest for 10 minutes before carving. The result is more juicy, medium-rare real estate inside and that crispy crust on the outside. With less time over high heat, that gray ring of well-done meat is very thin around the edges.
But is super high heat in a very short amount of time (thus potentially lowering risk of gray ring) even better than the reverse sear concept? I tested three different applications of high heat at short intervals and graded each one for mouth feel and flavor. Here’s what I found.
Frying

If done right, fried food is always crispy, right? So what would happen if we raised the oil temperature and limited the time our venison spent in the oil?
The Test
I heated peanut oil to 450 F for this test. High-heat oils like peanut oil or sunflower oil start to burn anywhere past 450 degrees, so we pushed this oil to the max.
For this test, I worked with whole tenderloins and backstrap medallions. I seasoned the cuts and left them out of the fridge for a few hours. All the meat started at 70 F, which is room temperature.
I fried one tenderloin and set of medallions for exactly 1 minute, then did the other set of tenderloins and medallions for 1 minute and 30 seconds. I let all the meat rest for 5 minutes before carving.
Results: After 1 minute of frying, it would appear the venison came out rare, while another 30 seconds of frying brought the meat closer to medium-rare. There was indeed a thick crust and a juicy center, which reminded me of those Fruit Gushers fruit snacks from grade school. The exterior ring was medium on the rare cook, and medium-well on the medium-rare rare cook.
Conclusion: This is a great option for smaller cuts best served medium rare, though not necessarily as health-conscious as other cooking options. Larger cuts would require a longer fry to hit medium-rare in the center, which could overcook the exterior.
Mouthfeel Grade: B-. There was a decent contrast between exterior and interior, which, as described above, felt more like fruit snacks than meat.
Flavor Grade: B+. It’s venison fried in peanut oil—what’s not to like?
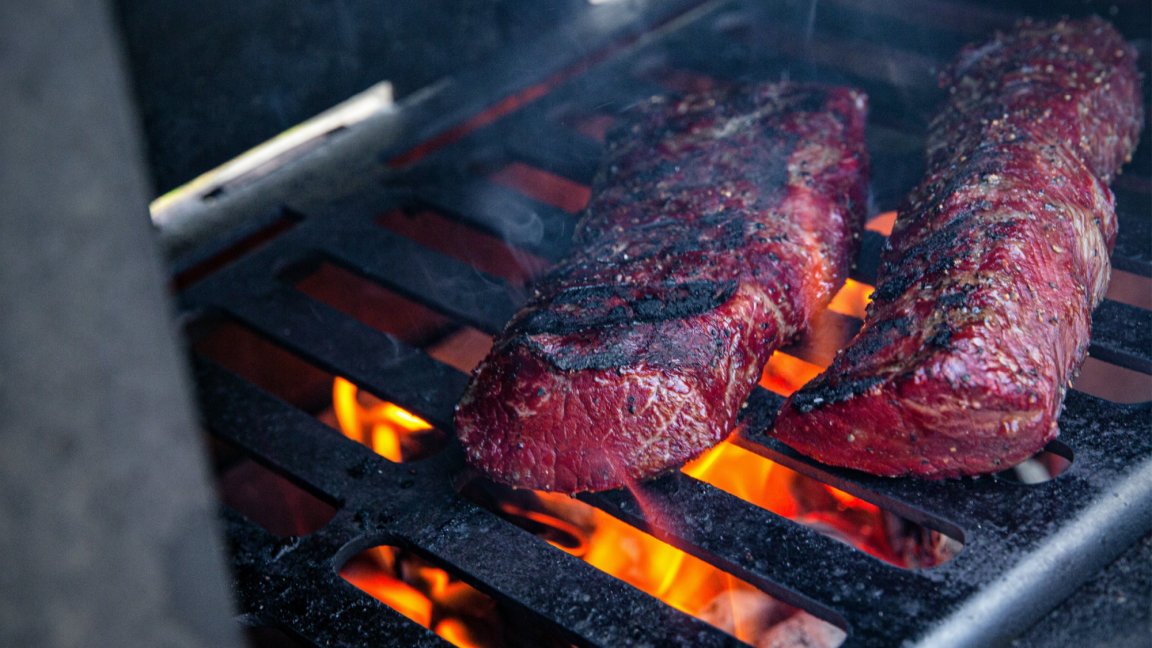
Cooking Directly on Coals and Embers

Sometimes referred to as the “cowboy steak” method, this is a great option for the backcountry where all you have is a makeshift fire pit.
The Test
I let charcoal briquettes and wood chunks burn down to hot coals and embers. Same as the fry method, I let my venison sit out for a few hours to come to room temp. In this instance, I was working with 18 ounces from the top portion of the back strap, which is slightly thinner and contains two separate muscles, versus the bottom half of a backstrap which is thicker and one whole muscle.
I coated the meat in Fire & Smoke Society Black and Tan rub and lacquered on some brown sugar to help build a caramelized crust. I placed the backstrap directly on the coals and embers, which I would guess were between 1,200 and 1,600 F (my laser thermometer read “high” which meant it was well over 900 F). I seared each side for 2 minutes then pulled the meat.
During the sear, the internal temp rose from 71 F to 97 F. After 5 minutes of resting, the internal temp rose to 107 F. I placed the meat back in coals for 1 minute on each side and pulled it again. The internal temp reached 122 F. After an 8-minute rest, I started carving the backstrap at an internal temp of 136 F.
Results: This method created a very good crust and a lot of flavor from the wood and charcoal embers. The outer meat layers were medium-well or even well-done depending on the portion of backstrap, but the middle was still juicy and tasty.
Conclusion: Some cooks prefer lump charcoal to minimize chances of ash coating the meat, but I didn’t have an issue with this. The carryover during the initial rest helped move heat through the meat—so much so that I could have let it rest for 5 more minutes and seared it again for 30 seconds per side instead of a minute. This would have minimized the overdone meat. Regardless, I do feel there was an interesting set of layers, from the crust to the outer ring to the middle.
Mouthfeel Grade: A-. Not chewy or tough at any point but rather a nice transition between layers, which created one of my favorite steak-biting experiences.
Flavor Grade: A+. One of the best-tasting cuts of venison I’ve eaten in a while, including my go-to reverse-sear backstraps.
Read Next: The Best Camping Cookware for Open Fires in 2023
Infared Grill/Oven at 1,500-Plus Degrees F

The infrared method is a new trend for many steakhouses. Infrared grills heat food from overhead rather than from underneath, which means ultra-high-heat cooking without the fear of flames engulfing your steak. The cooking temp rises and falls depending on how close to the burner you raise the meat.
I tested the latest propane model from Schwank Grills. (You can find their technology in the kitchens at Morton’s, Del Frisco’s, and other household names the steak-obsessed might recognize.) It was easy to set up and operate, and it boasted very high heat—especially as I raised the venison closer to the top infrared burner.
The Test
This time, I used an 18-ounce backstrap cut from the bottom, which was thicker than the cut I cooked on coals. I seasoned the meat (without sugar this time) and brought it to room temp. Similar to the prior test, I seared both sides for 2 minutes, let it rest for 5 and oiled it, then raised it for another 1 and 1/2 minutes on each side. Based on the level I put the backstrap in the oven, I cooked it at 1,100 F for the first 2-minute session, then when it was slightly lower in the oven, it cooked at around 750 F.
The internal temp rose from 71 F to 93 F during the initial sear. After 5 minutes of resting, the internal temp rose to 105 F. After the extra 1 and 1/2 minutes at 750 F for each side, the internal temp read 119 F. The longer second sear session (compared to the 1-minute direct-coals method) was intended to get the internal temp closer to 120 F and let carryover finish off the backstrap. After a 5-minute rest, I started carving as the internal temp read 136 F.
The result: Good char on the outside, although the outer layers were more well-done than I would have preferred. Carryover did shoot up the internal temp quicker than expected (I’m used to 2 degrees per minute of rest after a hot sear.)
Conclusion: These types of grills are consistent, quick, and easy to operate, but also expensive (this one cost $1,250). While heavy, they are still very portable and could easily sit on a tailgate. Is the cost of this technology worth it? I’d argue the benefit is more the simplicity and consistency versus the flavor. Cooking venison directly on coals and wood embers made for great flavor, but it also took over an hour to burn the material down to where I could do that. The infrared grill saves and is way more convenient.
Mouthfeel Grade: B. More tough on outer layers than I would have preferred and a noticeable contrast between those layers and the medium-rare center.
Flavor Grade: B+. Still flavorful and juicy in the middle, with a bit of grill-house char on the outside. It was good, but not great.
Final Thoughts on Grilling Venison

I’ve grilled a lot of steaks, both game and beef. Once you start cooking at 700 to 800 degrees F, the rise in temperature over time becomes universal no matter what temperature you’re working with. Searing a backstrap for 1 minute at 700 F will raise the internal temp the roughly the same amount as a sear at 1,200 to 1,400 F would. The only potential difference is a super-high temp will lead to quicker carryover, but even that seems negligible.
Still, cooking on a cast-iron skillet or other seasoned grill surface at 700 F or more will most certainly burn off that seasoning. You will need to re-season that cooking surface, which will require more time and care versus something more straight-forward like a quick-and-hot sear on coals and embers or an infrared grill.
Very high heat in a very short amount of time will lead to thicker, more cooked outer layers in the meat (especially compared to the reverse-sear method), but that isn’t necessarily a bad thing. It’s a different mouthfeel that I sometimes enjoy. After trying it, you may agree.
Read Next: What Temperature Should You Cook Venison?
My biggest takeaway from the high-heat venison test is this: The next time you find yourself with a punched tag, miles from propane, and your only option is a firepit, carve off those backstraps. Start a fire and season the meat while letting the coals burn down for an hour. Sear each side on glowing embers and coals for 2 minutes, let it rest for 5, then sear it again for 1 minute on each side. Let it rest for 10 minutes, carve, and enjoy the best venison you have ever tasted.
Thoughts or questions? Reach out to me on Instagram (@WildGameJack) with any questions or comments.