
Some trophies just don’t deserve a trip to the taxidermist for a shoulder mount, yet they don’t deserve to be tacked to the tool shed, either.
Three Ways to Clean a Deer Skull
European skull mounts are the answer, and it’s a cinch to produce a classy mount in a single day. Which route to a clean skull should you take?
1. Skull Stew
Boiling a skull doesn’t actually involve boiling, but instead uses gentle simmering to loosen tissue. Hard boiling will cause the bones of a skull to fall apart.
For best results—and to preserve your marriage—conduct the process outside or in the garage. Use a propane stove and an old canning pot large enough to submerge the skull up to the base of its antlers. Fill with water, and add a dash of dish detergent as a degreasing agent.
Remove as much excess meat and brain as possible, and protect any portion of the antler that might be submerged with clear plastic wrap secured with packaging tape or tin foil. This will preserve the antler’s color and natural look.
Now simmer. The chore may take several hours, even all day. After each hour, remove the skull and scrape meat away. If the water gets too goopy, dump it and refresh the bath. If you want the nose cartilage to stay intact, be careful when removing the fleshy portion of the nasal canal.
A moist skull cleans easier than one that has dried out, so if you can’t simmer soon after you kill your animal, freeze the skull until you have time to process it.
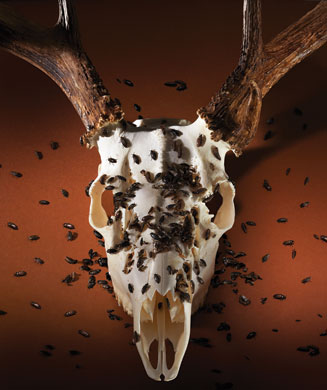
2. Beetle Juice
A hands-free method for removing meat from your skull is to employ dermestid beetles. A colony of these ravenous insects can make short work of a skull that’s had most of the large chunks of meat removed. In days, the beetles will eat away dried leftovers, saving you a stinky cooking job.
If you don’t want to grow your own insects—free-range bugs can eat everything in sight—send your skull to any of the many beetle keepers you can find online at beetlecleaning.com or at cleanbone.com. A clean skull is only a UPS truck ride away, for $50 to $100, plus shipping.
3. Power Wash
Put that power washer in your garage into play for skull cleaning. Restrained power washing removes meat with pressure and, when combined with simmering, can hasten the skull-cleaning task.
Don old raingear, rubber boots, latex gloves, and goggles to protect yourself from splashing gore. Wire the skull to a board or a fence, and then start with low pressure, since deer skulls are fragile. Increase the pressure as needed. For best results, use a rotating nozzle. After you’ve removed all the meat, give the skull a degreasing bath in dish detergent.
Post-Clean Bleaching
After the meat is removed, enhance your mount by boosting the skull’s whiteness. An easy path to a white skull is to purchase kits available through taxidermy outlets like Van Dyke’s Taxidermy. You can also use the hair salon products referred to as “basic white.” Mix this with a 40 percent solution of hydrogen peroxide and paint the paste on the warm skull, fresh from the pot. Wrapping the skull in foil or clear plastic wrap allows the concoction to soak in, enhancing the whiteness. After a day or so, brush away the flaky residue.
The Lazy Man’s European Mount
If bugs and boiling sounds like too much work, don’t toss the rack just yet. Mountain Mike’s mounting kits ($43; masterofskulls.com) come complete with an authentic-looking European skull reproduction. You simply saw the antlers off your real skull and use the hardware to mount them on the plastic-reproduction skull provided. Available for deer (in white and camo) and elk. ––Mark Kayser
How to Camo-Dip a Deer Skull
This DIY taxidermy trick isn’t for everyone, but it is an eye-popping option that will spice up your walls and provide a change from shoulder mounts and bleached skulls. You can choose whatever colors you like best, too.
1. Clean It
The most difficult part is cleaning the skull. Boiling it is probably the quickest method, even if it is a bit smelly. Dermestid beetles do a fantastic job, and you can usually get it done for a nominal fee. Or, if you have a few months, you can bury the skull and let nature do the work. Once the skull is clean, it’s time to have some fun.
2. Prep and Prime It
Use painter’s tape to cover about 5 inches of the antlers, starting at the bases. Apply an even base coat of spray paint to the entire skull. I prefer a flat-gray primer for the base coat, but you can use whatever color you like. Take your time, and apply several thin coats to ensure even coverage without drips and runs.
3. Spray It
Get a clean bucket or a plastic tote large enough to hold the skull. Fill it with clean room-temperature water. Next, create your color palette. Holding the spray can 3 to 4 inches away, cover the surface with the first color. Then repeat with another color. You can spray as many alternating color rings as you like. Next, use a paint-stirring stick to gently move the colors into a swirl pattern.
4. Dip It
Slowly submerge the skull. As you dip it, you’ll see the paint adhering to the bone. Once the entire skull is submerged, hold it in place as you grab your stir stick again, and swish any unused paint to the sides of the container and away from the skull. Lift the skull out of the water and admire your handiwork. If you prefer a gloss finish, allow the skull to dry completely, then top off with a clear coat. ––Tony Hansen