We may earn revenue from the products available on this page and participate in affiliate programs. Learn More ›
The new Leica Geovid Pro 10×32 is one of the best and most capable binoculars made for serious hunting. It excels in extreme environments where weight is a concern, optical quality is paramount, and where long shots on game can be expected. No other binocular on the market matches it in terms of size versus performance.
I’ve been using one during the last couple months for various shooting and hunting tasks, including a two-week bighorn sheep hunt in Alberta. Mountain hunts are one of the best proving grounds for any type of gear, and the Leica Geovid Pro was right at home.
Leica Geovid Pro 10×32 Specs
Leica Geovid Pro 10×32 Specs
- Magnification: 10x
- Objective lens diameter: 32 mm
- Dimensions (W x H x D): 5.1 x 6.0 x 2.8 inch
- Weight (measured): 29 oz.
- Field of view at 1000 yd. / 1000 m: 345 ft. / 115 m
- Rangefinder range: 2500 yd.
- Battery: One CR2 3V
- Battery Life: Approx. 2,000 measurements @ 68 degrees
- Water Resistance: 16 ft. / 5 m
- Eye-relief: 16 mm
- Close distance focus: Approximately 16 ft. / 5 m
- Light transmission: 91 percent
- Diopter compensation: ±4 dpt.
- Exit pupil: 3.2 mm
- Twilight factor: 16
Improved Ballistic Solver
Leica is no stranger to building good binoculars, and their laser rangefinders are consistently among the best. But one area where Leica has lagged is with their on-board ballistic solver. The last few years have witnessed significant improvements with this technology as part of the general growth of “electro optics.” Sig Sauer and Vortex have been leaders in the market with their ballistic-solving rangefinding binoculars. Other makers have been working to catch up. Leica’s proprietary ballistic solver in the Geovid 3200.com, for instance, is complicated to configure, doesn’t mesh well with commonly used ballistic calculators, and didn’t offer solutions beyond 1,000 yards—limiting its appeal among serious long-range shooters who otherwise loved that binocular’s performance.
With the new Geovid Pro, Leica cracked the code by licensing an Applied Ballistics (AB) solver, which has become an industry standard. The binocular comes pre-loaded with AB’s Ultralite software, a Romper-room version of the more robust AB Elite. The Ultralite has support for G1 and G7 ballistic coefficients, but only offers solutions to 875 yards, lacks important inputs like rifle twist rate and scope height over bore, and doesn’t take into account spindrift and other key factors. For a fee (currently $150) you can (and should) upgrade to AB Elite through the Leica Ballistics app. Why Leica didn’t just bump up the price of the binocular and include it is beyond me, and I suspect many purchasers will be mildly annoyed when confronted with this extra charge in order to utilize the Geovid Pro’s full potential.
Leica Ballistic App

Leica created the Leica Ballistics app to run the Geovid Pro and other units in their line. It effectively replaces the Leica Hunting app. The Leica Ballistics app is a major upgrade over the previous version, with a more intuitive and functional interface that makes running the binocular fairly easy. I say fairly, because there is still a significant learning curve for someone jumping into the AB ecosystem cold. Thankfully, there are many tutorials and other resources available for catching up. (A good place to start are the video tutorials under the app’s settings menu.) For anyone who is familiar with AB’s software or has used similar ballistic calculators, the transition to the Leica Ballistics app should be stress free.
The app has three main elements on the home page. One to pair with a rangefinder (which you do by toggling on the binocular’s Bluetooth in the menu that comes up after holding down the “mode” button), one for gun profiles, and one for Leica Pro track. This last is an interesting feature that lets you range an object and create a waypoint in a map of its position. This can help with navigating to a location you want to get to and can be a big benefit when trying to recover game.
Making Gun Profiles
You can make profiles for either guns or crossbows. When building a profile for a firearm you have the option of using data from AB’s extensive bullet library, making one in “easy” mode, or building via “Custom Data Entry.” The AB library and Custom mode basically are the same thing. They have different starting points that lead to the same destination.
These last two profile types incorporate all the AB variables, including muzzle velocity, BC values, twist rate, scope height, and zero offset.
Once the profile is built, uploading it to the binocular is simple. As long as your bino is powered on and has Bluetooth enabled, all you need to do is set a gun profile to “active” in the app and, voilá, it is running on the Geovid. The process is so automatic and seamless that I found it unnerving at first. Usually, you need to confirm the upload or go through some other step to make it active. But once I got used to how quickly Leica’s app uploaded the profile, I really appreciated it.
That said, I still make a point to double-check my dope by ranging something and comparing the result with another data source, like my Kestrel or a printed dope card. One thing the Leica doesn’t do is indicate in the binocular which profile is active.
Fine Tuning Gun Profiles in the Leica Geovid Pro
The speed with which the app uploads profiles to the binocular is really helpful when tuning your rifle’s dope. I’ve used the binocular in conjunction with two rifles so far, my Proof Conviction in 6.5 Creedmoor that I shoot in NRL Hunter competitions and my Allterra Arms 6.5 PRC, which I’ve been hunting with this fall. Making adjustments to the BC values of the bullets or muzzle velocity, which are the two main variables you’ll tweak during this process, is super quick and allows you to get back to shooting right away.
Within the app you can create and view range cards for your profiles and export them to email. That data can be copied and pasted into a spreadsheet so you can print out hard data or otherwise customize it.
The binocular can be configured to display elevation corrections in MOA, Mils, ¼ MOA clicks, .1 or .05 Mil clicks, centimeters or inches.
Leica Geovid Pro 10×32 in the Field

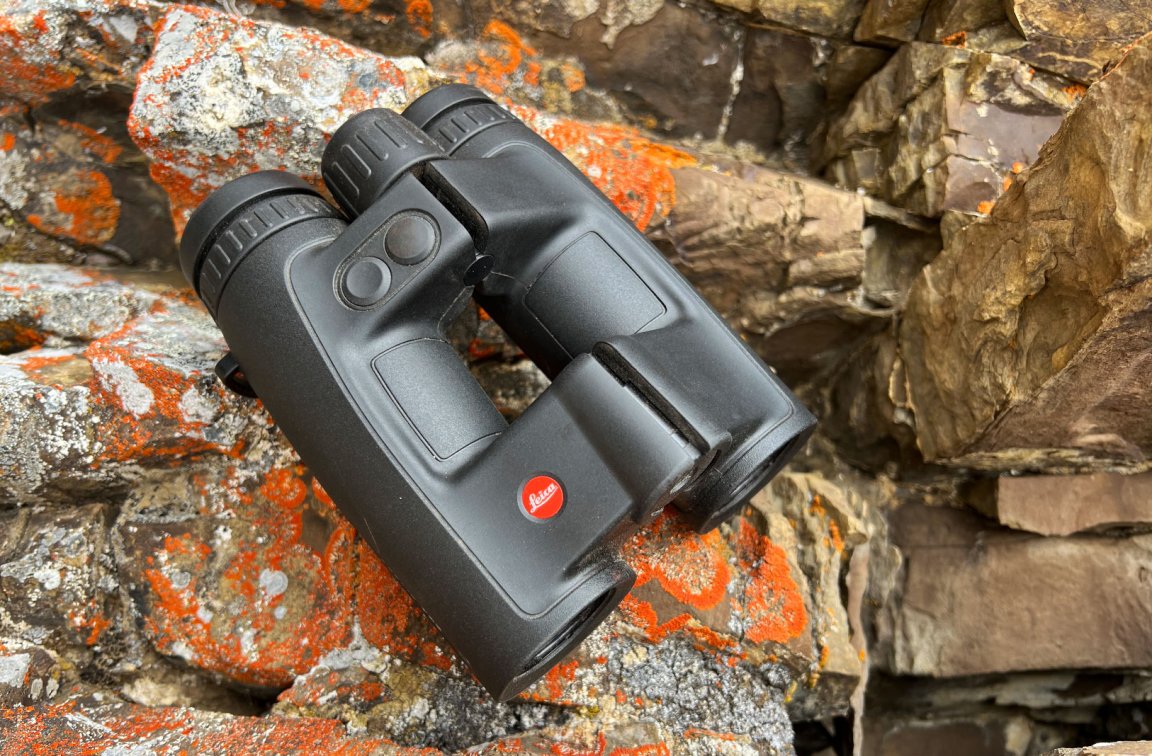
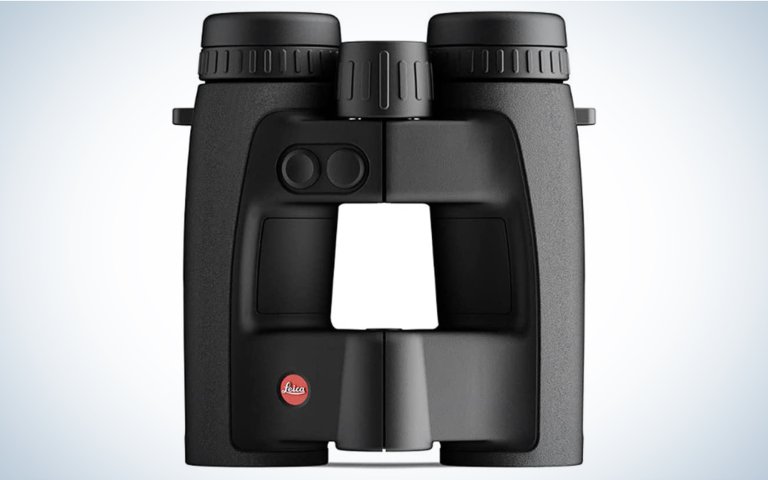
As I mentioned, I think this binocular is the finest hunting binocular out there in terms of performance and size. The 10×32 open-bridge design balances beautifully in the hand and is easy to keep stable. The slight curve in the barrels of the binocular not only looks good but fits naturally with the angle of your hand when glassing. Ergonomic touches like that help reduce fatigue during long glassing sessions and on optic-intensive hunts.
The binocular isn’t heavy (29 oz.) and was easy to carry in the mountains even on the toughest 3-hour climbs. It weighs 6.5 ounces less than my Geovid 3200.com 10x42s. Being able to reduce my payload by that amount and have a binocular with a better ballistic solver is a no-brainer.
Because the lasing element on the Geovid Pro is located in the middle of the front hinge, and doesn’t pass through one of the barrels, the optical quality of the binocular is everything you’d expect from a Leica product. Whenever the laser travels through one of the barrels it necessitates the incorporation of additional glass elements, which invariably degrades the quality of the image.
One of the best current examples of this phenomena is with the Sig Kilo binocular. I have a Sig Kilo10K for instance, which I love for how fast and precise the laser is (and is my current choice for use in shooting competitions), but which has a very noticeable blue tinge as you look through it. The Leica Geovid Pro, by contrast, has a beautiful and clear image, which is what you want when looking for hard-to-see animals and glassing in low-light conditions.
Distortion and color fringing in the binocular is minimal and the edge-to-edge clarity is excellent. I perceive no detectable reduction in image sharpness until the outer 25 percent of the field of view, and even then, the degradation isn’t bad.
Rangefinding Capabilities and Sensors
Leica says the Geovid Pro can range out to 2,500 yards. Under various field conditions, my unit is good to about 2,200 yards on larger features like trees and cliffs. On smaller targets the effective ranging tops out at about a mile or so (1,760 yards), which is still very good for a mid-sized binocular.
The aiming reticle for the binocular is a fairly large LED circle that has small gaps at 12-, 3-, 6-, and 9-o’clock. You’ll want to spend some time to determine the exact position of the aiming point on your binocular. (This goes for any rangefinding bino.) Often it isn’t in the center of the reticle.
With my unit, the actual aiming point is just below the center of the LED circle, right above the gap at 6 o’clock. You can determine this by ranging something with hard vertical and horizontal edges where you have something behind it that will give you range as well. Billboards, plywood backers at a shooting range, chimneys, the roofline and sides and houses are good examples of objects you can use to figure out where the laser on your bino really points.
The Geovid Pro has several onboard sensors, including a compass, inclinometer, and temperature and barometric pressure gauges. The binocular uses all these inputs to determine the ballistic solution it displays.
One dramatic example of the Leica’s intelligent computational ability was when I was ranging a small group of sheep high above me on a rocky escarpment. The linear range was just over 900 yards, but the correction the binocular gave was for a 700-yard shot, which was accurate because of the steep angle.
The binocular also does a great job with its environmental sensors. Comparing the results it gives with my Kestrel 5700 Elite, a unit I’ve used in ELR competitions with targets beyond 2000 yards, I found they track hand-in-hand. Leica nailed it with the Geovid Pro’s onboard sensing suite.
Leica Geovid Pro Ergonomics
I’ve already touched on the binocular’s good frame geometry, weight, and balance. But the quality of the controls also deserves mention. The central focus wheel is smooth and responsive, with no hesitation or mush when manipulating it. The hinge is sufficiently stiff so that the binocular can be wielded one-handed while secured in a harness without collapsing and opens and closes with the same smooth, even effort exhibited by the focus wheel.
The eyecups can be set to seven different heights, with each level giving a solid click that you can hear as well as feel. In each position the eyecups do a good job of staying put, though for the way I glass I keep them on the lowest setting.
Beneath each eyecup is a diopter focus ring. The right side is marked with a red hash (for focusing the LED display) and the left with a white hash. To focus the binocular, you close your left eye and power up the rangefinder. You then turn the right focus ring until the LED display is sharp and well defined. In my unit I couldn’t make both the central aiming circle and the readout tack-sharp. They were close, but not quite in the same focal plane. I opted to make the reticle the sharper of the two.
You then use the central focus knob to make the view through the right barrel sharp. I usually pick something like the needles on a distant pine tree. Then switch to your left eye and turn the left diopter ring until whatever you focused on with the right side is sharp as well.
Make note of the positions of the hash marks. One issue with my Geovid Pros is that the diopter rings move fairly easily and tend to get knocked out of position with intense use. This was the case with both my binocular and a Geovid Pro being used by my shooting partner. I found myself checking every so often while hunting to realign the diopters to their correct spot.
Two-Button Navigation and Wind Inputs
Leica kept their two-button control system on the Geovid Pro. The buttons are next to each other on the right barrel of the binocular, with the convex (dome shaped) button that’s used to get ranges positioned closer to the centerline of the hinge. Just to the right of it is the concave (hollow) button that’s used to enter the mode function and to assist with inputting wind values.
The design takes some getting used to and can feel a bit clunky at times. Ideally the binocular would have a four-button layout, as seen on the Vortex Fury 5000AB, which is very ergonomic and easy to master.
With a bit of practice, however, the user can input wind speed and direction. When the binocular is first activated with the main (convex) button it takes a few seconds for it to power up. Then you depress and release the concave button and get a prompt for wind speed (“SPd” in the display). (If you hold the concave button down for a few seconds you enter the binocular’s menu.) You then push on the main button repeatedly until you get the wind value you want. It goes from zero to 40 mph. Unfortunately, you have to cycle through the whole 40 mph to get back to zero. I’m hoping for a firmware update that allows you to hold the main button down for a few seconds to return it to zero.
Once you get to the wind speed value you want you push the concave button again, which brings up “dIr” for the wind direction. With the main button you toggle through 1 to 12, representing the hours on a clock face to input the wind direction relative to you position. Currently the software only allows for whole numbers with the hour value. It ought to have half-hour increments (12, 12:30, 1, 1:30, etc.) in order to be fully functional. Again, I imagine this could be addressed in a future firmware update.
But having some wind input is better than none. When you range a target, the Geovid Pro displays the yardage to the target for a couple seconds, then the elevation correction for a couple seconds, then the wind hold for a couple seconds. It cycles through this data twice before going back to the circular ranging reticle.
Caveats and Tips on Running the Leica Geovid Pro 10×32
The binocular runs on a single CR2 3V battery that is housed under the front hinge and in the bino’s right barrel. Leica says it is good for 2,000 cycles at 68-degrees Fahrenheit. I put a fresh battery in my bino for my two-week backcountry hunt and didn’t need to replace it with the spare.
Turn Your Bluetooth Off
When connecting to the phone app the Bluetooth function needs to be toggled on. But once I have the data loaded on to the bino, I turn Bluetooth off to conserve battery power. The Leica’s display shows a flashing Bluetooth icon in the lower right corner when it is activated, which is a helpful reminder to shut it off if you don’t need it.
With Bluetooth on, however, you can actually run the bino and get ranges through the app. There’s some functionality with this that I haven’t touched on, since it’s a fairly niche application, but it is a cool feature if you have the binocular mounted in a tripod and want to get a range without touching or disrupting the binocular.
The app also allows you to input wind speed and direction, as well as tweak the environmental inputs the binocular is using. This is a useful backup feature in case your bino gives you wonky readings and you want to override its sensors.
I never had an issue with my sensors providing bad data, but I also make a point to keep my binocular zipped in my chest harness when I’m not using it. Any instrument that measures environmentals for ballistic calculations should be kept out of the direct sunlight when possible and not placed on surfaces that get hot and retain heat, likes rocks or the hood of a vehicle.
Zero Your Wind
Another thing to be careful about is the wind value in the binocular. When you add wind, your elevation hold will change due to a phenomenon called aerodynamic jump. There’s a fair bit of controversy about how much a difference aerodynamic jump makes, but Applied Ballistics software seems to overstate the amount of elevation correction. This is why many experienced shooters running AB get their correction into two steps, first getting an elevation correction with no wind value added into the calculator (or sometimes 1 mph of wind), and then inputting the wind to see what their holdoff should be.
The point is, you should make a habit of zeroing out the wind in your bino so that you don’t forget about it and later range a target with the wrong (or any) wind value.
Leica Geovid Pro 10×32 Summary
Pros
- Unmatched performance in a hunting binocular
- Excellent optical quality
- Smart integration of Applied Ballistics software
- New Leica Ballistics App a major upgrade
- Great ergonomics
Cons
- Diopter adjustment rings should be stiffer
- LED display looks dated
- Two-button input system a bit clunky
Final Thoughts
The Leica Geovid Pro 10×32 represents the best of all worlds for the segment of outdoorsmen who are both serious hunters and serious shooters. For these users, the Geovid Pros will be absolutely worth the money because they have best-in-category optical quality and ballistic solving capability. All in a mid-sized package that is easy to carry under even the toughest conditions. For Western hunters who need to move and glass and be ready to take long shots, there isn’t a better option out there.
Yes, there are a couple areas I’ve highlighted that could use improvement, but I don’t want that to take away from what Leica has accomplished here. The Geovid Pro has set a new standard in the mid-sized binocular category with a degree of functionality that I, and a lot of hunters, have been waiting for.