We may earn revenue from the products available on this page and participate in affiliate programs. Learn More ›
When mounting a riflescope, you’re dealing with the most fragile and failure-prone point on your gun—so it pays to do it right. The process isn’t complicated, but it does require an attention to detail and some basic equipment. So in part one of our seven-part series on mastering the use of precision riflescopes and shooting to your rifle’s full potential, I’m going to dive in to how to actually get one of these bad boys mounted properly.
To correctly mount a riflescope, these conditions must be satisfied: The reticle needs to be level with the rifle. The scope must be positioned at the correct height above the bore. The proper eye relief needs to be established. And the fasteners in the rings and bases need to be tightened the right way. Before we get into detail on each of these points, here’s a basic outline of the process.
A Step-by-Step Guide to Mounting a Precision Riflescope
• Clamp the barrel in the padded jaws of a bench vise. If you don’t have a bench vise, you’ll need a solid gun cradle that will hold the rifle steady.
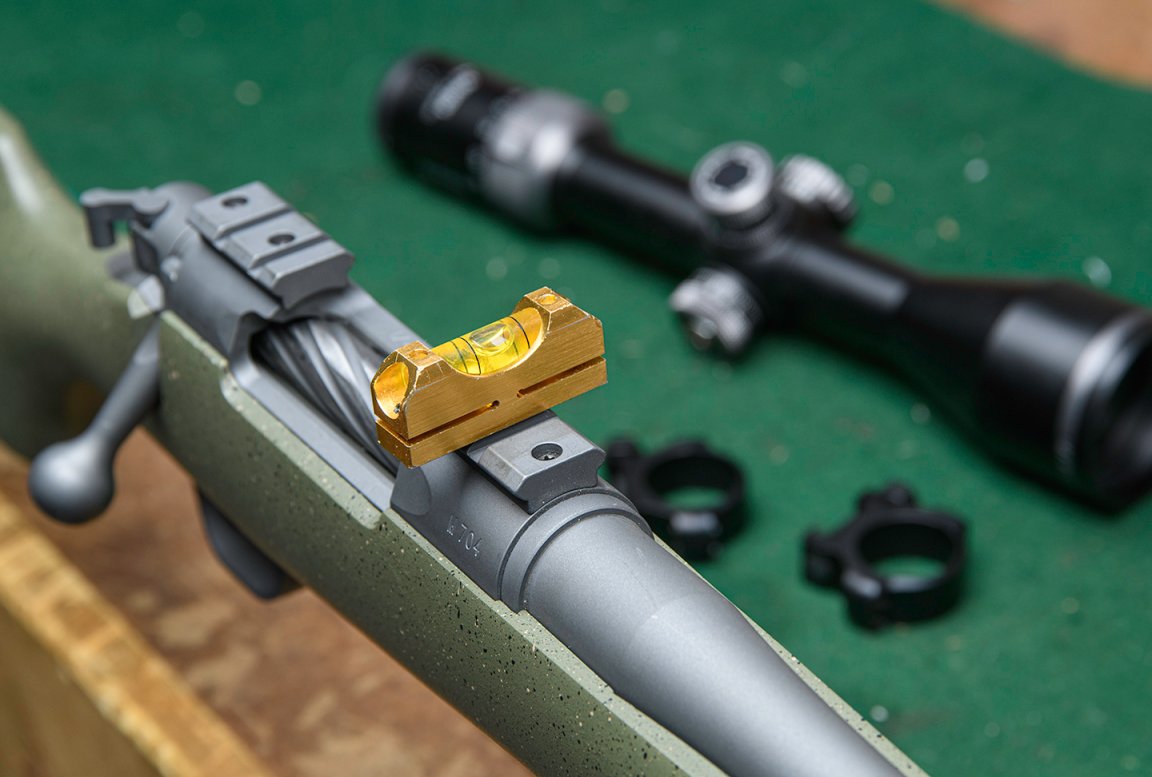
• Use a bubble level to level the rifle action. The flat on top of the Picatinny rail works. With some actions you can remove the bolt and have enough clearance on the tang (assuming it is flat) to set a bubble level as well. As a last resort you can attach the bottom half of a scope ring to the scope base and rest the level on it.
• Set the scope in the rings and lightly tighten the fasteners so that the scope will stay put but can be rotated and moved by hand. If your scope has a flat spot on the elevation turret, place the bubble level on it to level the reticle.
• An alternate method to level the reticle is to look through the scope on your leveled rifle at a plumb bob and orient the vertical crosshair with the string.
• Once the reticle is level, remove the rifle from vise and check your eye relief. Make adjustments as needed. Do this by placing the rifle back in the vise, making sure it is level, and then moving the scope.
• Tighten the fasteners to the correct torque levels with a torque wrench.
Tips for Mounting a Precision Riflescope: Get the Details Right
Scope Height
The depth of the scope rings controls how far above the bore the scope sits. The primary concern is that both ends of the scope have adequate clearance above the rifle. Having the objective end of the scope in contact with the barrel is an obvious no-no, but you want to make sure the eyepiece isn’t cramped either. Rings that are too low can limit the horizontal travel of the scope in the rings making it more difficult to get the right eye relief.
If your scope is too high, you’ll have a hard time lining up behind the rifle when shooting prone, though a stock with an adjustable cheek piece can mitigate this.
Ultimately, this is a Goldilocks situation where the scope should neither be too high, nor too low. As a rule of thumb, a gap between the objective bell and the barrel of .25 to .5 inches should be just right—but the profile of your barreled action and stock might dictate otherwise.
Eye Relief
With proper eye relief the shooter is able to look through the scope without any part of the image being blacked out. The way to test whether eye relief (and scope height) are correct is to get set up behind the rifle in the prone position, close your eyes, rest your check firmly on the stock by taking the tension out of your neck, then opening your eyes.
You should be looking right down the center of the riflescope and have a clear view of the reticle and image without needing to move your head.
Fortunately, many long-range rifles make fine tuning this easier by have adjustable lengths of pull and cheek piece height. Rifles equipped with Picatinny rails—which most precision rifles are—provide greater flexibility with the forward and aft placement of the scope to establish good eye relief.
Fastening Scope Screws
Some manufacturers provide values for the fasteners in their scope rings. Many don’t. As a rule of thumb, you can tighten the screws on scope rings to about 20 inch-pounds and be good to go.
It always makes sense to check the screws on your Pic rail or scope base as well. They tend to be beefier, so you can torque them to about 30 inch-pounds without worry.
You can use a torque wrench with preset fittings, like Fix-It Sticks or the Wheeler Fat Wrench, or one with an indicator dial like this one from Seekonk Precision Tools.
Before tightening the screws, you should consider doing one of two things. Either use a sparing amount of blue Loctite on the treads—a single small drop will do—or spray the screws with some degreaser. These will help the screws acquire a more secure hold.
Tighten the screws as you would lug nuts on a truck tire. Tighten one a bit, go to a screw on the other side of the ring and tighten that a bit, and repeat as you work your way through all the fasteners.
Tighten them gradually so that the rings are applying an even clamping force to the scope tube. When done correctly, the gap on either side of the rings should be even. That’s a good sign that whoever put the scope on the rifle knew their stuff. Next in our series, we’re going to cover how to get the most out of your precision riflescope.